Logging
Collect and send logs to MOLO17 support
|
How-to guides
For step-by-step walkthroughs tested on a running Gluesync, see the how-to guides Free disk space and manage cache and logs and Read Gluesync logs and diagnose errors. |
If you have a support ticket, you can use the collect-logs utility to collect and package logs from your Gluesync deployment and upload them straight into the ticket with its voucher. This utility can be invoked from within the Gluesync Control Plane, and it can be used to collect logs from any Gluesync deployment.
To access the Collect and send logs utility go to Settings → Support → Collect and send logs.
The collect-logs utility offers two modes of operation depending on whether the Conductor (modules manager) is available in your deployment:
-
With Conductor: the full environment logs collection is available, allowing you to gather logs, statistics, and metrics from all connected modules in a single operation.
-
Without Conductor: the utility falls back to CoreHub’s internal API to archive and upload logs directly from the CoreHub instance.
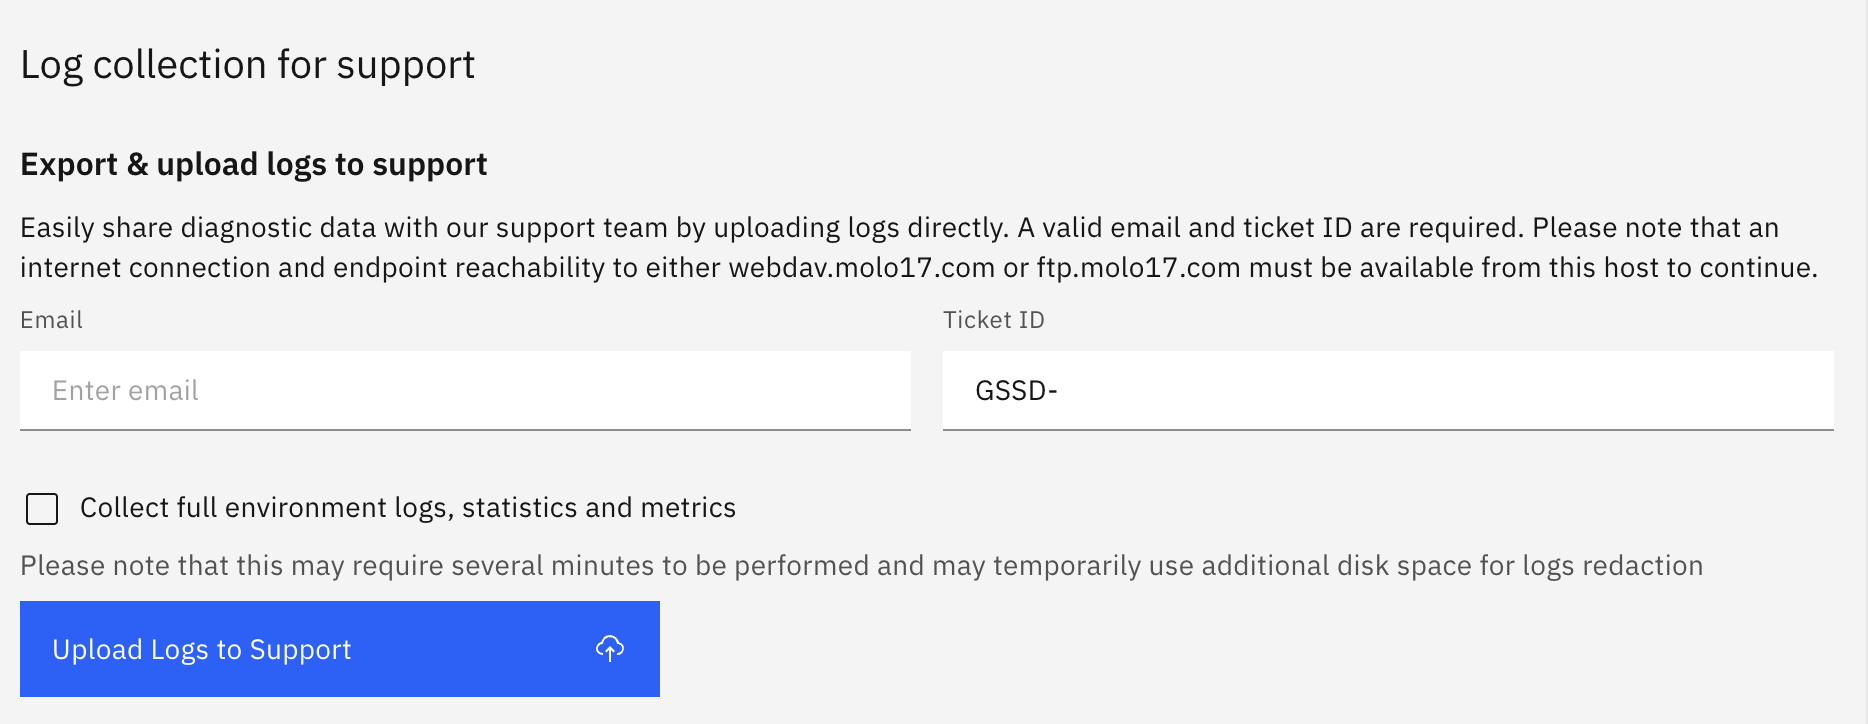
Export and upload logs to support
The Export & upload logs to support section allows you to share diagnostic data with the MOLO17 support team by uploading logs directly from the Control Plane UI.
Upload Logs to Support and gluesync collect-logs accept the voucher of your request, a code like GSV-XXXX-XXXX-XXXX. Copy it from the LOG UPLOAD VOUCHER card on the request page of the support portal (see Use the MOLO17 support portal) and give it to the tool, with --voucher <code> on the command line. Older versions ask for the email and the ticket ID instead, as described below.
For the older upload, you need to provide:
-
Support voucher: the code of your ticket, in the form
GSV-XXXX-XXXX-XXXX. It is shown on the ticket page in the support portal and in the e-mail sent when the ticket was opened. It is valid while the ticket is open and for 30 days after it is closed.
The archive is uploaded into the ticket, up to 5 GB, in resumable parts of 16 MB, and its size is verified when the upload ends.
An internet connection must be available from the host running Core Hub (and Conductor, for the full environment collection), with outbound HTTPS to the support portal API and to *.s3.eu-central-1.amazonaws.com. See Network access. The environment variable GLUESYNC_SUPPORT_API_URL overrides the address of the support portal API.
|
The ticket number and the e-mail address you opened the ticket with are still accepted as a legacy option (Legacy: ticket number and e-mail, under the voucher field), and the archive then goes over WebDAV to webdav.molo17.com. Core Hub no longer uses FTP or curl. See Ticket number and e-mail (legacy).
When the Conductor is available, an additional checkbox is displayed:
-
Collect full environment logs, statistics and metrics: when enabled, the collection will gather logs from all modules connected to the Conductor. Please note that this may require several minutes to complete and may temporarily use additional disk space for logs redaction.
Depending on the Conductor availability and the selected options, the following buttons are available:
-
Collect & Upload Logs: shown when the Conductor is available and the full environment logs option is enabled. This performs a complete collection and upload in a single operation, with the same voucher (or the legacy ticket number and e-mail). Conductor 0.14.0 and earlier do not take a voucher: update Conductor, or use the legacy option.
-
Upload Logs to Support: shown in all other cases. This first archives the logs locally via the CoreHub API and then uploads the resulting archive to MOLO17 support.
| If the Gluesync Control Plane is not available or the UI is unreachable, you can still collect and send logs using the command-line scripts included in the Gluesync Kit. See Exporting / Uploading logs to support for details. |
Collect logs locally
If your environment does not have external internet access, you can use the Collect Local feature to download a compressed archive of diagnostic logs directly to your machine. No voucher, ticket ID or email is required for this operation.
The local collection section provides the following option:
-
Include database: when enabled, the archive will also include a snapshot of the CoreHub database alongside the log files.
Once the archiving is complete, a download link will be displayed showing the name of the generated archive file. Click the link to download the archive to your local machine.

Get a local archive to MOLO17
When upload from the Control Plane fails, or the host is offline, use Collect Local (or an offline collector run) to produce a compressed archive, then deliver it to MOLO17:
-
Attach the archive in the support portal or in a ticket reply.
-
Legacy: upload it in the browser to the ticket web folder at https://ftp.molo17.com/.
To copy an archive from a remote server on Linux or macOS:
scp user@host:/path/support-logs.tar.gz .From Windows, use WinSCP or PuTTY’s pscp:
pscp user@host:/path/support-logs.tar.gz .
Always send a compressed archive (support-logs.zip or support-logs.tar.gz), never raw .log files.
|
| The Collect and send logs screen includes a How to collect and send logs help dialog with the same steps for Linux, macOS, Windows, and Docker & Kubernetes (for advanced users). Platform-specific collector paths are documented under Exporting / Uploading logs to support. |
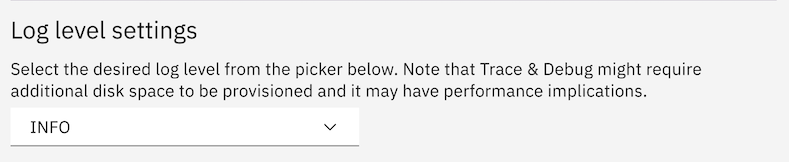
Set the logging level
The logging level can be customized directly from the UI by navigating to Settings → Support → Change logging level and selecting the desired setting from: info, debug, trace, error.
Log retention settings
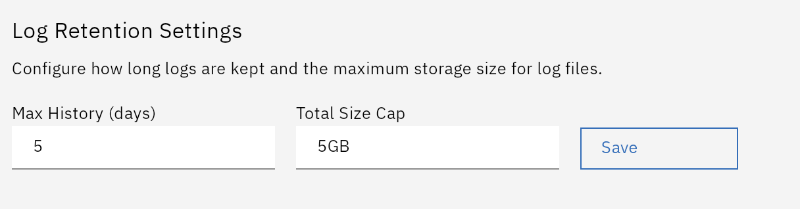
You can easily configure how long logs are kept and the maximum storage size for log files directly from the Control Plane UI.
To access these settings, navigate to Settings → Support and scroll down to the Log Retention Settings section. From here, you can define:
-
Max History (days): The maximum number of days to retain log files before they are automatically deleted (for example, 5).
-
Total Size Cap: The maximum total storage size allowed for all log files combined (for example, 5GB).
Once you have entered your desired values, click the Save button to apply the new retention policy to your deployment.
Enable remote logs collection (telemetry)
The remote logs collection feature can be enabled directly from the UI by navigating to Settings → Support → Enable remote logs collection and selecting the desired setting from: enabled, disabled.
Remote logs collection is a feature that allows Gluesync to collect logs from your deployment and send them to MOLO17. This allows us to futher improve the platform and provide you with a better, pro-active support.
Note that remote logs collection is disabled by default, and when turned on it only send ERROR level logs to MOLO17.
Logs are sent anonymously and securely using Logstash (TCP under TLS) to MOLO17’s servers.

Default log file
Gluesync by default logs its status in the system’s output console as well to a file within the following folder /var/log/gluesync/archived/gluesync.XXX.log where XXX is the file date (plus its incremental counter) used for logs rotation. This process can be customized by tweaking the logging configuration file according to the logback’s framework documentation available at: http://logback.qos.ch/documentation.html. This lets the user have great control under the hood and wider flexibility to decide which logs you want to collect (also for GDPR purposes) and where they should be stored.
You can download a sample logback.xml configuration file to get started with custom logging configuration.
To provide Gluesync with a custom Logback configuration file, you need to set the actual file path into an environment variable called LOG_CONFIG_FILE similar to what you’re used to doing for both the license and configuration file. Once set, Gluesync will override its default log settings and use the provided ones.
LOG_CONFIG_FILE=/path/to/logback.xmlBelow you can find the default configuration file used by our professional services. You can also download this logback.xml file directly.
<?xml version="1.0" encoding="UTF-8"?>
<included>

    <appender name="CONSOLE" class="ch.qos.logback.core.ConsoleAppender">
        <encoder>
            <pattern>
                %d{yyyy-MM-dd'T'HH:mm:ss.SSS} [%t] %c{0} %p - %msg%n
            </pattern>
        </encoder>
    </appender>

    <appender name="FILE" class="ch.qos.logback.core.rolling.RollingFileAppender">
       <file>/opt/gluesync/logs/${JAR_NAME:-gluesync}.log</file>
       <rollingPolicy class="ch.qos.logback.core.rolling.SizeAndTimeBasedRollingPolicy">
           <fileNamePattern>/opt/gluesync/logs/archived/${JAR_NAME:-gluesync}.%d{yyyy-MM-dd}.%i.log</fileNamePattern>
           <!-- each archived file, size max 100MB -->
           <maxFileSize>100MB</maxFileSize>
           <!-- total size of all archive files, if total size > 1GB, it will delete old archived file -->
           <totalSizeCap>1GB</totalSizeCap>
           <!-- 5 days to keep -->
           <maxHistory>5</maxHistory>
       </rollingPolicy>
       <encoder>
           <pattern>%d{yyyy-MM-dd'T'HH:mm:ss.SSS} %c{1} %p %m%n</pattern>
       </encoder>
   </appender>

    <logger name="com.molo17.gluesync" level="DEBUG" additivity="false">
        <appender-ref ref="CONSOLE"/>
        <appender-ref ref="FILE"/>
    </logger>

</included>
Customize logs time zone
By default, Gluesync takes its time zone by the host operating system. In the case of containerized environments, Gluesync can be told to change that behavior by passing to the container orchestrator a different time zone.
Here we’re providing an example of how you can pass a different value in a docker-compose environment:
environment:
    - TYPE=source #example of other environment variables
    - LOG_CONFIG_FILE=/opt/gluesync/shared/logback.xml #example of other environment variables
- TZ=Asia/Bangkok # <--- this is the time zone you want to set-
TZ: is key that you will need to customize by issuing a value ofRegion/City.
Exporting logs
Use the scripts included in the Gluesync Kit to collect and package logs (gluesync collect-logs on Linux and on Windows Server, collect-logs.sh on macOS; Linux installs made with an installer older than 2.0 and Windows installs made before setup wizard 1.4.0 can also use the script of their kit: collect-logs.sh, collect-logs.ps1).
To read more you can check out our dedicated section here.