Use the MOLO17 support portal
The MOLO17 support portal at support.molo17.com is where you ask the Gluesync engineers for help and follow the answer until the problem is solved. This guide shows you how to sign in, how to open a request with the help of Spark or by choosing a request type, how to fill the form, how to send logs into your request with a voucher, how to reply and add colleagues, how to find your requests, and how to choose the notifications that you receive. It ends with what partners see and what to do when something does not work.
In this guide
You will sign in or create your account, describe a problem to Spark and read the answers it finds in the documentation, open a request, choose its type and priority, attach files, send a support bundle with the voucher of the request, reply to support, add colleagues of your company, search your requests, and set the email language and the notification settings.
|
The screenshots show the customer view of the portal, as a MOLO17 colleague sees it when testing. The name in the header is the name of that test user. |
Quick information
Goal |
Open a support request, give the engineers what they need, follow the request to the solution and control the notifications |
Audience |
Customers and partners who run Gluesync and use the MOLO17 support portal |
Level |
Beginner |
Time required |
About 20 minutes |
Area |
support.molo17.com → Home, New request, My requests, user menu |
Applies to |
Gluesync 2.3 |
Before you begin
Make sure that:
-
You have a work email address. The portal links you to your company through the domain of this address, so do not use a free mail address such as Gmail or Outlook.com when you create the account;
-
You can open support.molo17.com in a browser;
-
For an Incident, your company has an Enterprise license. Without it, the portal opens the request as Help, see step 4;
-
To send logs, you can reach Gluesync Core Hub or the server that runs Gluesync. The collection itself is in Collect and send logs to MOLO17 support.
Guide steps
UI
-
Open support.molo17.com. The sign-in page opens when you select Sign in, or when you open a page that needs an account;
-
If you already have an account, enter your email and your password, or select Continue with Google or Continue with Microsoft;
-
If you are new, select the link to create an account. Enter your work email and a password of at least 8 characters with uppercase letters, lowercase letters and numbers. Select the button to create the account;
-
The page says Check your inbox. Open the verification email and select the link in it. The portal signs you in when you come back to the tab, or when you select I’ve verified it, continue;
-
If you forgot your password, select Forgot your password, enter your email and open the reset link that you receive. The portal gives the same answer for every address, so the page does not tell you whether the address has an account.
If your company already has Gluesync contacts at MOLO17, your account is linked to your company automatically. The link decides which requests you can see and whether an Incident keeps its type.
UI
The Home page has a box with the question What’s going on?. Describe your problem in your own words and let Spark, the MOLO17 assistant, suggest what to do. You can also skip Spark and choose the request type yourself.
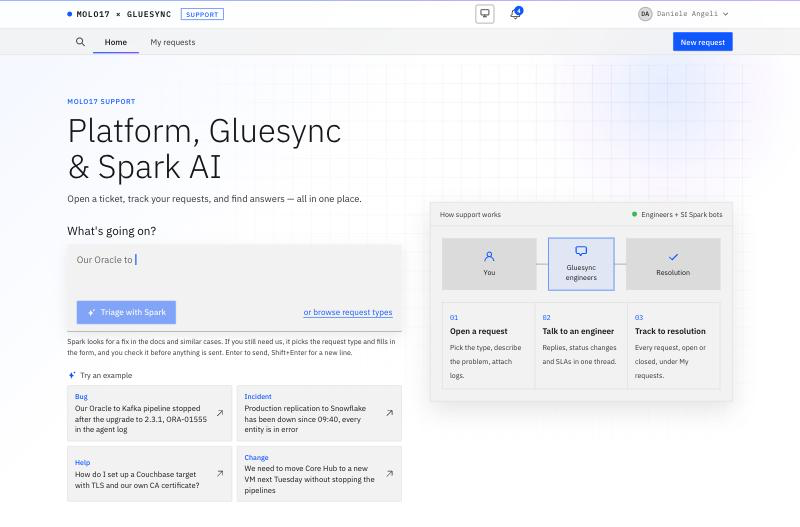
The Home page also has:
-
Try an example cards for Bug, Incident, Help and Change. Select a card to fill the box with a sample text that you can change;
-
How support works, with three steps: open a request, talk to an engineer, track the request to its resolution;
-
quick links to the Documentation, the Status page, the Roadmap, the Downloads and Contact sales.
Check the Status page first when many things fail at once: it tells you whether MOLO17 already knows about a platform problem.
UI
-
Type what is going on in the box. Include what you did, what you expected, what you saw and the error text if there is one. Press Enter to send. Press Shift+Enter to add a new line;
-
Select Triage with Spark;
-
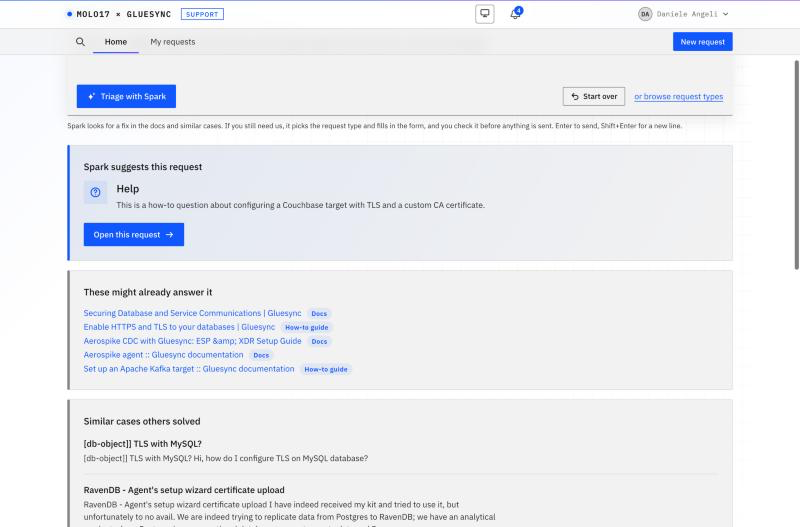
Read the answer. Spark shows three things, one after the other:
-
These might already answer it: links to the documentation and to how-to guides;
-
Similar cases others solved: short summaries of past cases;
-
Spark suggests this request: the request type with the reason why, and the button Open this request;
-
-
If the documentation solves your problem, stop here. If not, select Open this request. Select Start over to clear the box and begin again.
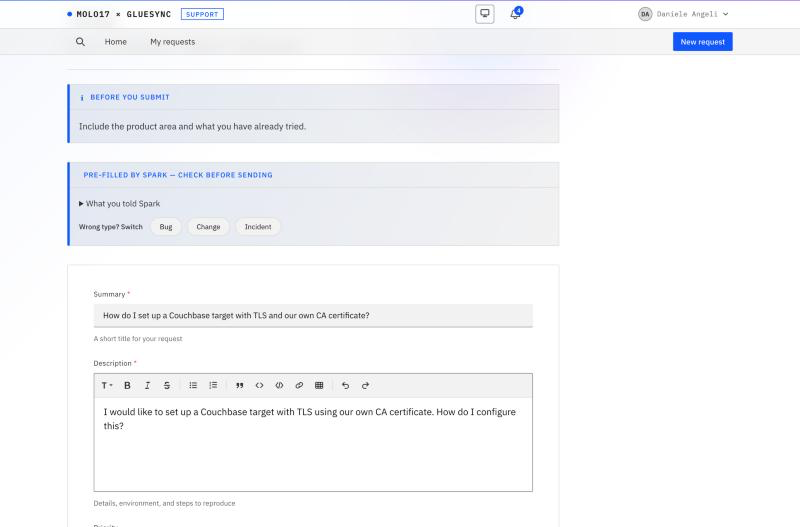
The form opens with the label PRE-FILLED BY SPARK — CHECK BEFORE SENDING. It shows What you told Spark, the summary and the description that Spark wrote, and the link Wrong type? Switch, which lists the other request types. Correct the text and the type if needed.
UI
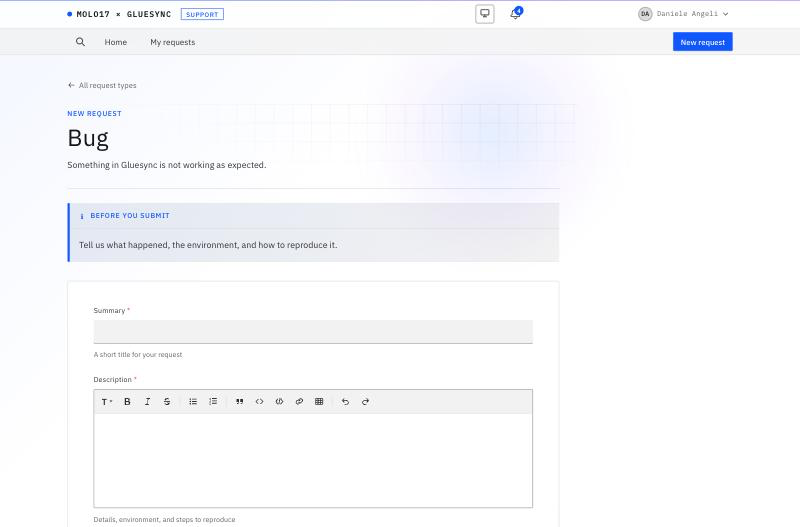
To skip Spark, select or browse request types on the Home page, or New request in the header. The page lists four types. Choose the one that fits best:
| Type | Use it for |
|---|---|
Bug |
Something that does not work as documented |
Help |
A question, a configuration, or best practices |
Change |
A planned change. Say what you want to change, why, and in which time window |
Incident |
A production incident or outage. Say the impact, when it started and any workaround that you found |
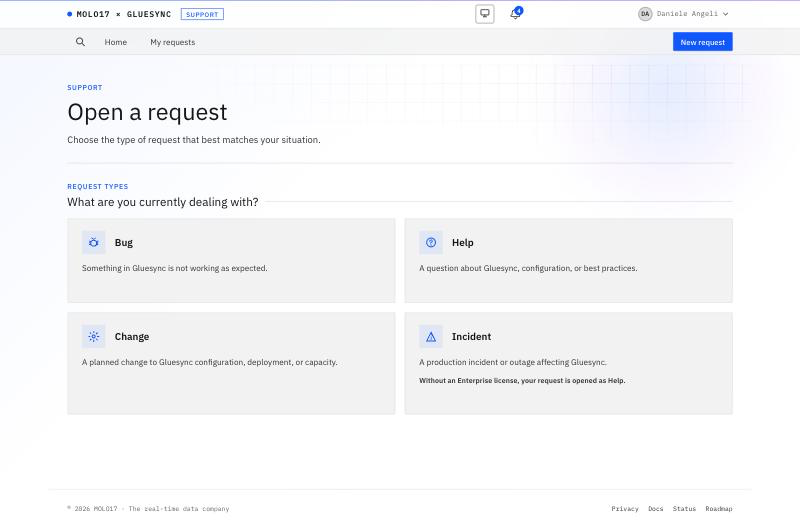
Each card says that, without an Enterprise license, your request is opened as Help, and that the priority you pick is kept. The portal changes the type for you and never refuses the request. Use Incident only for a production problem: the incident commitments of the enterprise plan are in Enterprise support.
UI
-
Enter the Summary. It is required. Write one line that names the product and the symptom;
-
Enter the Description. It is required. The editor has headings, bold, italic, strike-through, lists, a quote, inline code, a code block, a link and a table, and it has undo and redo. Put error messages and commands in a code block;
-
Choose the Priority:
Priority Meaning P1 - Blocker
Production is down or blocked, and there is no workaround
P2 - Major
An important function is impaired
P3 - Minor
A minor issue or a question
-
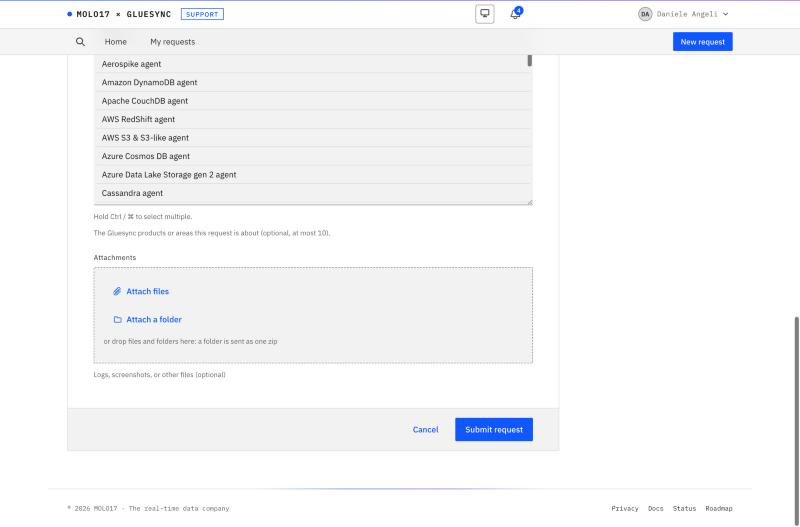
Optional: in Components, choose the Gluesync products and agents that the request is about. You can choose up to 10. Hold Ctrl, or ⌘ on a Mac, to select more than one;
-
Optional: add files with Attach files, add a whole folder with Attach a folder, or drag and drop. The portal sends a folder as one zip file. One request or one reply can carry up to 1 GB of files;
-
Select Submit request. Select Cancel to leave without creating anything.
Send logs with your request, not instead of an explanation. Step 8 shows how.
UI
-
Select My requests in the header;
-
Use the tabs Open, Closed and All, and the Status filter, to choose what the list shows;
-
Sort a column or filter it. The columns are Status, Priority, Key, Created, Request (the title and the type), Assignee and Updated;
-
Select a request to open it.
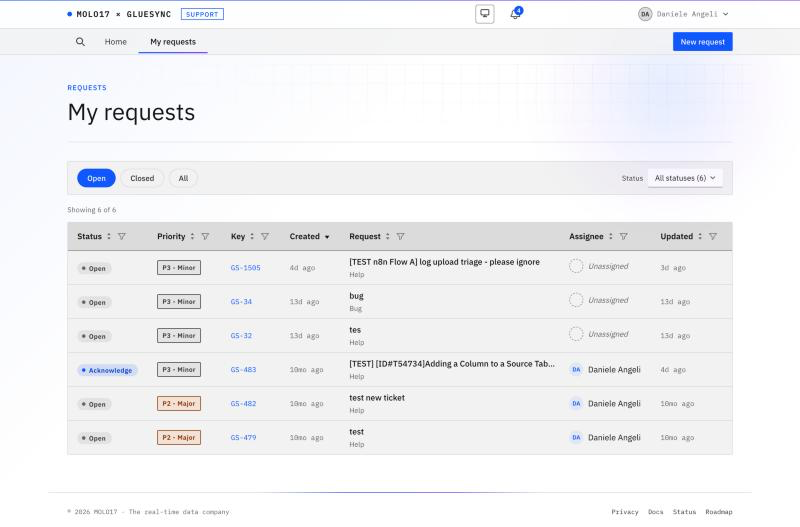
You see the requests that you opened and the requests where someone added you as a participant. You do not see the requests of other people.
The status badge shows where the request is. The names can differ a little between request types:
| Status | What it means |
|---|---|
Open, Acknowledge |
MOLO17 received the request and has not started to work on it |
Under Investigation, Work in Progress, Task Force |
The engineers are working on it |
Waiting for user |
The engineers need something from you. Answer in the request. If the request waits for you for about three business days, you receive a reminder as a comment and an email |
Done, Canceled |
The request is closed. It moves to the Closed tab |
You cannot change the status yourself. A reply on a request that is Done does not reopen it. If the problem comes back, open a new request and give the earlier key.
UI
The request page has the title, the status and the priority at the top. Under them are the Key details (who raised the request, through the support portal, and when), the Description and the thread of comments.
-
Read the comments of support. Select Translate to English on a message to read it in English;
-
Type your answer in the Reply box at the bottom;
-
Add files with the paperclip button, or a folder with the folder button. A folder is sent as one zip file;
-
Select Send.
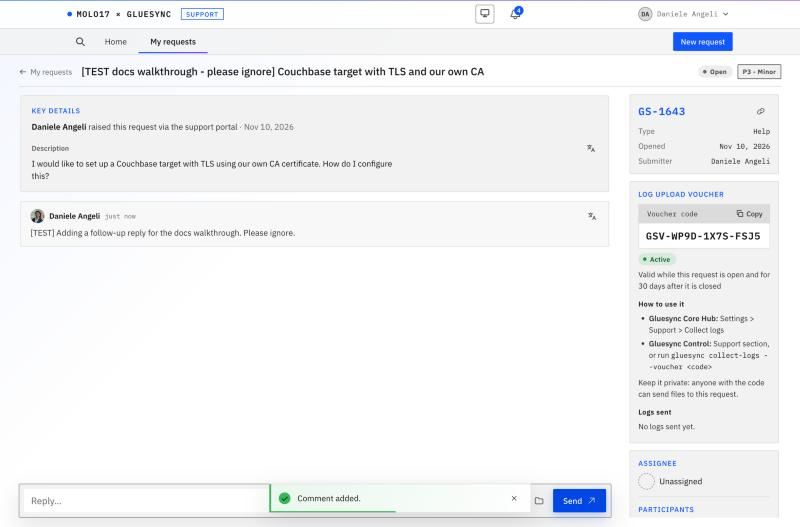
The side panel shows the key of the request with the button Copy link, the Type, the date the request was Opened and the Submitter. The Priority is read-only for you. If the priority is wrong, say so in a comment.
You can also answer from your mail program. Every email about your request has a reply address that belongs to the request. Reply from the address that received the email and write above the line ##- Please type your reply above this line -##. The portal adds your text as a comment, marked via email. Keep in mind:
-
Reply from your own address. An email that someone else forwards, or that comes from another sender, is not added as your comment;
-
Automatic replies, such as out-of-office messages, are discarded;
-
The portal keeps the text and skips a file over 10 MB, and it says so in the comment. Use the portal to send big files.
UI + CLI
Every request has a LOG UPLOAD VOUCHER in the side panel. The voucher lets Gluesync send a support bundle straight into the request, without an email address or a ticket number.
-
Find the card LOG UPLOAD VOUCHER. The code has the form
GSV-XXXX-XXXX-XXXX. Select Copy; -
Check that the state is Active. The card says that the voucher is valid while the request is open and for 30 days after it is closed;
-
Use the code in one of these places:
-
Gluesync Core Hub: Settings → Support → Collect logs;
-
Gluesync Control: the Support section, or the command line:
gluesync collect-logs --voucher <code>
-
-
Wait for the upload to end. The list Logs sent on the card shows each bundle that arrived.
Keep the code private: anyone who has it can send files to your request. If the card does not show a code, because the voucher was revoked or has expired, ask support in a comment to issue a new one.
Choose which logs to collect, and set the log level, with Read Gluesync logs and diagnose errors. The options of the command are in Gluesync Control and in Gluesync Control for Linux.
UI
Participants receive the emails about the request and can follow and answer it.
-
In the side panel, under Participants, select + Add people;
-
Type the email address of your colleague, or pick a name from the list that opens under the field;
-
Select Add.
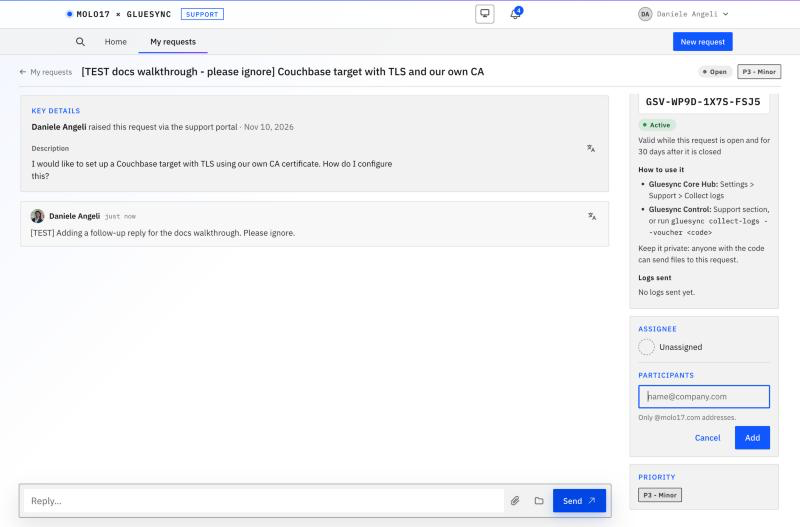
The portal accepts only addresses of your own company domain. The line under the field names the domain, for example Only @<your domain> addresses. If you cannot add people, the card says To add people, ask support in a comment. Only the person who opened the request can add participants.
UI
-
Select the magnifier in the header;
-
Type some words, or a key such as
GS-1234, and press Enter; -
Read the list. Each result shows the status and where the words matched: the Title, the Description or a comment. Select a result to open it.
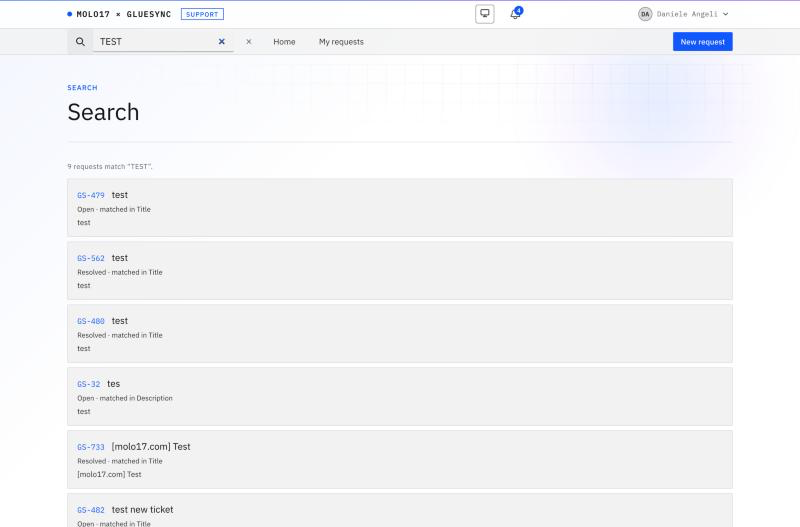
The search looks only at the requests you may see. Use at least 2 characters. A key typed alone opens that request.
UI
The bell in the header lists what happened on your requests, for example Support replied on <KEY> or Status is now <status>.
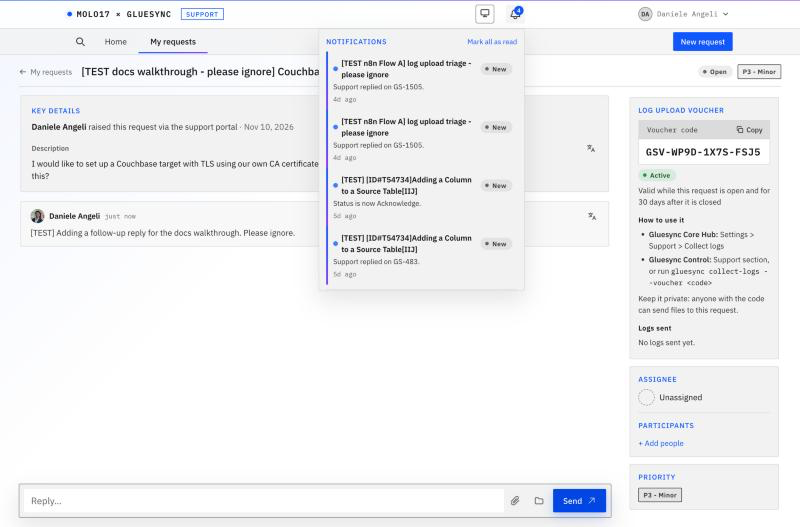
-
Select the bell to read the latest items. Select Mark all as read to clear them, or View all to see the whole list;
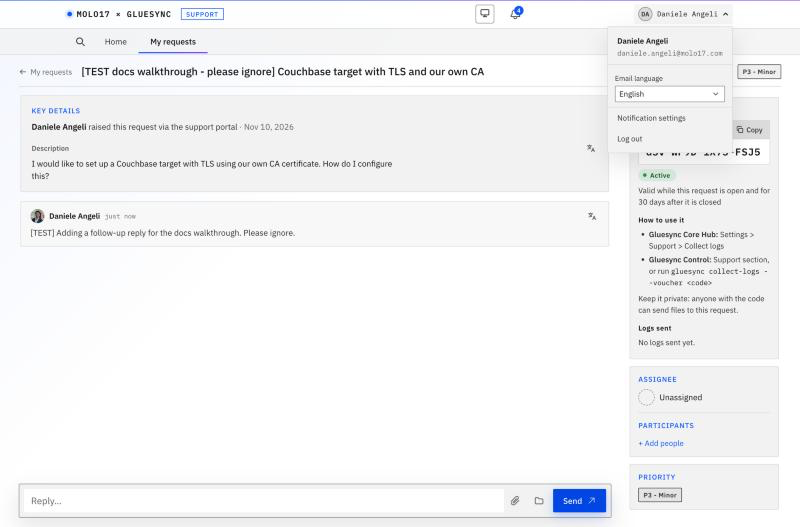
-
Select your name in the header to open the user menu. It shows your name and email, the Email language, Notification settings and Log out;
-
In Email language, choose English, Italiano, Español, Français or 日本語. The portal sends you its emails in that language. The portal screens stay in English;
-
Select Notification settings;
-
For each kind of notification, choose how it reaches you by email: Instant, Daily digest or Off. Where a kind has a bell, switch In the portal on or off;
-
If you use the Daily digest, choose the hour and the time zone of the digest. The default hour is 08:00;
-
Select Save. Select Reset to defaults to go back to instant everywhere.
A customer has four kinds of notification:
| Kind | What it covers |
|---|---|
Replies on my requests |
A public reply on a request that you opened, follow or were added to. It has an email and a bell |
Status changes |
A move to another status, including resolved and reopened. It has an email and a bell |
Requests opened for me |
The confirmation of a request that was created for you or by you. It has an email only |
Closing and reminders |
The resolution email, the reminders and the notices before a request is closed for lack of an answer. It has an email only |
When a request is solved, you receive an email that asks how support did. It has three answers, Awesome, OK and Bad. One click is enough, and you can add a comment on the next page. The survey is part of Closing and reminders: set that kind to Off, or to Daily digest, and you do not receive it.
What partners see
A partner is a reseller or an integrator that has its own login and works with end customers. The pages are the same, with these differences:
-
My requests lists the requests of the end customers of the partner, as well as the partner’s own;
-
the request form has a Customer list. Choose the end customer that the request is for. An Incident follows the Enterprise license of that customer, not the license of the partner. Without a license, it is opened as Help;
-
a partner can write a comment that only the partner and MOLO17 support read. The end customer never sees it. Use the switch of the Reply box to choose between a comment for everyone and a comment for the partner and support.
Troubleshooting
| Problem | Possible cause | What to do |
|---|---|---|
The page Check your inbox appears when you sign in |
The email address of the account is not verified yet |
Open the verification email and select the link. If you cannot find it, ask the page for a new one and check your spam folder |
You chose Incident and the request is Help |
Your company has no valid Enterprise license, or the license has expired |
Nothing is wrong: the portal keeps the priority you chose. Ask your MOLO17 contact about the license if you expected an Enterprise one |
A partner opens an Incident and gets Help |
The end customer that you selected has no Enterprise license |
Select the right end customer in the Customer list, or ask your MOLO17 contact about the license of that customer |
You do not see a request that a colleague opened |
You see only your own requests and the ones where you are a participant |
Ask your colleague to add you under Participants |
+ Add people is missing, or the portal refuses an address |
Only the person who opened the request can add people, and only addresses of the company domain are accepted. A free mail address has no company domain |
Use an address of your company domain, or ask support in a comment to add the person |
The card LOG UPLOAD VOUCHER shows no code |
The voucher was revoked, or the request was closed more than 30 days ago |
Ask support in a comment for a new voucher |
The upload with the voucher fails |
The server that runs Gluesync cannot make outbound HTTPS connections, for example because of a proxy or a firewall rule. A bundle can be up to 5 GiB |
Allow outbound HTTPS from the server, and try again. If it still fails, collect the bundle locally and attach it to a reply |
Core Hub or Gluesync Control asks for an email and a ticket ID, not a voucher |
The installed version still uses the older upload |
Update Gluesync, or collect the bundle locally and attach it with Attach files. See Collect and send logs to MOLO17 support |
The portal refuses a file |
A request or a reply can carry up to 1 GB of files |
Zip and split the files, or send the large ones with the voucher |
Your email reply does not appear in the request |
You replied from another address, the email was forwarded, or the text above the line was empty |
Reply from the address that received the email, write above the line, and check that the text is new. If it is still missing, reply on the request page |
You receive no emails from the portal |
The kind of notification is Off or Daily digest, or the mail system moved the email to the spam folder |
Open Notification settings and choose Instant. Check your spam folder and allow the sender of the portal emails |
The search finds nothing |
The words are not in the title, the description or the comments of a request that you may see |
Try other words, or a key such as |
Related guides
Contact MOLO17 Support if you need assistance with the support portal.