Set up a Databricks target with bulk snapshots
Databricks is a target of Gluesync: it writes your rows into Delta tables in Unity Catalog through a SQL warehouse. Every batch of changes is a Delta MERGE, and a snapshot can be loaded in bulk from a Unity Catalog volume. This guide prepares the workspace, connects Gluesync with a personal access token, creates a Delta table from a PostgreSQL table, runs a bulk snapshot and live changes, and shows you the errors you get when the token, the warehouse or a column type is wrong.
In this guide
You will create a schema and a staging volume in Unity Catalog, grant a user the access Gluesync needs, generate a personal access token, and create the Databricks target connection in the Control Plane. You will add an entity, fix the column types that the field mapping cannot map on its own, create the Delta table, load 300,000 rows with a bulk snapshot, follow inserts, updates, deletes and key changes, and read the rows back with SQL. A symptom, cause and fix table closes the guide.
Quick information
Goal |
Replicate a PostgreSQL table to a Delta table with a bulk snapshot, then keep it in sync with change data capture (CDC) |
Audience |
Data engineers and Databricks workspace administrators |
Level |
Intermediate |
Time required |
About 45 minutes |
Area |
Databricks → SQL warehouse and Unity Catalog; Control Plane → Pipelines → Databricks target → Base settings and Advanced connection properties; entity → start options |
Applies to |
Gluesync 2.3 |
Before you begin
Make sure that:
-
You have a Databricks workspace with Unity Catalog, and a SQL warehouse. Serverless warehouses start on the first statement. Databricks is a target only, so you need another database as the source. This guide was tested with a PostgreSQL 16 source and a serverless warehouse;
-
Core Hub can open HTTPS connections (port
443) to the workspace; -
You can create a schema and a volume in a catalog, grant privileges on them, and create a personal access token. A workspace admin, or the owner of the catalog, can do all three;
-
You can sign in to the Control Plane with a role that can create pipelines;
-
You have a source table with a primary key. This guide uses a PostgreSQL table
public.eventswith 300,000 rows. Its columns areid bigint(primary key),kind varchar(20),val integer,amount numeric(12,2),+created_at+ timestamp,+seen_at+ timestamptz,payload jsonbandtags text[], and the database haswal_level = logical. See PostgreSQL CDC with WAL.
|
A personal access token is the shortest path to a first test. For production, use a service principal with OAuth, which renews its own token. Authentication lists the five methods and the fields each one takes. |
Guide steps
SQL
Gluesync creates tables, not schemas, so create the schema first. Bulk snapshots stage their files in a Unity Catalog volume. Gluesync can create a default volume itself, but that needs CREATE SCHEMA and CREATE VOLUME on the whole catalog. A volume that you create in advance needs fewer rights. Run the statements in the Databricks SQL editor. Replace <catalog> and <user>.
-
Create the schema for the target tables and a volume for the staged files:
CREATE SCHEMA IF NOT EXISTS <catalog>.gluesync_guide; CREATE VOLUME IF NOT EXISTS <catalog>.gluesync_guide.staging; -
Grant the user whose token Gluesync will use the access listed in Access the identity needs. Write the user name between backticks. If the user owns the catalog, as in the test of this guide, you can skip this statement:
GRANT USE CATALOG ON CATALOG <catalog> TO `<user>`; GRANT USE SCHEMA, SELECT, MODIFY, CREATE TABLE ON SCHEMA <catalog>.gluesync_guide TO `<user>`; GRANT READ VOLUME, WRITE VOLUME ON VOLUME <catalog>.gluesync_guide.staging TO `<user>`;SELECTandMODIFYlet Gluesync read and write the tables, because every batch is aMERGE.CREATE TABLEis needed only because Gluesync creates the table in step 4. Give the userCAN USEon the SQL warehouse too: open SQL Warehouses, select the menu of the warehouse, select Permissions and add the user with Can use. -
Note the Warehouse ID. In SQL Warehouses, open the warehouse and select Connection details. The ID is the last part of the HTTP path,
/sql/1.0/warehouses/<id>.
UI
-
In Databricks, select your user name in the top bar, then Settings and Developer. Next to Access tokens select Manage, then Generate new token;
-
Enter a name and a lifetime in days. If the dialog asks for scopes, choose Other APIs and select
sqlandfiles. Gluesync uses the SQL Statement Execution API and the SQL warehouses API, and bulk snapshots upload their files with the Files API; -
Select Generate, copy the token, and keep it in a safe place. Databricks shows it only once.
UI
-
In the Control Plane, select Create your first pipeline, or the + button of the pipeline list if you already have pipelines. The Agents setup wizard opens;
-
In 1. Setup source, choose the PostgreSQL CDC agent tile and fill Base settings: Host name / Address, Port, Database name, Username and Password of your source database. Select Test and continue. The source appears with a green check mark. Select Next;
-
In 2. Setup target(s), choose the Databricks agent tile and fill Base settings:
-
Workspace URL (https://…): the address of your workspace, starting with
https://; -
Port:
443; -
Authentication mode:
PAT. The form shows only the fields of the mode you choose. The default isSERVICE_PRINCIPAL; -
SQL warehouse ID: the ID of step 1;
-
Client secret or personal access token: the token of step 2;
-
Unity Catalog catalog: the catalog of step 1;
-
Statement timeout in seconds:
600, or the time after which a running statement is canceled on the warehouse;
-
-
Under Advanced connection properties select Add property, choose the key Staging volume for bulk snapshots (catalog.schema.volume) and enter
<catalog>.gluesync_guide.stagingas the value. Leave the property out to use the default volume<catalog>.gluesync_staging.bulk_files, which Gluesync creates when it is missing; -
Select Test and continue. The target appears with a green check mark. Select Next, enter a Pipeline name and select Finish.
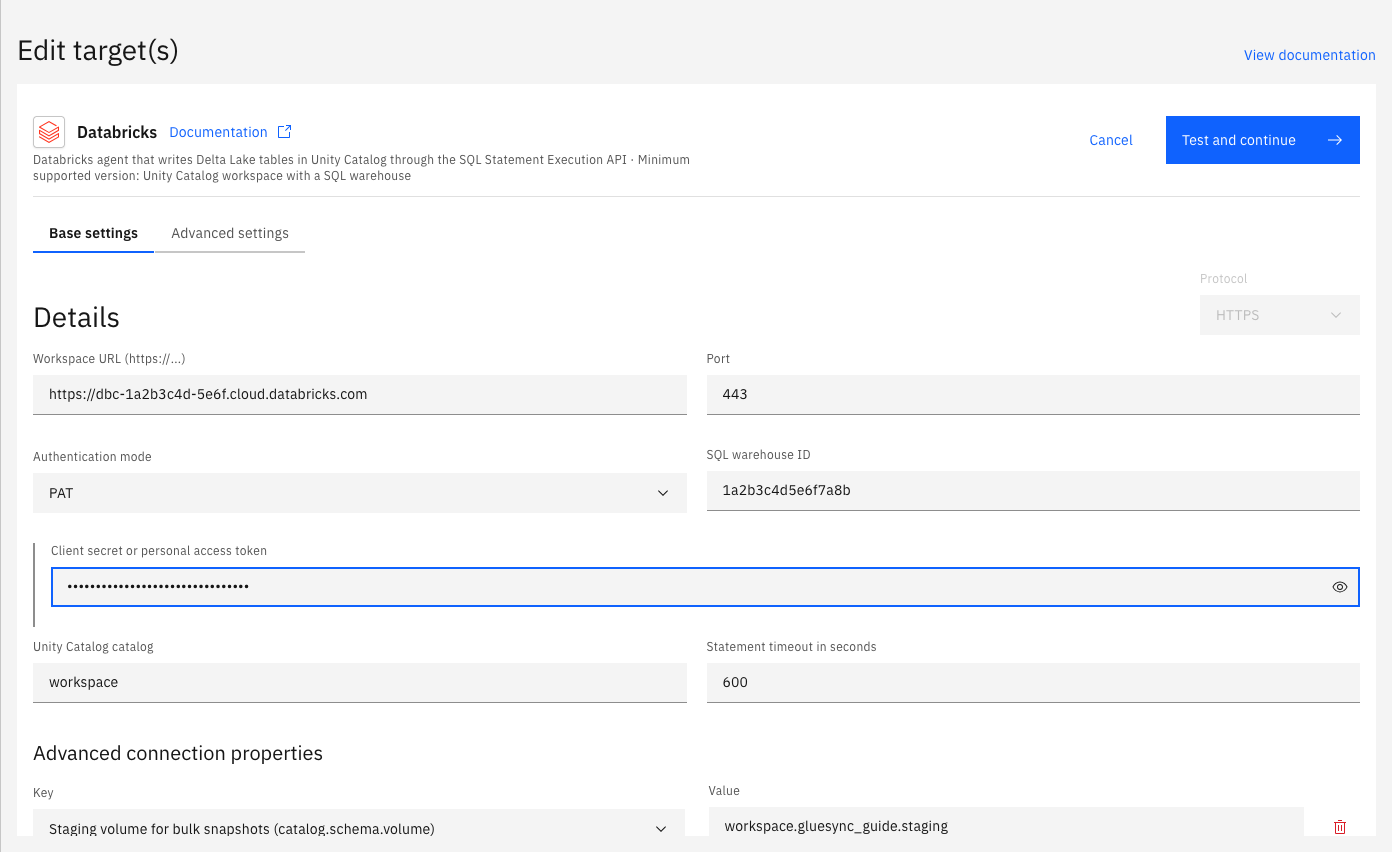
PAT authentication mode and the staging volume as an advanced connection property.The check reads the state of the warehouse without starting it, so a stopped warehouse passes. It does not run a query and it does not read the catalog, so a wrong catalog name or a missing grant shows up only in step 4 or when the first statement runs. Step 7 shows the messages of the checks that do fail.
UI
-
In the pipeline, select Entities. The Add entities page opens with the Object browser. Expand the source schema
public, select the tableeventsand wait for the Field mapping dialog; -
Under Target, select the Target Schema
gluesync_guide. In Target Delta table typeeventsand choose Create table "events". The dialog shows New table events will be created on confirm. and proposes a target type for every column; -
Check the proposed types. A
bigint,integer,numeric(12,2)and the two timestamps map toBIGINT,INT,DECIMAL(precision 12, scale 2),TIMESTAMP_NTZandTIMESTAMP. Avarchar(20)maps toSTRING. Thejsonbcolumnpayloadand the array columntagsmap toSTRINGwith a length of0, and the dialog shows Missing required field until you fix them; -
Fix the two columns:
-
For
payload, choose the target typeVARIANTif you want to query the JSON with the:operator in Databricks, orSTRINGto keep the JSON text. Enter a Length of4000in both cases. The length is required by the form, and the Delta column has no length; -
For
tags, chooseSTRINGand enter a Length of4000. The column keeps the JSON text of the array, such as["a1","b"]. Do not chooseARRAYhere: see the troubleshooting table;
-
-
Select Confirm. The Create table events dialog shows the Read-only SQL statement. Read it, then select Create table events to run it on the warehouse;
-
Back on the Add entities page, select Confirm and continue.
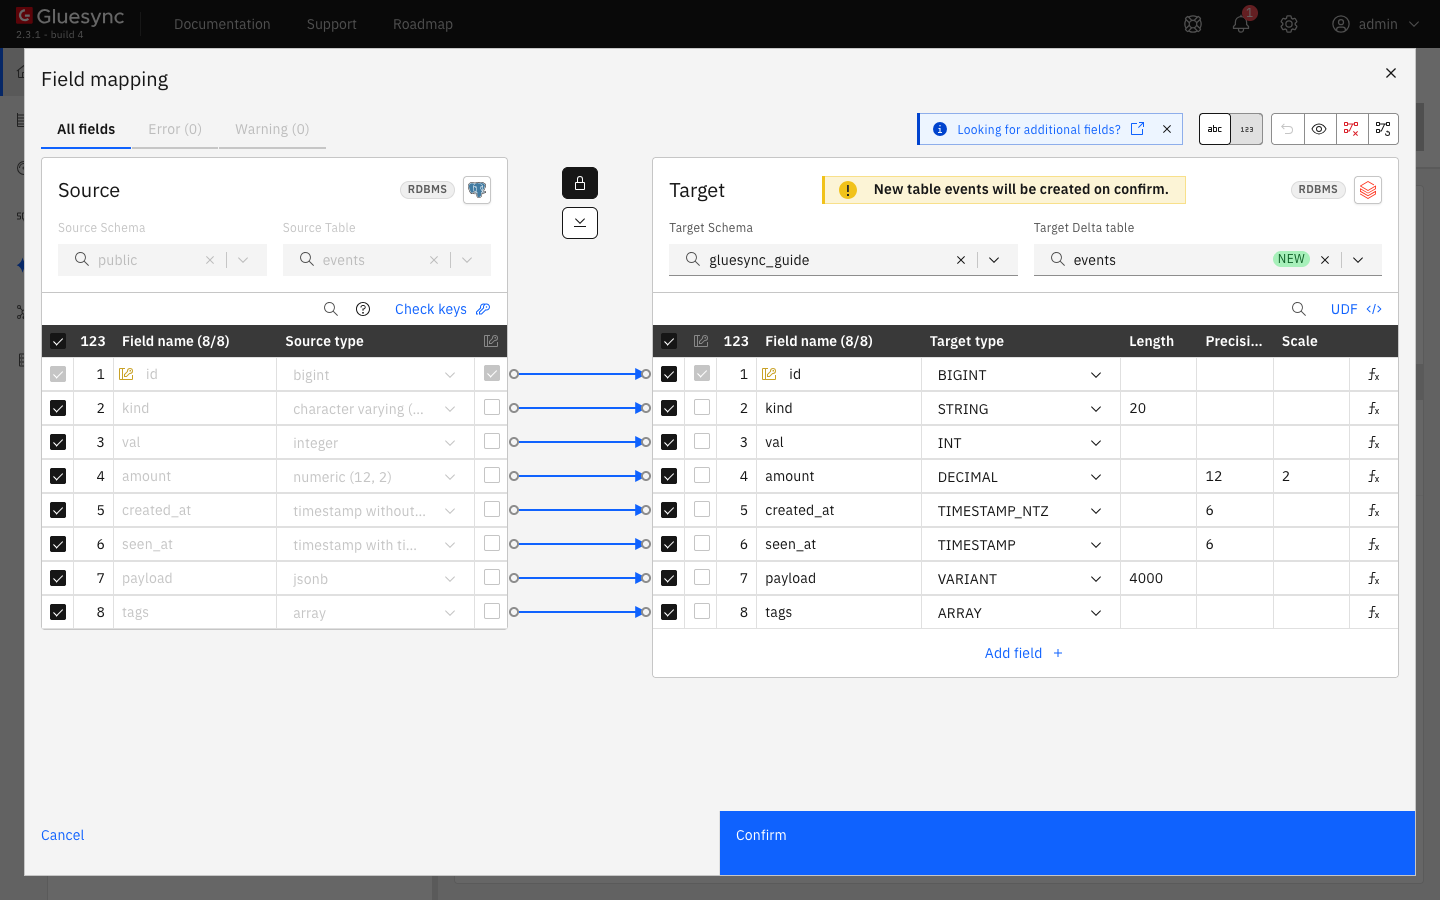
payload as VARIANT and tags as STRING, each with a length.The statement has this form. Gluesync makes the key column NOT NULL and declares it as an informational PRIMARY KEY, which Delta does not enforce.
CREATE TABLE IF NOT EXISTS `<catalog>`.`gluesync_guide`.`events` (
  `id` BIGINT NOT NULL, `kind` STRING, `val` INT, `amount` DECIMAL(12, 2),
  `created_at` TIMESTAMP_NTZ, `seen_at` TIMESTAMP, `payload` VARIANT, `tags` STRING,
  CONSTRAINT `pk_events` PRIMARY KEY (`id`))
USING DELTA COMMENT 'Replicated by MOLO17 Gluesync'
TBLPROPERTIES ('gluesync.managed' = 'true', 'gluesync.version' = '<version>')See Target table creation for the dialog.
UI + SQL
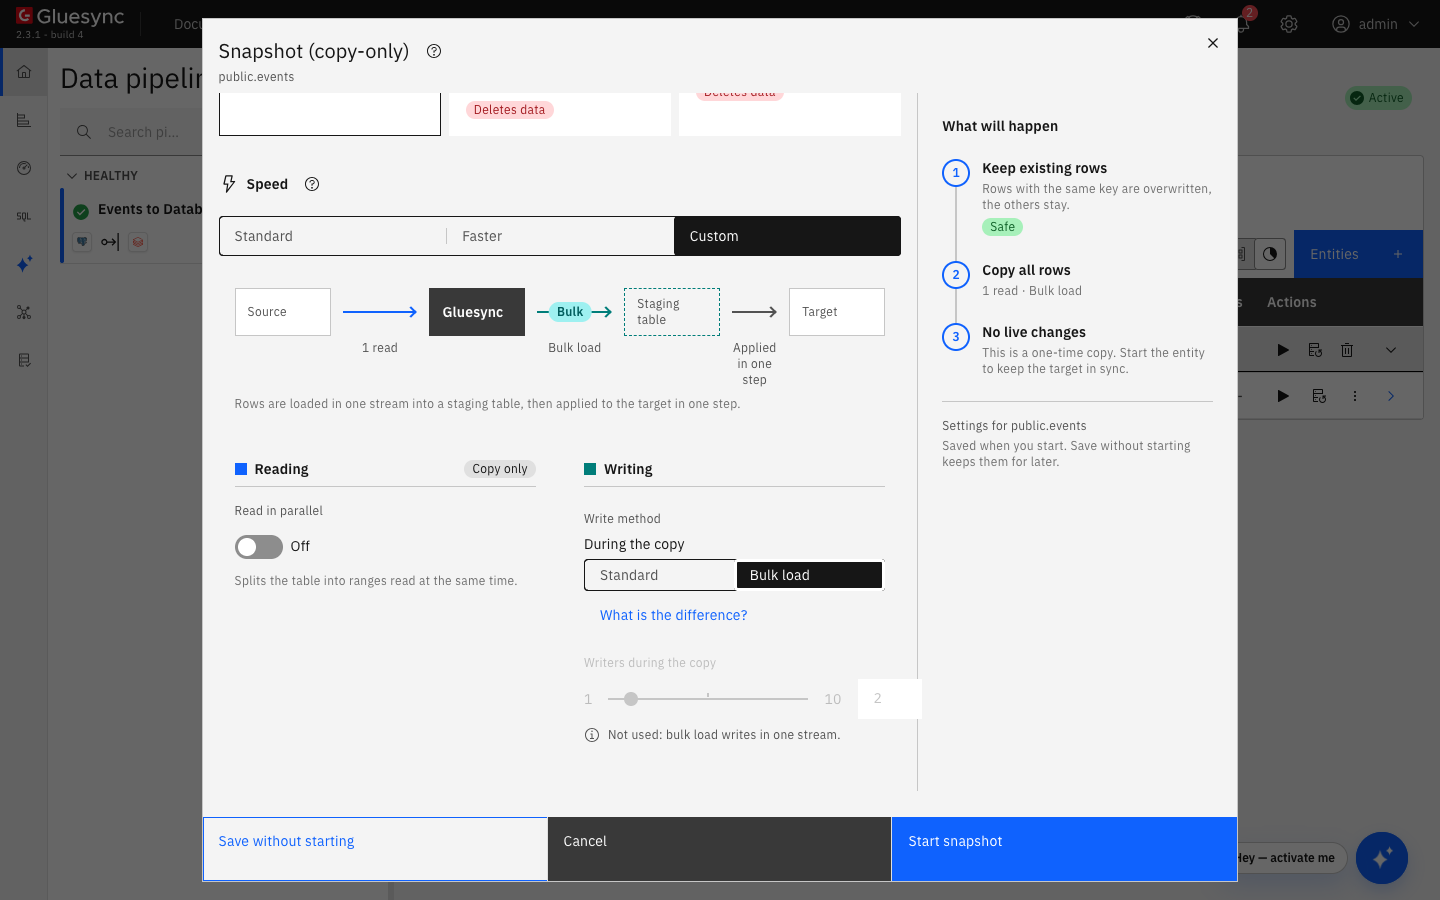
With bulk load off, Gluesync writes one MERGE for every transaction. With bulk load on, it stages the rows in a file, uploads it to the volume, and loads it with one MERGE for every Rows per bulk snapshot load rows (1,000,000 by default) and one at the end of the snapshot. Bulk load applies to the snapshot only. Live changes always use the per-transaction MERGE.
-
In the pipeline, find the entity. On Hold, select the start options button, the one next to the play button. The Snapshot (copy-only) dialog opens;
-
Keep Keep and merge under Data already in the target. It overwrites rows with the same key and keeps the others;
-
Under Speed select Custom. In the Writing column, under During the copy, select Bulk load. The diagram changes to Bulk, Staging table, Applied in one step, and the writers slider is disabled, because a bulk load writes in one stream;
-
Select Start snapshot.
Read the table on Databricks and compare it with the source:
-- On Databricks
SELECT count(*), sum(val), sum(amount) FROM <catalog>.gluesync_guide.events;
SELECT id, kind, payload::string, tags FROM <catalog>.gluesync_guide.events WHERE id = 7;
-- On PostgreSQL
SELECT count(*), sum(val), sum(amount) FROM public.events;The bulk path needs READ VOLUME and WRITE VOLUME on the staging volume. Gluesync deletes the staged file after each load.
UI + SQL
The copy-only snapshot leaves the entity on Hold. Start it to follow the changes.
-
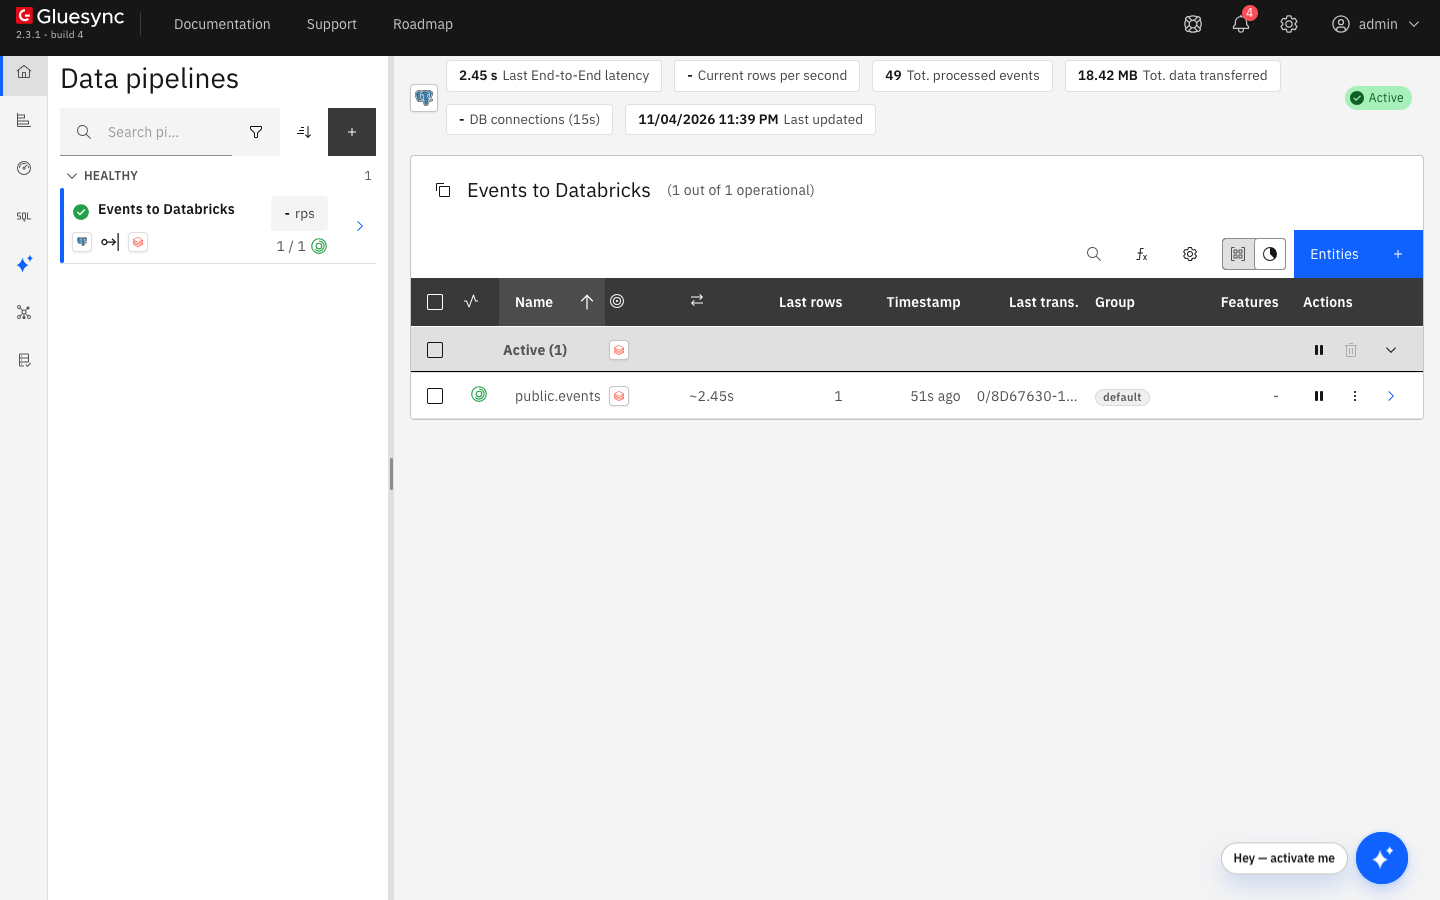
Select the play button of the entity. The Sync changes (CDC) dialog opens. Keep Where it stopped, which continues from the last checkpoint and loses nothing, and select Start entity. The dialog shows This target has no bulk load for the live changes. The entity becomes Active;
-
On the source, insert, update, delete and change a key, and update one row three times in one transaction:
INSERT INTO events VALUES (400001, 'new', 1, 12.50, now(), now(), '{"n":400001}', '{x,y}'); UPDATE events SET val = -1, kind = 'edited' WHERE id = 5; DELETE FROM events WHERE id = 6; UPDATE events SET id = 500000 WHERE id = 9; BEGIN; UPDATE events SET val = 100 WHERE id = 8; UPDATE events SET val = 200 WHERE id = 8; UPDATE events SET val = 300 WHERE id = 8; COMMIT; -
Wait up to a minute. Each batch is a statement on the warehouse, so a few seconds to some tens of seconds pass before a change shows. Then read the rows on Databricks:
SELECT id, kind, val FROM <catalog>.gluesync_guide.events WHERE id IN (5, 6, 8, 9, 400001, 500000) ORDER BY id;
SELECT count(*), count(DISTINCT id) FROM <catalog>.gluesync_guide.events;
Gluesync matches a row on the key it had before the change, so a change of the primary key moves the row instead of adding a second one. A Delta MERGE fails when two source rows match the same target row, so Gluesync cuts a batch into statements where every key appears once and keeps the order of the changes. The last change of a row is the one left on the table. A column that you add to the source table later is not replicated until you add it to the Delta table and to the entity: in the test, a new row arrived, without the new column.
UI + SQL
Each error below was reproduced on the Control Plane of Gluesync 2.3 against a real workspace.
-
Enter a token that Databricks does not know and select Test and continue. The page shows Failed to save:
Check connection failed. Could not connect to host "<workspace url>" at port 443 as user "". Databricks API returned HTTP 403 403: Invalid access token.Fix: generate a token in the workspace of the Workspace URL, and enter it in Client secret or personal access token; -
Enter a warehouse ID that does not exist. The page shows Failed to save:
The connection was saved, but agent <id> of pipeline <id> did not accept the new credentials: Check connection failed. … Databricks API returned HTTP 404 RESOURCE_DOES_NOT_EXIST: SQL warehouse <id> does not exist.The connection is saved with the wrong value. Fix: enter the ID from Connection details and select Test and continue again; -
Enter a workspace address that does not exist. The page shows
Databricks API request failed after 5 attempts: null. Gluesync retries the request five times before it gives up. Fix: copy the address of the workspace from the browser, without a path; -
Choose
ARRAYfor thetagscolumn, confirm, and select Create table events. The dialog shows Failed to create table, and the notification Create Target Table showsCreate target table execution error: BAD_REQUEST: [UNSUPPORTED_DATATYPE] Unsupported data type "_TEXT".The statement the dialog proposed containstags_textSTRINGfor the column, or create the table yourself withARRAY<STRING>and choose it in Target Delta table.
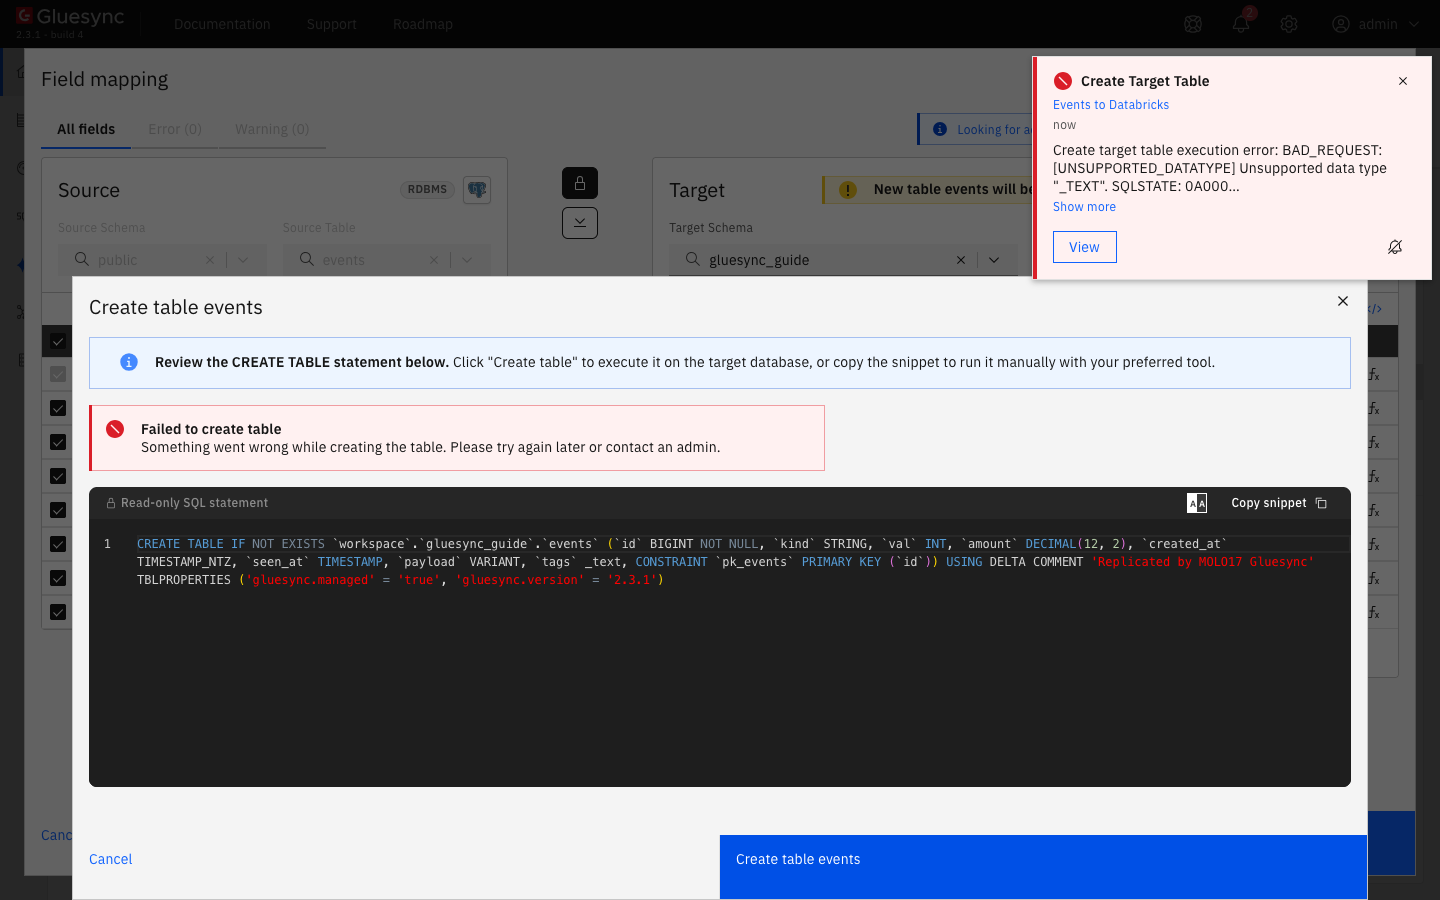
The agent reference lists more errors, such as a missing grant, an expired token and a missing volume right, in Troubleshooting authentication and access. To check the grants before you start a pipeline, run SELECT current_user() and SELECT * FROM <catalog>.gluesync_guide.events LIMIT 1 in Query Studio on the Databricks agent. They use the same identity and warehouse as the pipeline.
Troubleshooting
| Problem | Possible cause | What to do |
|---|---|---|
Failed to save with |
The token is wrong, revoked, expired, or from another workspace |
Generate a token in the workspace of the Workspace URL and enter it again |
Failed to save with |
The SQL warehouse ID is wrong. The connection is saved with it |
Copy the ID from Connection details of the warehouse and test again |
|
The workspace address does not resolve or is not reachable from Core Hub |
Use the address of the workspace without a path, and open port |
Missing required field in the field mapping, with a length of |
The column is a |
Enter a Length of |
Failed to create table with |
The array column was mapped to |
Map it to |
The connection test passes but the table list is empty or the first write fails |
The catalog name is wrong, or the user lacks |
Check the catalog name and the grants of step 1, and run the checks in Query Studio |
A new source column is missing on Databricks |
Gluesync maps columns explicitly and does not add columns |
Add the column to the Delta table and to the entity mapping |
Data types
Every value is written as a literal cast to the type of its column, with microsecond precision for timestamps. The table shows what the field mapping proposed for the columns of this guide. The agent reference lists all alternatives in Data types.
| PostgreSQL type | Databricks type | Note |
|---|---|---|
|
|
The same width |
|
|
Precision and scale come from the source, up to 38 digits |
|
|
Delta strings have no length. The form still asks for a length for some columns |
|
|
The wall-clock time as the source has it |
|
|
Stored as an instant, shown in the session time zone |
|
|
|
Arrays such as |
|
The JSON text of the array. The |
Tune bulk and write settings
-
Rows per bulk snapshot load: 1,000,000 by default. Raise it to load fewer, larger files. The setting belongs to the entity;
-
Maximum rows per MERGE statement: 1,000 by default. Raise it for large snapshots without bulk load. Gluesync also cuts a statement before it reaches 3,000,000 characters;
-
Statement timeout in seconds: a statement that runs longer is canceled on the warehouse and the write fails. A large
MERGEon a small warehouse needs a larger value; -
A larger warehouse makes both the snapshot and the live batches faster, because the time of a batch is the time of its statement.
Read Tune replication throughput for the settings that apply to every target. The agent reference describes the entity settings in Setup via Web UI.
Related guides
Contact MOLO17 Support if you need assistance with a Databricks target.