Set up a Supabase target and replicate PostgreSQL to it
A Supabase project is a PostgreSQL database, and the Gluesync Supabase agent writes to it over the PostgreSQL wire protocol, with TLS on. Most of the work is on the Supabase side: a database role that can write your tables and, for bulk load, create one helper schema. This guide creates that role, connects Gluesync, lets Gluesync create the target tables, runs a snapshot and live changes from PostgreSQL, turns on bulk load, and shows the errors you meet when a privilege is missing and how to fix each one.
In this guide
You will learn how to create a least-privilege database role for Gluesync, choose between the direct connection and the session pooler, create the Supabase target connection, let Gluesync create the target tables and fix the Missing required field error of the table dialog, run a snapshot and CDC, check inserts, updates and deletes, turn on bulk load and know what it changes on a Supabase project, and recover from the connection and permission errors that customers meet most often. A data type table and a symptom, cause and fix table close the guide.
Quick information
Goal |
Replicate PostgreSQL tables to a Supabase project with a snapshot and change data capture (CDC), using a role that has only the privileges Gluesync needs |
Audience |
Data engineers and Supabase project owners who receive data from Gluesync |
Level |
Intermediate |
Time required |
About 45 minutes |
Area |
Supabase → SQL editor; Control Plane → Data pipelines → Supabase target; entity Edit settings → Fine tuning |
Applies to |
Gluesync 2.3 |
Before you begin
Make sure that:
-
You have a Supabase project, hosted on supabase.com or self-hosted, with Supabase Postgres 15 or later, and you can run SQL as the
postgresrole (the SQL editor of the dashboard is enough). This guide was tested against self-hosted Supabase Postgres 17.6 that accepts TLS connections only, like a hosted project with Enforce SSL on; -
You have a source that Core Hub can read. This guide uses PostgreSQL 16 with WAL CDC, prepared as in PostgreSQL CDC with WAL. Any other source works the same way on the Supabase side. Supabase is a target only;
-
Core Hub can reach the Supabase host on port
5432. The direct connection resolves to an IPv6 address unless the project has the IPv4 add-on. If Core Hub has no IPv6 route, use the session pooler; -
You can sign in to the Control Plane with a role that can create pipelines.
|
The Supabase agent is the PostgreSQL target with Supabase’s defaults: database |
Guide steps
SQL
Skip this step if you already have your own tables. On the source PostgreSQL database, run:
CREATE SCHEMA shop;

CREATE TABLE shop.customers (
  id integer PRIMARY KEY, name varchar(100), notes text, ref uuid,
  payload jsonb, tags text[], credit numeric(12,2),
  created_at timestamp, seen_at timestamptz, active boolean);
INSERT INTO shop.customers VALUES
  (1,'Acme Spa','first','2f8c7d2e-6b1a-4c5e-9d0f-1a2b3c4d5e6f','{"tier":"gold"}',
   '{a,b}',1500.50,'2026-10-28 10:00:00','2026-10-28 10:00:00+02',true),
  (2,'Beta Srl',NULL,NULL,NULL,NULL,NULL,NULL,NULL,false);

CREATE TABLE shop.orders (id integer PRIMARY KEY, customer_id integer, total numeric(12,2), status varchar(20));
INSERT INTO shop.orders
SELECT g, 1 + g % 2, g * 10.5, 'new' FROM generate_series(1, 1000) g;SQL
You can connect Gluesync as postgres. A dedicated role is safer, because a leaked password then gives access to the tables Gluesync writes and nothing else. Each privilege below is needed for one thing.
-
In the SQL editor of the Supabase dashboard, or with
psqlaspostgres, create the role:CREATE ROLE gluesync_writer LOGIN PASSWORD '<a strong password>' NOINHERIT; -
Let it create the tables that Gluesync creates for you (step 5) in the schema
public:GRANT USAGE, CREATE ON SCHEMA public TO gluesync_writer; -
Let it create the helper schema for bulk load (step 8). Gluesync keeps its staging tables in a schema named
GLUESYNC, in capital letters, and creates it the first time an entity uses bulk load:GRANT CREATE ON DATABASE postgres TO gluesync_writer;If your policy does not allow
CREATEon the database, create the schema yourself and give the role the right to use it and to create staging tables in it. The agent used the schema in a test, with no other grant:CREATE SCHEMA "GLUESYNC"; GRANT USAGE, CREATE ON SCHEMA "GLUESYNC" TO gluesync_writer; -
If the tables already exist and you do not want Gluesync to create them, grant the privileges on each one instead of
CREATEon the schema.TRUNCATEis needed only for the option Empty the table first in step 6:GRANT SELECT, INSERT, UPDATE, DELETE, TRUNCATE ON public.customers TO gluesync_writer;
|
A table that |
UI
In the Supabase dashboard, select Connect and copy the host of the connection you will use.
| Connection | Host and port | User | When to use it |
|---|---|---|---|
Direct connection |
|
The role from step 2 |
Recommended. IPv6 only, unless the project has the IPv4 add-on |
Session pooler |
|
|
Core Hub has no IPv6 route |
Transaction pooler |
Port |
Not supported |
The write path uses prepared statements, which the transaction pooler does not support |
The database name is postgres. For a self-hosted project, use the host and port of your Postgres container or proxy.
UI
-
In the Control Plane, select Create your first pipeline, or the + button of the pipeline list. The Agents setup wizard opens;
-
In 1. Setup source, search for
postgresand select the PostgreSQL CDC agent tile. The connection form opens. Enter the Host name / Address, the Port, the Database name, the Username of a user with the CDC grants and the Password. Select Test and continue, then Next; -
In 2. Setup target(s), search for
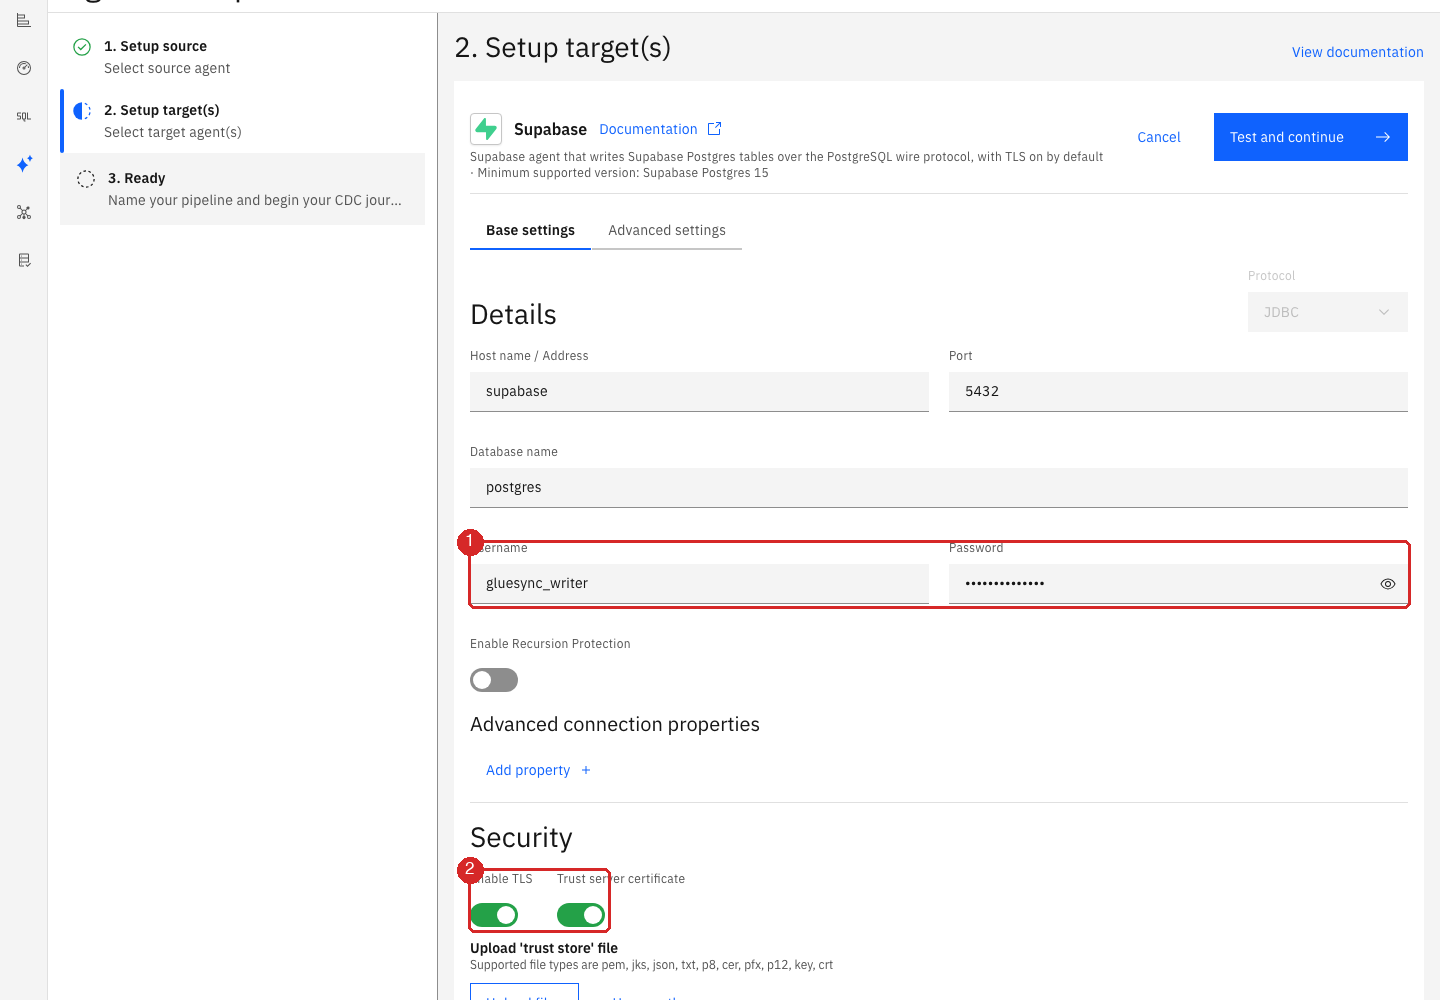
supabaseand select the Supabase agent tile. The connection form opens with Port5432, Database namepostgresand Usernamepostgresalready filled in; -
Enter the Host name / Address. Change Username to
gluesync_writer(1), or to the pooler form of step 3, and enter the Password; -
Under Security, keep Enable TLS and Trust server certificate on (2). Both are on by default. Select Test and continue.
-
Select Next, enter a Pipeline name and select Finish.
The TLS switches behave as follows:
-
Enable TLS is on by default. In a test with the switch off, the connection to a server that accepts TLS only was still made, and it was encrypted;
-
With Trust server certificate on, the connection is encrypted and the certificate is not checked. With it off, you must upload the CA certificate of the project as the trust store (Upload files or Use a path). Without it, the test fails with Failed to save and
Could not open SSL root certificate file.
UI
-
In the pipeline, select Entities (the blue button with the plus sign). The Add entities page opens with the Object browser;
-
Expand the source schema, for example
shop, and select the check box ofcustomers. The Field mapping dialog opens; -
In Target Schema select
public. Select the Target Table field and typecustomers. Select Create table "customers". The banner New table customers will be created on confirm. appears and every source column gets a proposed type; -
Look at the Length column. The cells of
notes,refandpayload(text,uuidandjsonb) show0with a red mark, the banner says Missing required field and Confirm is disabled.
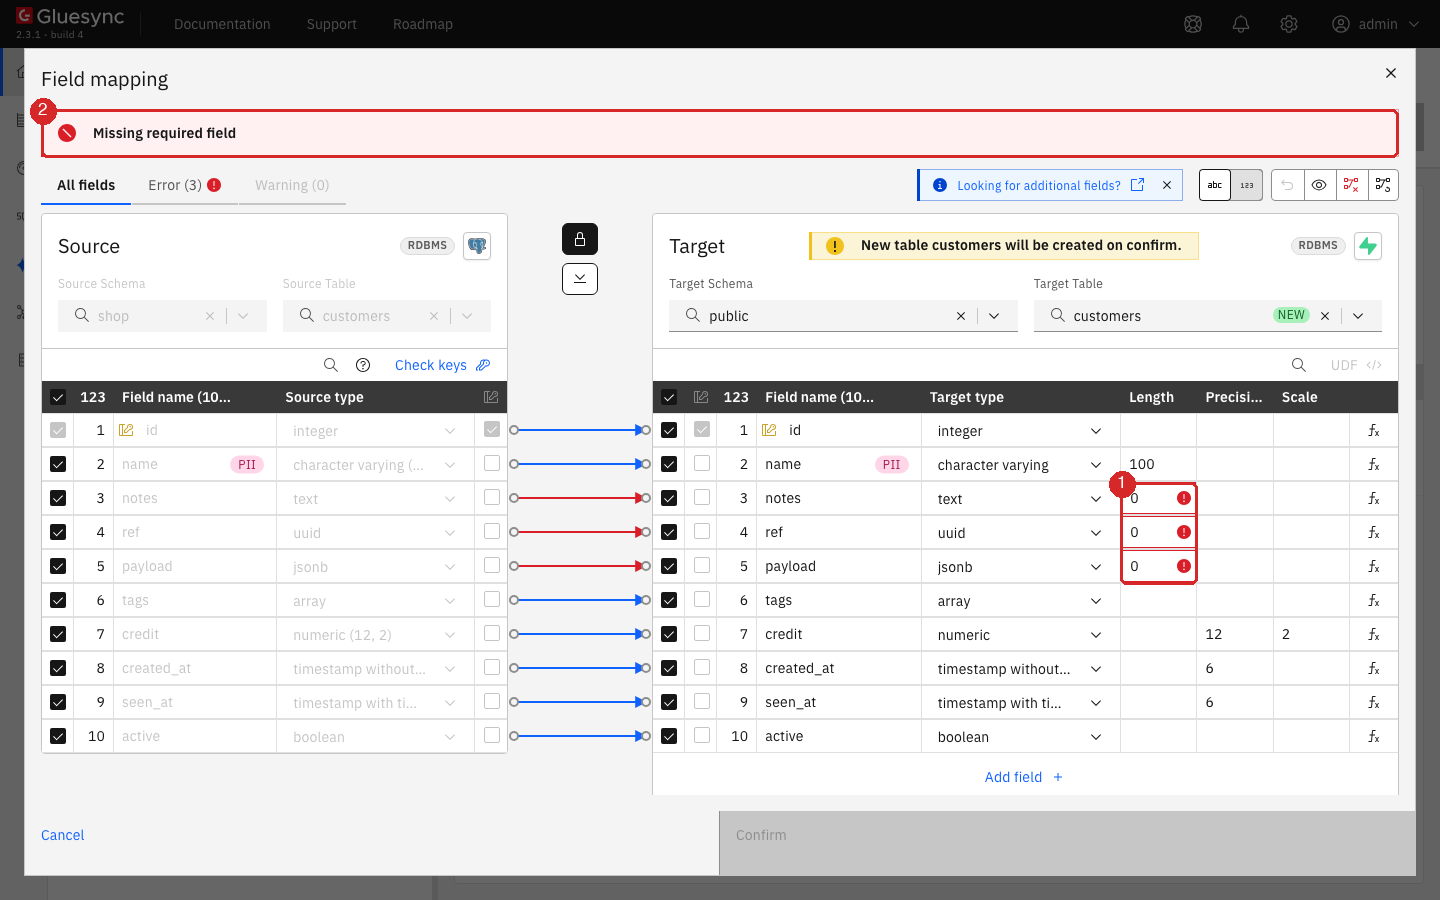
text, uuid and jsonb are required (1), so the dialog cannot be confirmed (2).-
Select each of the three cells and type
-1, then press Tab. The type staystext,uuidandjsonb, and the error clears. The Error tab reads Error (0); -
Select Confirm. A second dialog, Create table customers, shows the exact statement (1). Read it, then select Create table customers (2). Select Copy snippet (3) instead if your database administrator must run the statement. Both dialogs close and
customersappears under Selected entities.
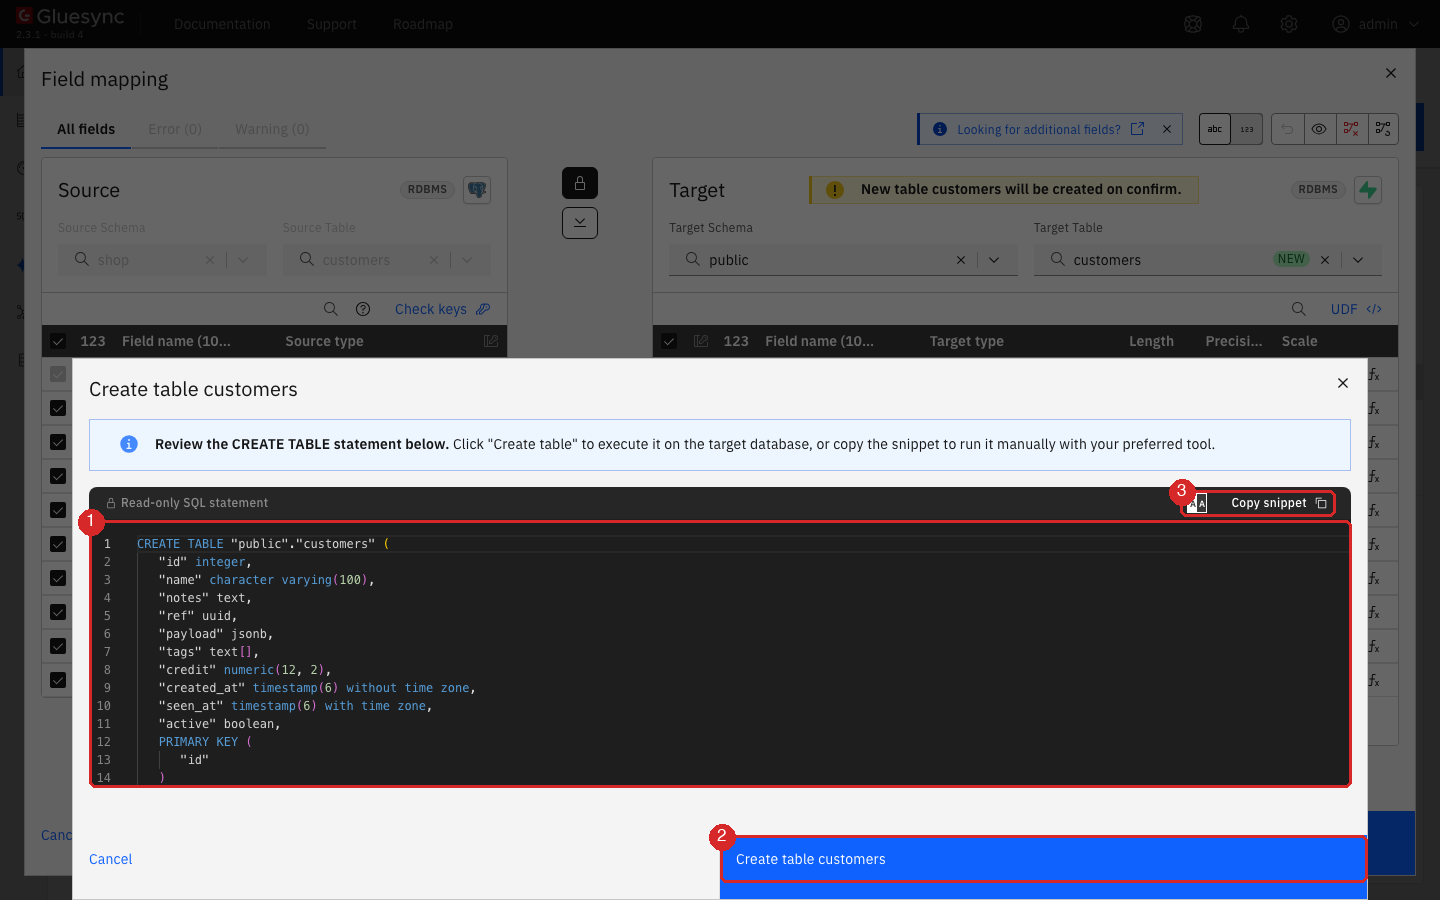
CREATE TABLE (1), create the table (2) or copy the statement (3).-
Select the check box of
ordersand repeat. Its columns have lengths, so the dialog has no errors. Then select Confirm and continue.
|
Gluesync creates the table with the role of the connection, in the schema you chose. A table created this way has row level security off, grants nothing to the Supabase API roles |
UI
-
In the entity list, select the play button of
shop.customers. The Sync changes (CDC) dialog opens; -
Keep Full copy and Keep and merge. Full copy copies all rows and then follows the live changes. Keep and merge overwrites rows that have the same key and leaves the others. Choose Empty the table first only if the target table must contain the source rows and nothing else: it runs a
TRUNCATE, needs that privilege and asks you to confirm with I understand rows in the target will be deleted; -
Select Start entity. Do the same for
shop.orders.
SQL + UI
-
On the source, change the data:
INSERT INTO shop.customers (id, name, notes, payload, tags, credit, seen_at, active) VALUES (3, 'Gamma', 'n3', '{"a":1}', '{x,y,z}', 99.99, now(), true); UPDATE shop.customers SET name = 'Acme SpA', credit = 2000 WHERE id = 1; DELETE FROM shop.customers WHERE id = 2; -
After a few seconds, read the target:
SELECT id, name, credit, tags FROM public.customers ORDER BY id; -
In the entity list, select the arrow at the end of the row of
shop.ordersand then Count both. The page counts the rows of the source and of the target.
If the numbers differ, follow Find and fix row differences between source and target.
UI + SQL
Bulk load stages the rows in a table of the GLUESYNC schema with COPY and merges them into the target table in one statement. It is the fast path for large snapshots and for busy CDC.
-
Open the entity menu (the three dots on its row) and select Edit settings, then Fine tuning;
-
Under Bulk load settings, select Bulk for CDC and Bulk for Snapshot. Close the dialog and select Confirm and continue to save the entity;
-
In Supabase, list the staging tables:
SELECT schemaname, tablename FROM pg_tables WHERE schemaname = 'GLUESYNC'; -
On the source, update three rows of
ordersand delete one, then select Count both on the entity page. The entity keeps running: you do not restart it.
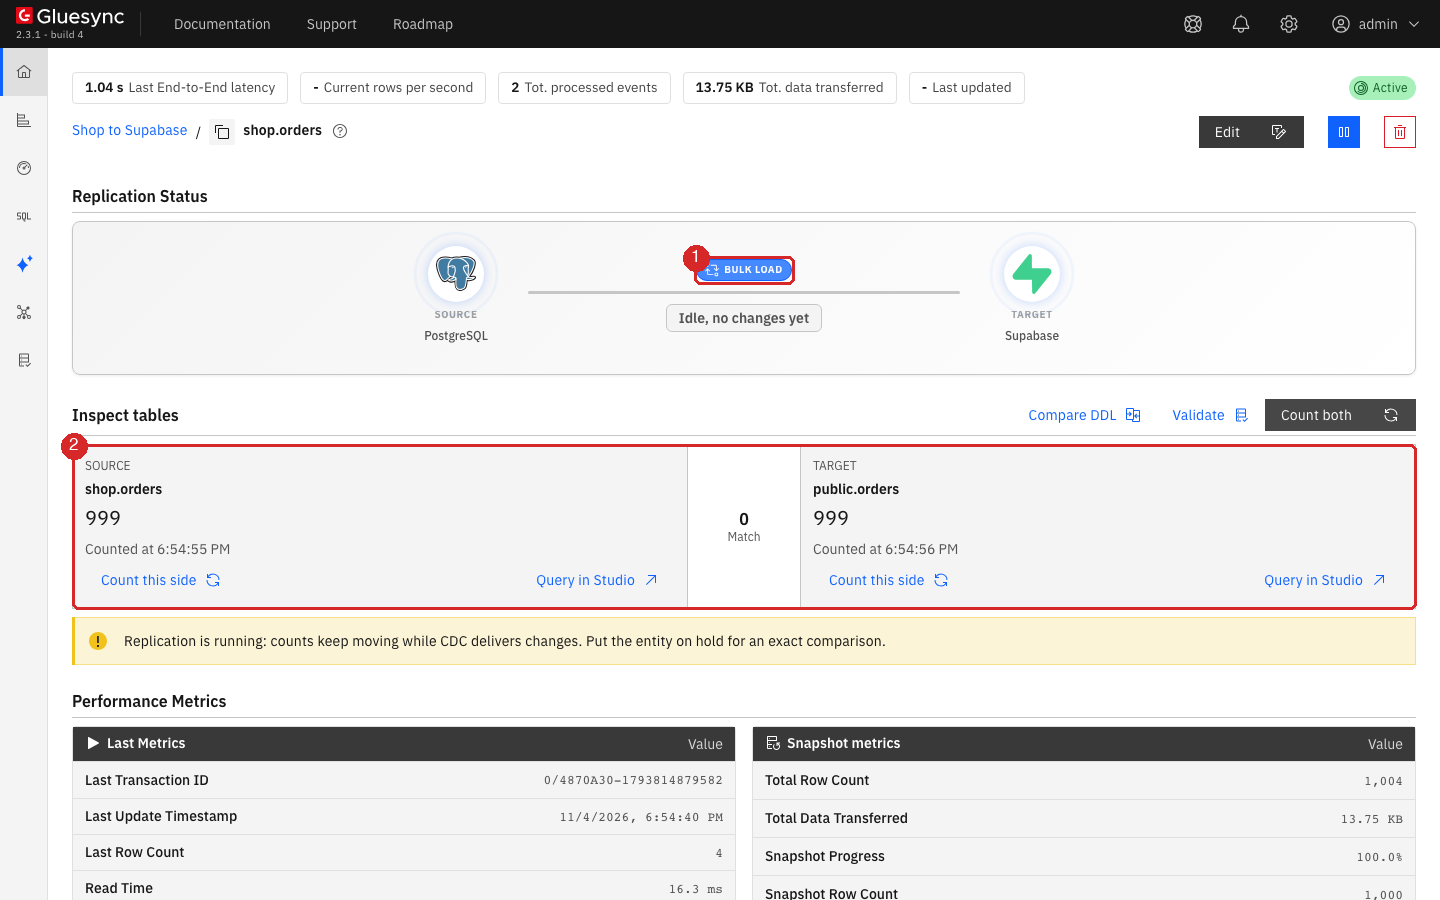
Bulk load applies the changes of a batch to the target table in a different way from the plain write path, which matters if the table has triggers, cascading foreign keys or Realtime subscribers. Read Updates with bulk operations during CDC on the agent page before you turn it on for CDC on such a table.
If the role cannot create the GLUESYNC schema, saving an entity with bulk load on fails with the banner The entity could not be saved. and ERROR: permission denied for database postgres. Grant CREATE on the database or create the schema yourself, as in step 2, and select Confirm and continue again. If the GLUESYNC schema is dropped later, the entity does not stop: the Core Hub log shows a warning, Bulk insert failed … falling back to the batch write, with schema "GLUESYNC" does not exist, and the rows are written without bulk load. To bring bulk load back, switch it off, save, switch it on and save again: that recreates the staging table.
UI + SQL
A table that belongs to another role fails on the first write. You can reproduce it and fix it without restarting anything.
-
In Supabase, as
postgres, makepostgresthe owner of the tableorders. Gluesync then writes a table that it does not own and has no privilege on:GRANT gluesync_writer TO postgres; ALTER TABLE public.orders OWNER TO postgres; REVOKE gluesync_writer FROM postgres; -
On the source, update a row of
orders; -
Open the entity
shop.orders. The status is Error, the banner reads Target write failed and the message names the SQLSTATE and the table.
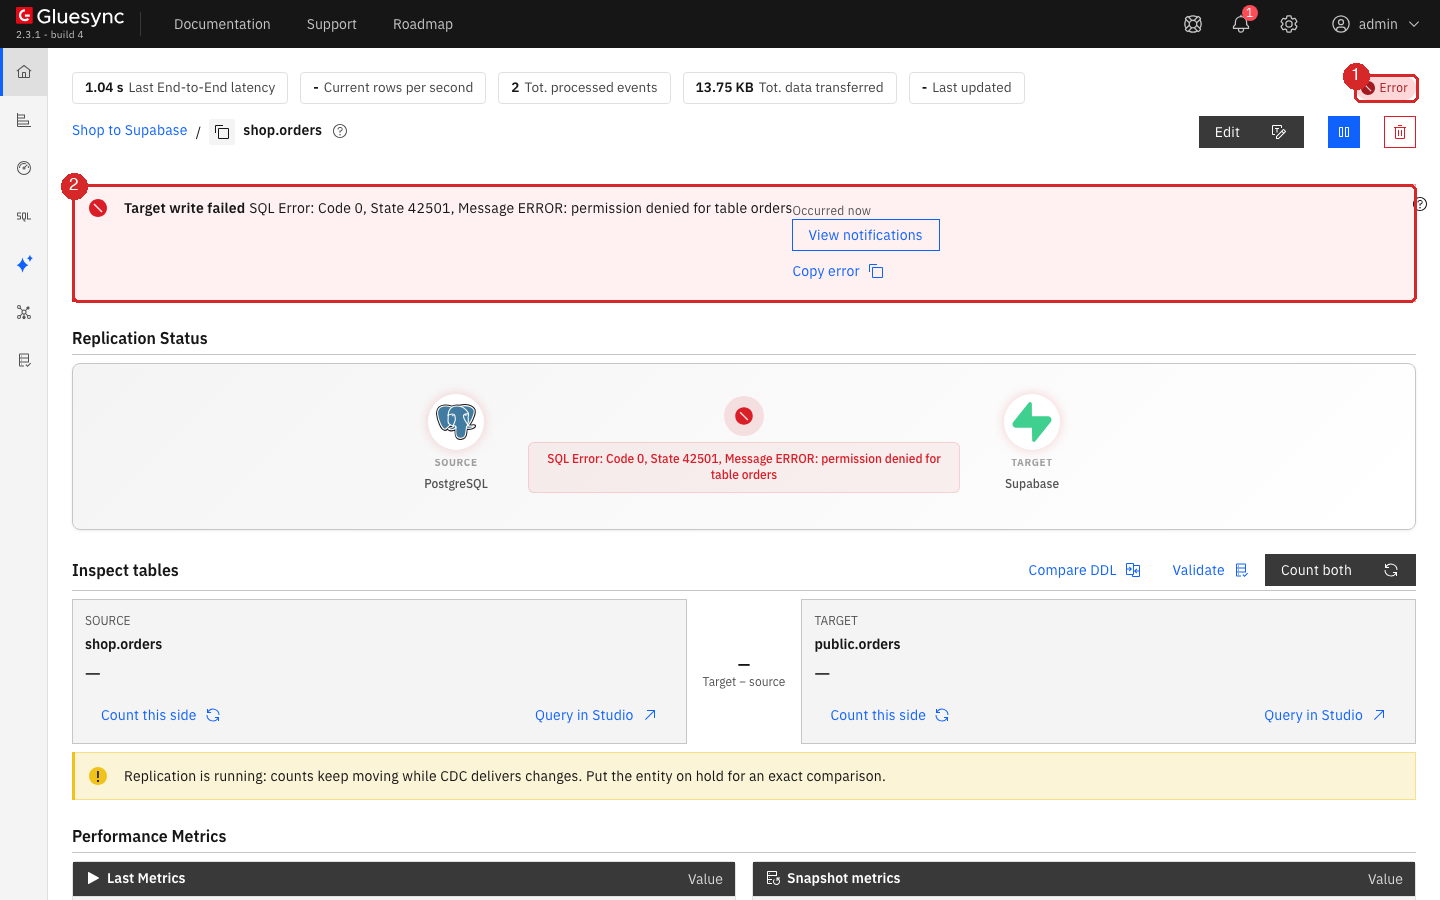
-
Grant the privileges to the role of the connection:
GRANT SELECT, INSERT, UPDATE, DELETE, TRUNCATE ON public.orders TO gluesync_writer;
The same message, permission denied for table, appears at the start of a snapshot with Empty the table first when the role has no TRUNCATE on the table: the entity goes to Error and the Core Hub log shows that it was running the truncate.
Data types
The mapping is the PostgreSQL target’s. When Gluesync creates the table from a PostgreSQL source, it proposes these types. They were checked in the test of this guide.
| PostgreSQL source | Type created in Supabase | Note |
|---|---|---|
|
|
Values written unchanged |
|
|
|
|
|
Set Length to |
|
|
Precision and scale kept |
|
|
Microseconds kept |
|
|
Shown in the time zone of the session |
Arrays such as |
|
The array stays an array |
The agent also writes enum types, money, interval, network address types, geometric types, range and multirange types, bit strings and the types of extensions: vector, geometry, geography, raster and hstore. These are covered by the integration test suite as column values and as primary keys, in snapshot and CDC. The full list is in Data types on the agent page. A numeric value of NaN cannot be written, because the Gluesync decimal type has no such value.
Tables with row level security are written. The postgres role bypasses row level security on Supabase. A connection role without the BYPASSRLS attribute follows the policies of the table, and needs policies that let it INSERT, UPDATE, DELETE and SELECT. See Row level security.
Troubleshooting
| Problem | Possible cause | What to do |
|---|---|---|
Failed to save with |
Wrong password or user name. On the session pooler, the user is missing the project reference |
Check the role and password in Supabase. On the pooler, use |
Failed to save with |
The database name is not |
Enter |
Failed to save with |
The host cannot be reached from Core Hub. The direct connection is IPv6 only without the IPv4 add-on |
Check the host name and the network route. Use the session pooler if Core Hub has no IPv6 route |
Failed to save with |
Nothing listens on that port, for example a typo or a closed firewall |
Use port |
Failed to save with |
Trust server certificate is off and no trust store is set |
Upload the CA certificate of the project as the trust store, or turn the switch on if encryption without a check is enough |
Missing required field in the Field mapping dialog, with |
The proposal for |
Type |
The entity could not be saved. with |
The role cannot create the |
|
Entity in Error with |
The role does not own the table and has no privilege on it, or has no |
|
|
The |
Switch bulk load off, save, switch it on and save again (step 8) |
The |
The table belongs to the Gluesync role |
|
Related guides
Contact MOLO17 Support if you need assistance with a Supabase target.