Use Gluesync Automator
This guide shows how to use Gluesync Automator, the tool with a web page that creates entities, exports and restores pipelines and duplicates them. You sign in to Core Hub, create entities for a whole schema without writing YAML, load a YAML file, export a pipeline, check the archive, restore it on the same or on a second Core Hub, and duplicate a pipeline.
In this guide
You will learn how to start Automator and sign in, how to read the Core hub overview, how to create entities in bulk from a source schema, how to create entities from a table-list YAML file and preview the plan first, how to export one pipeline or all pipelines with or without secrets, how to validate an archive, how to restore it on the same Core Hub or on a second one with the Customize panel, how to duplicate a pipeline and how to read the log.
Quick information
Goal |
Create, back up, restore and duplicate pipeline configuration with Automator instead of by hand |
Audience |
Gluesync administrators who can sign in to Core Hub with a user that manages pipelines |
Level |
Intermediate |
Time required |
About 45 minutes for all workflows. Each one takes a few minutes |
Area |
Gluesync Automator, in a browser on |
Applies to |
Gluesync 2.3 |
Before you begin
Make sure that:
-
You downloaded the current Automator for your system from the Gluesync Automator page and started it. The version is under the title, for example
v1.4.26; -
You can reach Core Hub from the computer where Automator runs, and you know its address, port, user name and password;
-
For the bulk and YAML workflows, the pipeline exists and has a SOURCE and a TARGET connection that Core Hub can open;
-
The schema that receives the tables exists on the target. Automator creates tables, but it does not create schemas;
-
For the restore workflows, you have a pipeline to export and, for a second Core Hub, the address and a login of that Core Hub.
| This guide was tested with Automator 1.4.26 on macOS, on two Core Hubs of Gluesync 2.3, on a pipeline from PostgreSQL to PostgreSQL with three tables. Other releases can name buttons differently. The version under the title tells you which one you run. |
| Automator keeps one Core Hub session at a time. To work on a second Core Hub, select Sign out and sign in again. |
Guide steps
UI
-
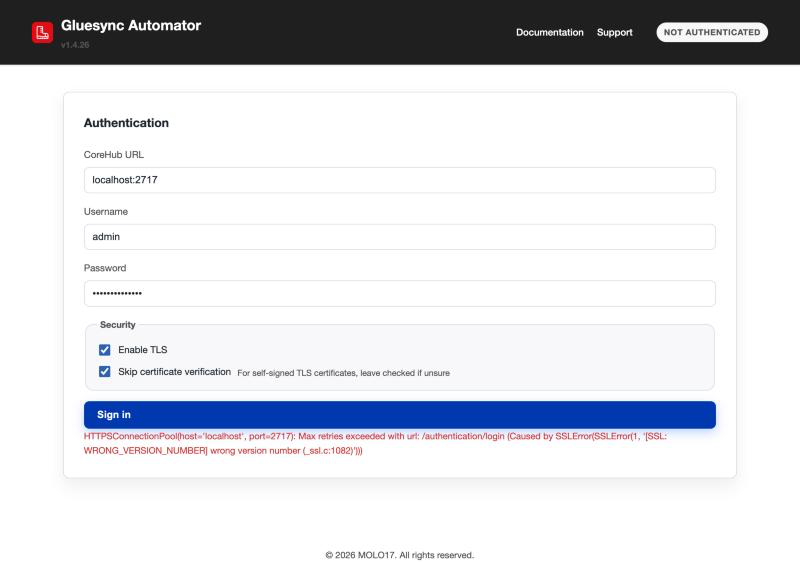
Start Automator and open
http://localhost:8080in your browser; -
In CoreHub URL, type the address of Core Hub, for example
https://corehub.example.com. Include the port when it is not 443; -
Enter Username and Password;
-
Under Security, leave Enable TLS selected when Core Hub answers on HTTPS. Clear it when Core Hub answers on plain HTTP. Leave Skip certificate verification selected for a self-signed certificate;
-
Select Sign in.
Two things help when the sign in does not work:
-
A wrong password ends with
401 Client Error: Unauthorized for url: <address>/authentication/login; -
Enable TLS against a Core Hub that answers on HTTP ends with an
SSLErrorthat containsWRONG_VERSION_NUMBER. Clear Enable TLS.
Use Sign out to sign in to another Core Hub.
UI
-
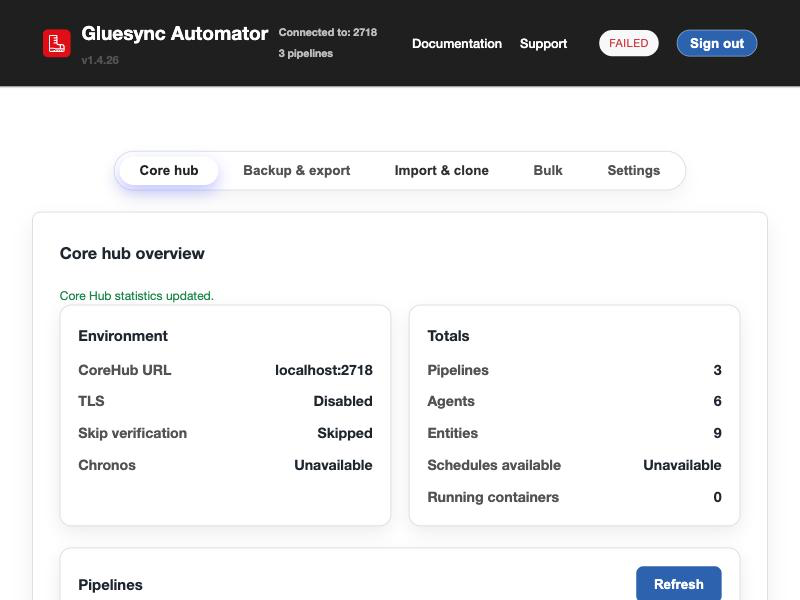
Select the Core hub tab;
-
Read Environment: the address, TLS, Skip verification and Chronos;
-
Read Totals: Pipelines, Agents, Entities, Schedules available and Running containers;
-
Select Refresh under Pipelines when you changed something in Core Hub.
UI
Use this to create one entity for every table of a schema without clicking each table in Core Hub and without a YAML file.
-
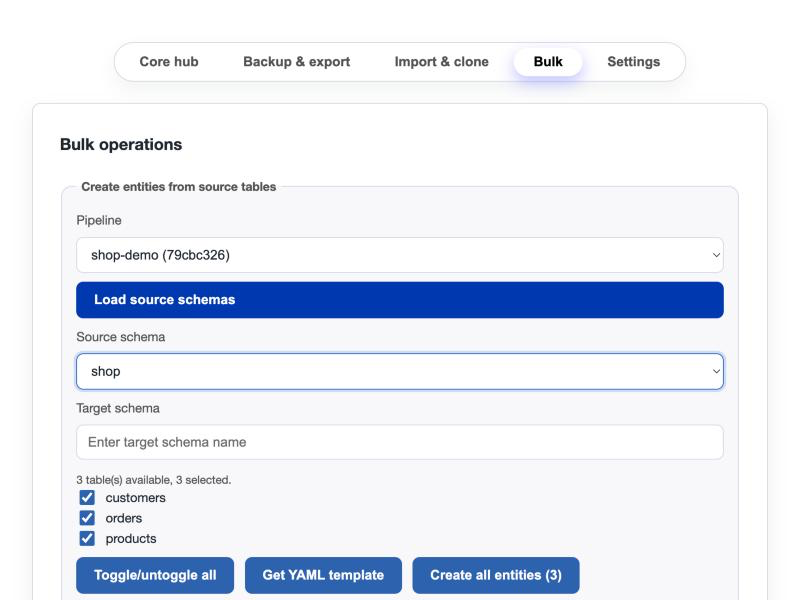
Select the Bulk tab;
-
In Pipeline, select the pipeline;
-
Select Load source schemas. Automator asks the SOURCE agent of the pipeline for its schemas;
-
In Source schema, select the schema, for example
shop. The system schemas of the database are in the list too; -
In Target schema, type the name of the schema on the target;
-
Read the table list. Every table is selected, and the line above it says how many tables are available and how many are selected. Clear the tables you do not want, or select Toggle/untoggle all and tick only the ones you want;
-
Select Create all entities (N), where N is the number of selected tables.
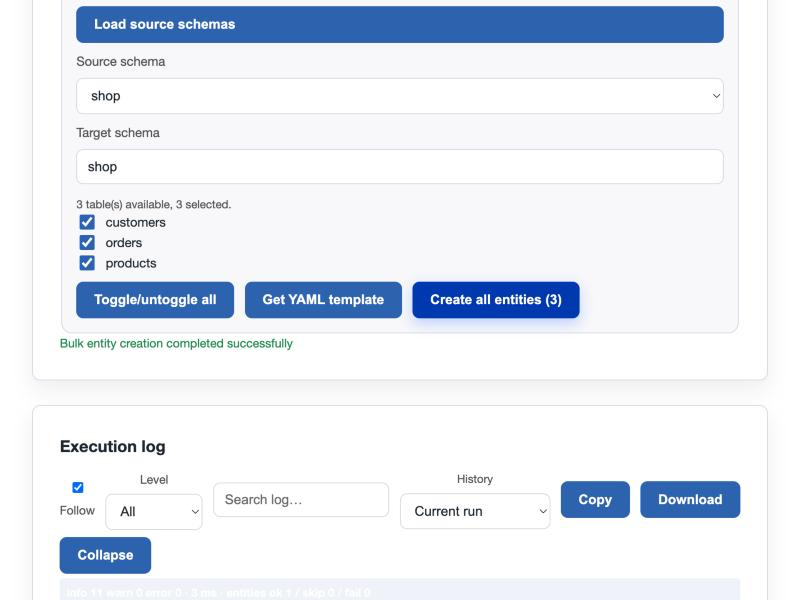
Automator creates the entities. It does not start them. Start them in Core Hub, as in Start a snapshot and CDC.
Get YAML template downloads a YAML file named template_<pipelineId>_<schema>_<time>.yaml with the selected tables and their columns. It needs a target schema too. Use it as the start of the YAML workflow below.
|
Open the Settings tab to change how Automator creates entities: Chunk size, Skip errors, Create missing tables automatically and Enable scheduling for created entities. The settings apply to the next run. |
UI
Use a YAML file when you need a different target table name, a column mapping or a filter. The template table-list-template.yaml shows every option. A small file is enough to start:
shop:
  target: shop
  sourceType: SQL
  targetType: SQL
  tables:
    whitelist:
      - reviews
    custom:
      reviews:
        name: reviews_copy
        keys:
          - id
        columns:
          - id: "id"
          - rating: "stars"
          - body: "body"
        filter:
          clauses:
            - column: rating
              type: int
              operation: GreaterEqual
              value: 3
The first key (shop) is the source schema, target is the target schema, and every line under columns maps a source column to a target column.
-
Select the Import & clone tab. The first card is Create entities from YAML (single pipeline);
-
In Pipeline, select the pipeline;
-
Under YAML configuration or pipeline backup (ZIP with UDFs), choose the file;
-
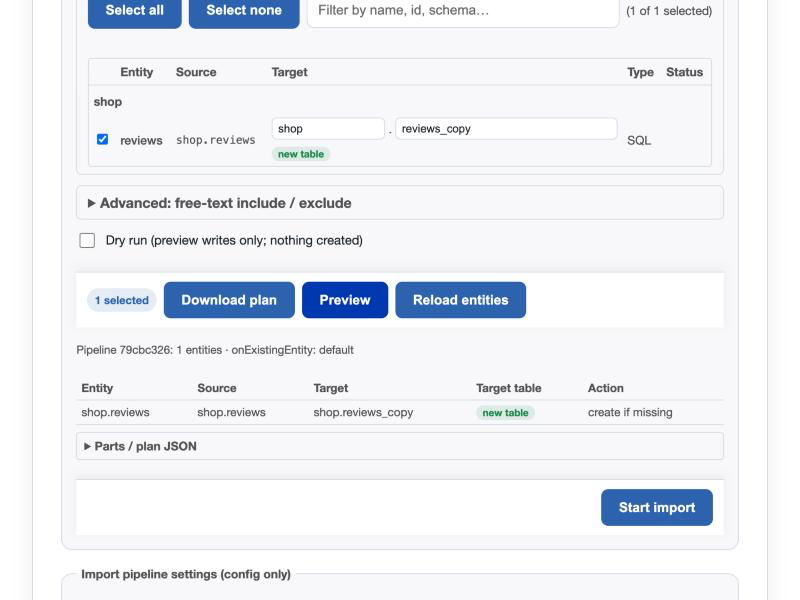
Read the line
1 entities loaded from the export file.and the table under it. The Status column showsnew tablewhen the target table does not exist, andtable existswhen it does.⚠︎ mismatchmeans that the existing table differs from the plan; -
Change the Target schema or table of a row when you need to;
-
Under Customize entity creation, set If the entity is already in the pipeline when the entity may exist:
keep current behaviour,skip (leave as-is),update in placeorfail if it already exists. Clear Parts to apply you do not need (UDFs, Function collection, Schedules, Groups, Create missing tables); -
Select Preview. It only reads from Core Hub. A table shows each entity, its target and its Action, for example
create if missingoruse existing (no create); -
Select Start import.
UI
-
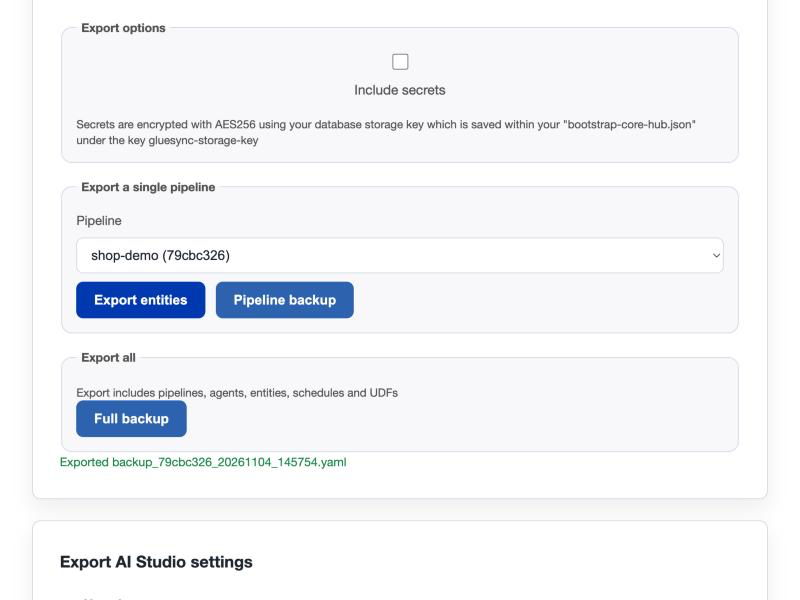
Select the Backup & export tab;
-
Decide on Include secrets under Export options. Leave it cleared to write
*******in place of every agent password. Select it to write the real passwords into the archive; -
Under Export a single pipeline, select the pipeline;
-
Select Export entities for one YAML file with the entities of that pipeline, or Pipeline backup for a ZIP archive with the pipeline, its agents and its UDFs;
-
To export every pipeline of the Core Hub, select Full backup under Export all.
An archive made with Include secrets holds the passwords of your databases as text in agents-config.yaml. Store it like a password, and delete it when you no longer need it.
|
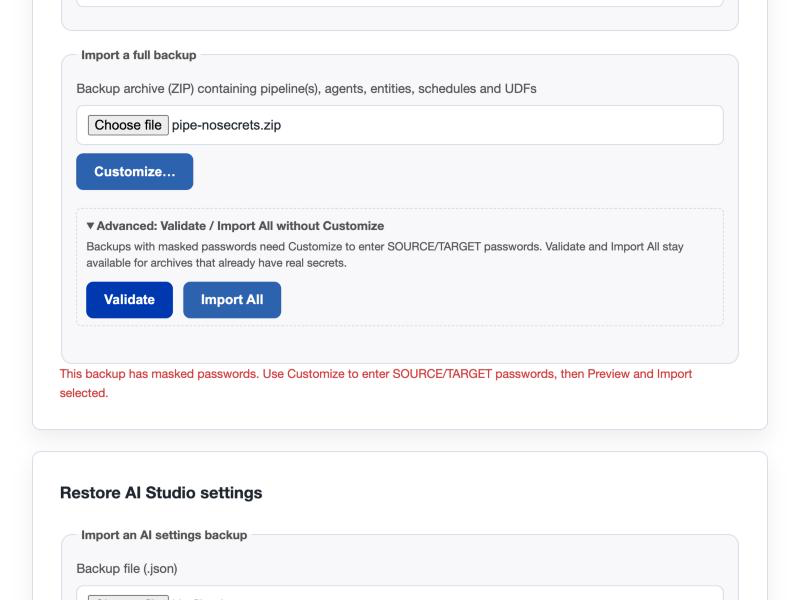
An archive made without Include secrets holds password: '*******' for every agent. It cannot be imported until the passwords are supplied, as the next step shows.
UI
-
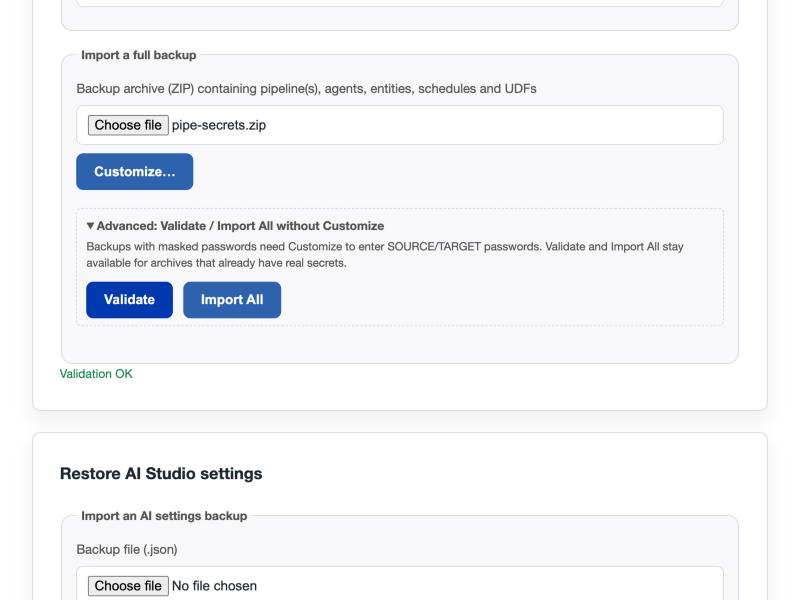
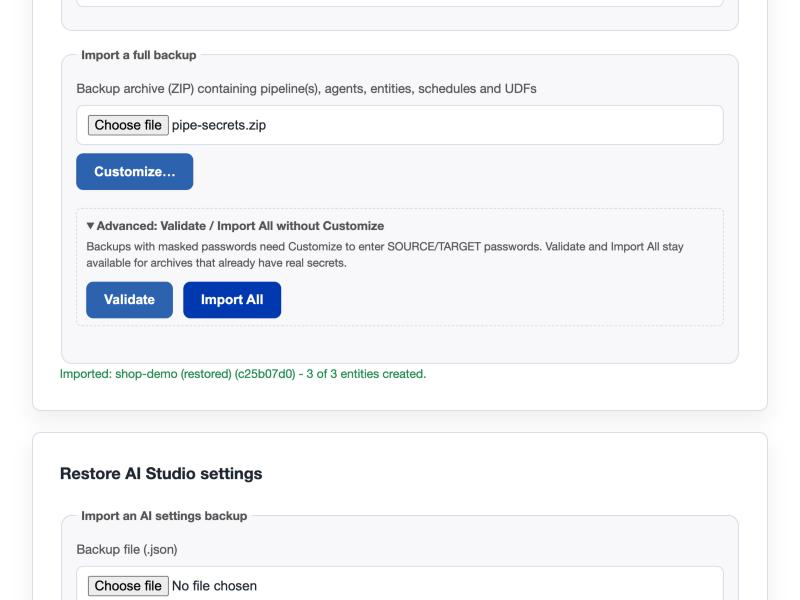
On the Import & clone tab, find the card Import a full backup;
-
Under Backup archive (ZIP) containing pipeline(s), agents, entities, schedules and UDFs, choose the archive;
-
Open Advanced: Validate / Import All without Customize;
-
Select Validate.
For an archive that still holds *******, Validate stops with This backup has masked passwords. Use Customize to enter SOURCE/TARGET passwords, then Preview and Import selected. Use the Customize panel in the next step.
UI
Use this to get a copy of a pipeline next to the original, or to test a restore. Use an archive with real passwords.
-
In Import a full backup, choose the archive and open Advanced: Validate / Import All without Customize;
-
Select Import All.
UI
Use Customize to restore on another Core Hub, to type the passwords of an archive that has none, or to change names and tables before anything is written.
-
Select Sign out, and sign in to the second Core Hub as in the first step;
-
On Import & clone, choose the archive in Import a full backup, and select Customize…;
-
Read the four steps of the panel: Analyze, Customize, Preview and Import;
-
Under Global settings, read what the archive does not hold: Notifications (SMTP), Users, OIDC and user groups and Data access policies show
(not in backup); -
Under Defaults for every pipeline, set If an entity already exists and Pipeline name already taken. The default for the second is to add
(restored); -
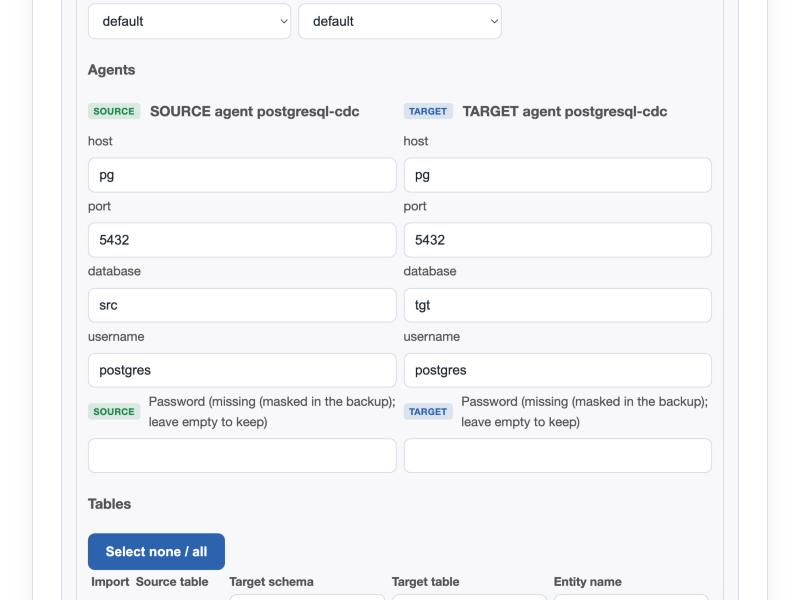
For each pipeline, change Pipeline name if you want. Under Agents, change the host, port, database and username of the SOURCE and TARGET agent for the new environment. In the Password fields, type the password when the label says
missing (masked in the backup). Leave them empty when it saysfrom backup; leave empty to keep; -
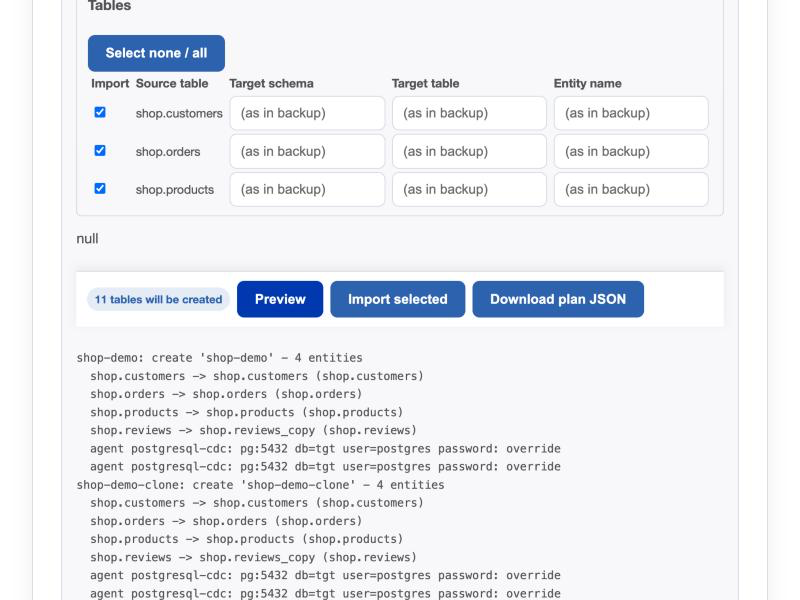
Under Tables, change Target schema, Target table or Entity name of a row, or clear Import to leave a table out.
(as in backup)means no change; -
Select Preview. Read the plan. Every agent line ends with
password: overridewhen you typed a password; -
Select Import selected.
|
Check the connections before you start anything. In the lab, a pipeline whose SOURCE and TARGET agents were of the same type (PostgreSQL to PostgreSQL) was restored on the second Core Hub with the details of the target database on both agents. The source then showed the tables of the target database. Open each restored pipeline in Core Hub, select the SOURCE and TARGET connection and compare the database name with the one of the original pipeline. If a connection is wrong, fix it in Core Hub before you create or start entities. See Troubleshooting. |
UI
-
Open the second Core Hub in the Control Plane;
-
Open each restored pipeline. Compare the SOURCE and TARGET connections, the entities and the target tables with the original;
-
In Automator, open the Core hub tab and select Refresh. The totals include the new pipelines.
For the full flow from QA to production, see Promote pipelines from QA to production.
UI
Duplicate a pipeline when you want a copy that points to the same or to other databases, without an archive.
-
On Import & clone, find the card Duplicate pipeline (w/ agents);
-
In Source pipeline, select the pipeline;
-
In New pipeline name, type the name of the copy;
-
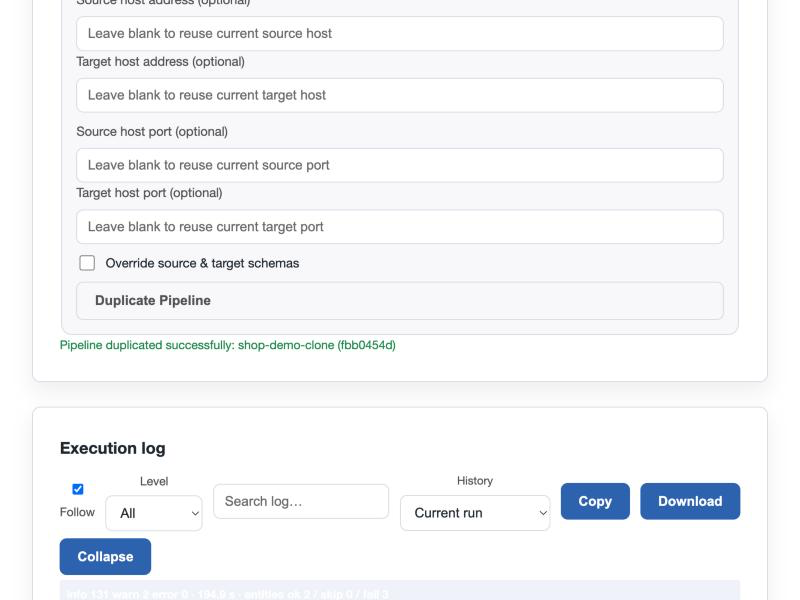
Type Source host password and Target host password. Both are required;
-
Leave Clone entities, schemas, and schedules from the original pipeline selected to copy the entities. Clear it to get only the pipeline and its connections;
-
To point the copy elsewhere, fill Source host address, Target host address, Source host port and Target host port, or select Override source & target schemas. Empty fields reuse the values of the original;
-
Select Duplicate Pipeline.
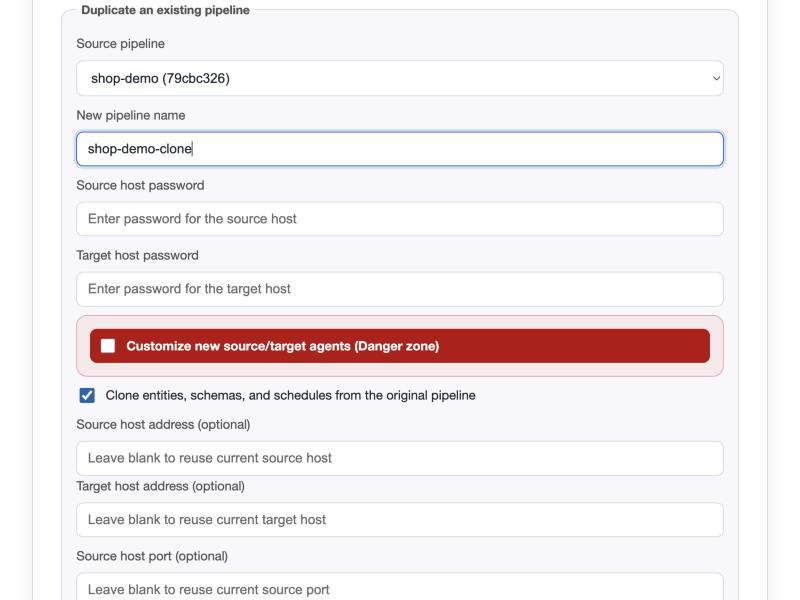
| Customize new source/target agents (Danger zone) replaces the agent types of the copy. Use it only when the new agents exist or can be created. |
UI
Every workflow writes to the Execution log at the bottom of the page.
-
Select a level in Level (
All,Debug+,Info+,Warning+orError) to filter the lines, and use the search box to find a table or a pipeline; -
Read the summary line above the lines, for example
info 11 warn 0 error 0, the duration andentities ok 1 / skip 0 / fail 0; -
Select History to open an earlier run;
-
Select Copy or Download to attach the log to a ticket, and Collapse to hide it.
Troubleshooting
| Problem | Possible cause | What to do |
|---|---|---|
The sign in ends with |
Enable TLS is selected, and Core Hub answers on plain HTTP |
Clear Enable TLS, or use the HTTPS address and port of Core Hub |
The sign in ends with |
User name or password is wrong |
Sign in to the Control Plane with the same user to check it, then try again |
Bulk shows |
Target schema is empty. Create all entities and Get YAML template need it |
Type the schema of the target and select the button again |
The log shows |
The target schema is missing, or its name has a typing error. Automator creates tables, not schemas |
Create the schema on the target, or correct the name, and run again with the same selection |
The log shows |
Core Hub passed on an error of the source or the target database while it saved the entity |
Read the text after |
|
Every entity of a PostgreSQL CDC source uses one replication slot, and the database reached |
Raise |
Validate or Import All says |
The archive was exported without Include secrets |
Export again with Include secrets, or select Customize… and type the passwords |
In Customize, the red message |
The text covers more than masked passwords. In the lab it appeared when SOURCE and TARGET are of the same agent type, so both received the same plan key |
Export the pipeline again with Include secrets, choose that archive, and leave the Password fields empty |
The result starts with |
One entity could not be created. The line after it names the table and the reason |
Fix the cause, delete the partial pipeline in Core Hub and import again |
An entity is refused with |
The SOURCE connection of the pipeline does not point to the database that has the table |
Open the SOURCE connection in Core Hub and check the database name. See the warning in Restore on a second Core Hub |
The Core hub tab shows |
Automator cannot reach Chronos at the address of Core Hub |
Nothing to fix for entities and archives. Core Hub and the entity workflows keep working |