Set up SAP SQL Anywhere as a source and a target
SAP SQL Anywhere has no CDC feature that Gluesync can switch on. The agent reads the transaction log with dbtran, a utility of the SAP client, and the SAP JDBC driver comes from the same client. Gluesync cannot ship either, so you provide the client and give the database user one privilege.
In this guide
You will create the database users for a source and a target, make the SAP SQL Anywhere 17 client available to Core Hub, build a pipeline from a source database to a target database, run a snapshot and CDC, check the rows on the target, turn on the bulk path and fix the errors that you are most likely to meet.
Quick information
Goal |
Replicate a SAP SQL Anywhere 17 database to another one, with a full copy first and then every committed insert, update and delete |
Audience |
Database administrators and Gluesync users who own a SQL Anywhere source or target |
Level |
Intermediate |
Time required |
About 45 minutes |
Area |
SQL Anywhere → Core Hub host → Control Plane → Data pipelines |
Applies to |
Gluesync 2.3 |
Before you begin
Make sure that:
-
You have two SAP SQL Anywhere 17 databases that Core Hub can reach, on their database port (default
2638). The guide calls them the source and the target. The examples use the source tableDBA.ordersand the target schematarget_schema; -
Core Hub runs on Linux x86_64. SAP ships its client for that platform only. On Apple silicon run Core Hub as
linux/amd64; -
You have the SAP SQL Anywhere 17 client, for example from the Developer Edition or from your server installation. Gluesync does not distribute it;
-
You can sign in to the Gluesync Control Plane with a role that can create pipelines;
-
You can run SQL as
DBAon both databases, for example withdbisql.
|
The SAP SQL Anywhere agent does not change the source database. It creates no trigger, no shadow table and no other object. It reads the catalog, the tables and the transaction log. |
Guide steps
SQL
Skip the table if you already have tables to replicate. The agent needs the system privilege BACKUP DATABASE and SELECT on each table. SYS_RUN_REPLICATION_ROLE alone is not enough for dbtran.
-
Connect to the source database as
DBA; -
Run the script.
CREATE USER gluesync IDENTIFIED BY '<password>';
GRANT BACKUP DATABASE TO gluesync;

CREATE TABLE DBA.orders (
  id       INTEGER NOT NULL PRIMARY KEY,
  customer NVARCHAR(100),
  amount   NUMERIC(12,2),
  created  TIMESTAMP DEFAULT CURRENT TIMESTAMP
);

INSERT INTO DBA.orders (id, customer, amount)
  SELECT row_num, 'customer ' || row_num, row_num * 1.5 FROM sa_rowgenerator(1, 1000);
COMMIT;

GRANT SELECT ON DBA.orders TO gluesync;
Grant SELECT for every table to replicate, or grant SELECT ANY TABLE.
SQL
The target agent creates a missing table, and it truncates the table before a snapshot unless you turn that off. The user therefore needs the privileges to create, alter and truncate tables. The simplest way is to let the user own the target schema. The script below uses ANY TABLE privileges instead.
-
Connect to the target database as
DBA; -
Run the script.
CREATE USER gluesync IDENTIFIED BY '<password>';
GRANT CREATE ANY TABLE, ALTER ANY TABLE, DROP ANY TABLE, TRUNCATE ANY TABLE TO gluesync;
GRANT SELECT ANY TABLE, INSERT ANY TABLE, UPDATE ANY TABLE, DELETE ANY TABLE TO gluesync;
GRANT CREATE ANY INDEX, ALTER ANY INDEX, DROP ANY INDEX, CREATE ANY OBJECT TO gluesync;

-- A user without a password owns the schema: nobody can sign in as it
CREATE USER target_schema;CLI
The agent loads the client at run time. It looks for the folder in this order: the SQL Anywhere client folder connection property of the agent, the SQLANY17 environment variable of Core Hub, then /opt/sqlanywhere17. A full installation has the right layout. The agent needs only these parts:
/opt/sqlanywhere17
├── bin64/dbtran                  (source agent only)
├── java/sajdbc4.jar
├── lib64/libdbjdbc17.so and the other lib*.so files
├── res/dblgen17.res
└── SAP_SQL_Anywhere_version.txt  (optional)
When Core Hub runs in a container, mount the folder read-only.
services:
  gluesync-corehub:
    platform: linux/amd64
    volumes:
      - /opt/sqlanywhere17:/opt/sqlanywhere17:ro
Keep the .so.1 files that sit next to the libraries. A Core Hub process loads one client folder, so restart Core Hub after you change it.
CLI
Skip this step if you never rename the transaction log. If you do, dbtran runs in Core Hub and finds the renamed logs in the directory of the server’s own log, at the path the server reports.
-
On the source, run
SELECT DB_PROPERTY('LogName'). The renamed logs are next to that file; -
Mount that directory into Core Hub at the same path.
    volumes:
      - /opt/sqlanywhere17:/opt/sqlanywhere17:ro
- /var/lib/sqlanywhere/log:/var/lib/sqlanywhere/log:roUI
-
Open Data pipelines;
-
Select the + button. On a Core Hub without pipelines, select Create your first pipeline. The Agents setup wizard opens on 1. Setup source;
-
In Search agents, type
SQL Anywhereand select the tile SAP SQL Anywhere agent. The connection form opens on the tab Base settings; -
Enter Host name / Address, Port (default
2638), Database name (theDBNof the connection), Username (gluesync) and Password of the source; -
Optional: under Advanced connection properties, select Add property and pick SQL Anywhere client folder, SQL Anywhere server name (for a host that runs several servers) or Use connection pool. Turn on Enable TLS under Security if the server needs it. The tab Advanced settings holds the settings of the agent, such as the polling interval of the log;
-
Select Test and continue. The source appears as a card with a green check mark. Select Next;
-
On 2. Setup target(s), select the tile SAP SQL Anywhere agent and enter the connection of the target in the same way;
-
Select Test and continue, then Next;
-
On 3. Ready, enter
SQL Anywhere demoin Pipeline name and select Finish.
|
The same tile serves as source and as target. To script this step, use the REST calls in Setup via Rest APIs. |
UI
-
In the pipeline, select Entities. The page Add entities opens with the Object browser on the left;
-
Expand the schema
DBAand tickorders. The Field mapping dialog opens; -
In Target Schema, clear the prefilled
DBA, typetarget_schemaand select it from the list; -
In Target Table, type
ordersand select Create table "orders". The banner New table orders will be created on confirm appears and every field of the source is linked; -
Select Confirm. The dialog Create table orders shows the
CREATE TABLEstatement. Select Create table orders to run it on the target; -
Select Confirm and continue.
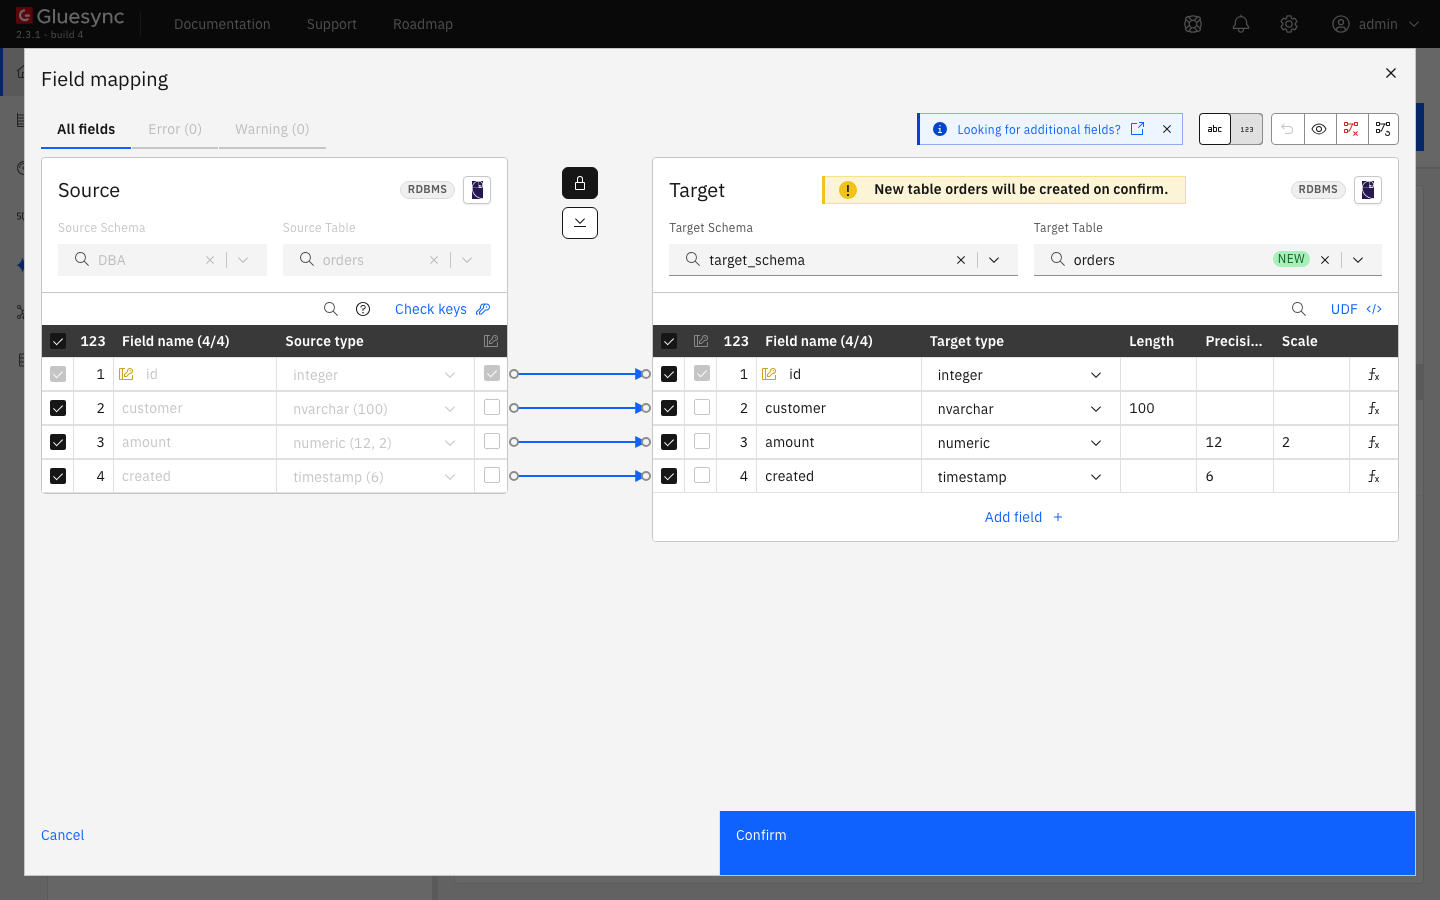
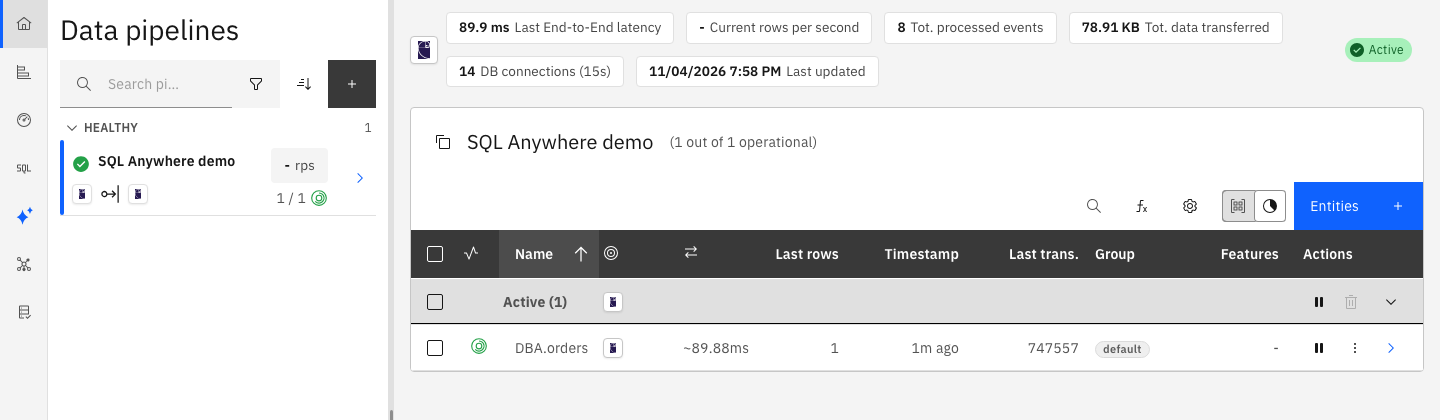
The default tag next to the entity is its group for the wizard. The default types of the new table are in the data type section below.
UI
-
In the Actions column of the entity, select the play icon. The dialog Sync changes (CDC) opens;
-
In Start from, keep Full copy (marked Recommended for the first start);
-
In Data already in the target, keep Keep and merge;
-
Leave Speed on Standard and select Start entity.
SQL
-
On the target, count the rows;
-
On the source, run an insert, an update, a primary key change and a delete in one transaction;
-
Wait a few seconds and read the same rows on the target.
-- Target
SELECT COUNT(*) FROM target_schema.orders;   -- 1000

-- Source
INSERT INTO DBA.orders (id, customer, amount) VALUES (2001, 'cdc insert', 10.25);
UPDATE DBA.orders SET amount = 99.99 WHERE id = 5;
UPDATE DBA.orders SET id = 3001 WHERE id = 6;
DELETE FROM DBA.orders WHERE id = 7;
COMMIT;

-- Target
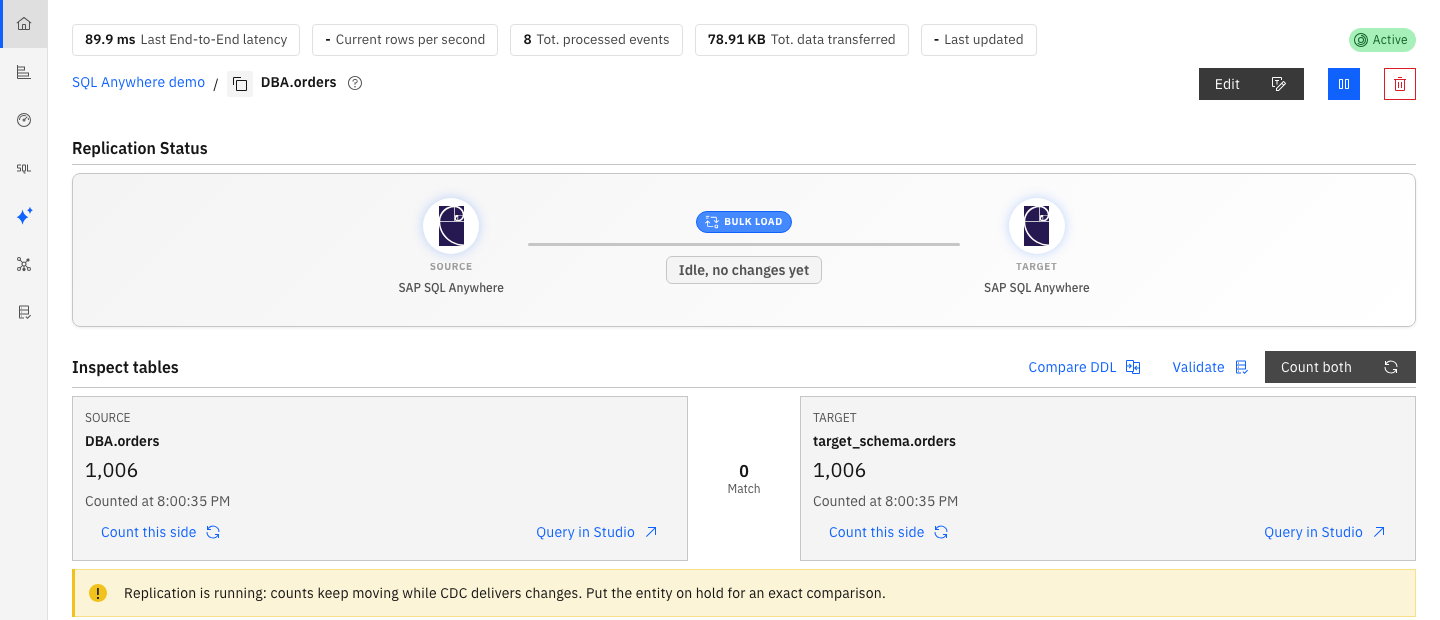
SELECT id, customer, amount FROM target_schema.orders WHERE id IN (5, 6, 7, 2001, 3001);In the Control Plane, open the entity (the arrow at the end of its row) and, under Inspect tables, select Count both. The counts match when CDC has caught up, and the page shows 0 with Match between the two sides.
UI
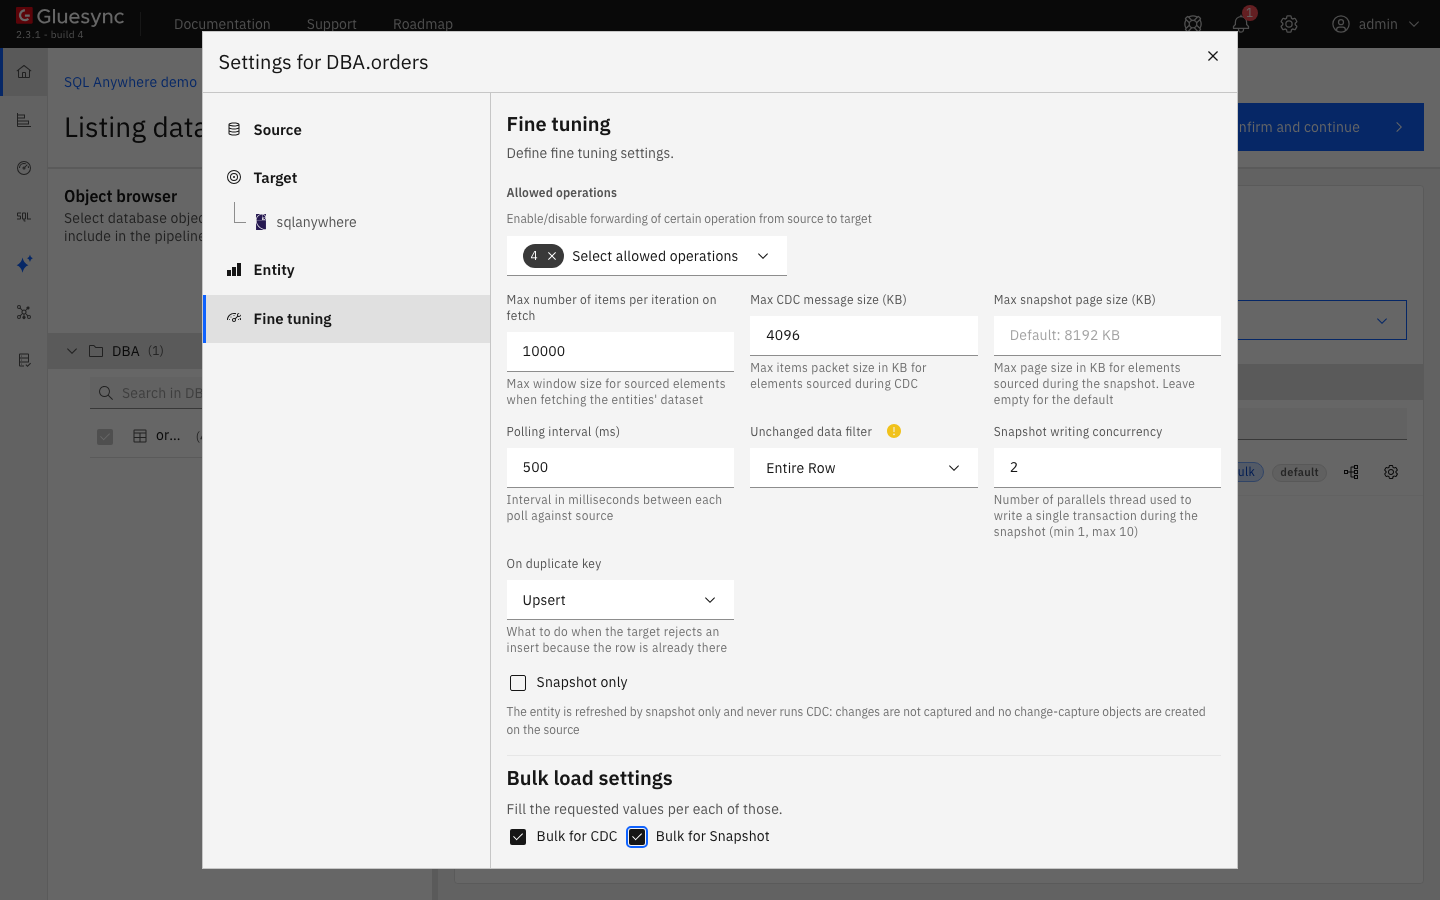
The bulk path loads each batch with one statement that reads the rows from OPENSTRING. It is off by default. Two settings of the target entity turn it on, one for the snapshot and one for CDC. They are independent.
-
On the pipeline page, select the three dots of the entity and then Edit settings;
-
Open Fine tuning. Under Bulk load settings, tick Bulk for Snapshot, Bulk for CDC, or both. See Write strategies for where they are;
-
Close the dialog and select Confirm and continue;
-
Pause the entity, select the play icon again and start it with Full copy to use the setting on the snapshot.
You can also choose the write method when you start the entity: in the dialog Sync changes (CDC) select Custom under Speed and pick Bulk load under During the copy, During live changes or both.
Data type notes
When both sides are SQL Anywhere, the Field mapping dialog proposes for every column the type of the source. The source agent reads the type of each column from the catalog.
| Source type | Proposed on the target |
|---|---|
|
The same type and length |
|
The same type, with the precision and scale of the source ( |
|
The same type with precision 6 |
|
|
|
The same type |
You can change the proposed type of a column in the dialog before you create the table. The types that a target table can use are listed in Target tables and data types.
Troubleshooting
| Symptom | Cause | Fix |
|---|---|---|
Test and continue fails with Failed to save and the message |
The client folder is incomplete, not mounted or not the one the agent looks for |
Check the mount and the file list in the step above. Restart Core Hub after you change the client folder |
After you change SQL Anywhere client folder on a running Core Hub, the save fails with |
A Core Hub process loads one client folder. The connection is saved with the new value even though the agent refused it |
Restart Core Hub, or put the previous value back and select Test and continue again |
Test and continue fails with |
Core Hub runs on another architecture or operating system |
Run Core Hub as |
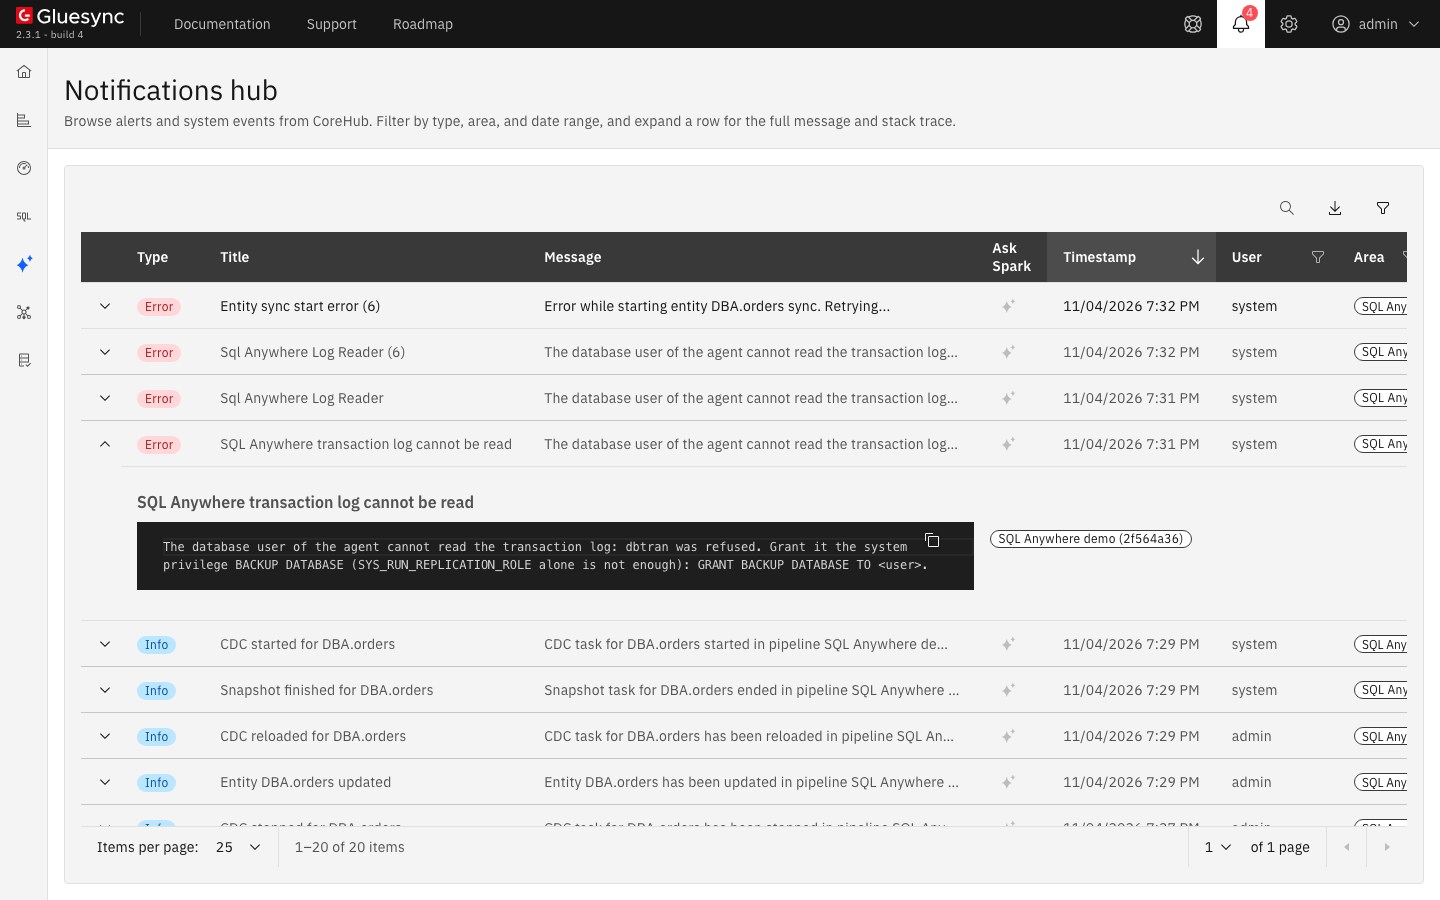
The entity goes to the Error group and the notification SQL Anywhere transaction log cannot be read says that |
The user lacks |
Run |
The notification says the log was renamed or truncated past the position of the agent and lists offsets |
A |
If the renamed logs are still on the server, make them readable in Core Hub at the same path (see the step above) and start the entity again with Where it stopped: the agent then reads the renamed log and loses nothing. Without them, a plain start keeps failing with the same error. Start the entity with Full copy |
Changes arrive late and the lag grows |
|
Rename the active log on a schedule so it stays small. Look at the duration of each |
A warning asks for a re-snapshot of a table |
The log shows an |
Snapshot the entity again |
The target refuses a row with SQL Anywhere error |
A row with that key is already on the target |
Choose the On duplicate key setting of the entity (Upsert, Skip or Fail) in Edit settings, Fine tuning. With Fail, the entity stops with the SQL Anywhere error |
The agent logs connection errors |
A connection was lost or a row is locked |
No action. The agent retries these statements |
Rows written by one pipeline come back through the other in a two-way setup |
Both pipelines read each other’s writes |
Give the writing agent its own database user and list it in |
Errors of the agent appear in the notification panel (the bell) and in the Notifications hub, with the full message when you expand a row.
Related guides
Contact MOLO17 Support if you need assistance with SAP SQL Anywhere.