Set up an Apache Kafka target
The Kafka agent publishes every change of a source table as one JSON message on a Kafka topic. It does not read from Kafka, and it does not create topics: the topic names, the partitions and the access rules are yours to define. This guide creates a Kafka user that can only write to your topics, creates the target with SASL authentication, copies a PostgreSQL table and follows its live changes, and reads the messages back with a console consumer. It then shows how messages are keyed and partitioned, which producer settings you control, how to switch on Kafka transactions and TLS, and how to fix the errors you are most likely to meet.
In this guide
You will create a SCRAM user, give it write access to a topic prefix with ACLs, and create the topics with several partitions. You will add the Kafka target in the Control Plane, choose how a table maps to a topic and to a message key, run a snapshot and live changes, and read inserts, updates, deletes and tombstones with kafka-console-consumer. You will check that the changes of one key stay in order, tune the write settings, add transactions and TLS, and recover from authentication, authorization and missing-topic errors.
Quick information
Goal |
Publish the snapshot and the change events of a PostgreSQL table to Kafka topics, and read them back |
Audience |
Data engineers and Kafka administrators who feed stream consumers |
Level |
Intermediate |
Time required |
About 60 minutes |
Area |
Kafka → users, ACLs and topics; Control Plane → Pipelines → Kafka agent → Base settings and Advanced settings; entity → Field mapping and Settings |
Applies to |
Gluesync 2.3 |
Before you begin
Make sure that:
-
You have an Apache Kafka cluster and you can run the Kafka command line tools (
kafka-topics.sh,kafka-configs.sh,kafka-acls.sh,kafka-console-consumer.sh) as an administrator. This guide was tested with a single Apache Kafka 3.9 broker in KRaft mode, with an authorizer,SCRAM-SHA-256and TLS listeners, and automatic topic creation switched off; -
Core Hub can open a connection to the broker address that the broker advertises. The agent connects to the host and port you enter, and the producer then follows the addresses in the broker metadata;
-
You can sign in to the Control Plane with a role that can create pipelines;
-
You have a source table with a primary key. This guide uses the PostgreSQL table
public.orders(idinteger primary key,customer varchar(50),status varchar(20),amount numeric(10,2),created_at timestamp) with 20 rows; -
The source database is ready for change data capture. For PostgreSQL that means
wal_levelset tological, a user with theREPLICATIONattribute that can read the table, and thewal2jsonplug-in. See the PostgreSQL CDC reference for the exact statements.
|
Kafka is a target only. The agent cannot read topics, so it cannot be a source. The options of the agent are listed in the Apache Kafka target reference. The agent overview lists the supported versions. |
Guide steps
CLI
Gluesync needs to write to topics and to list them. It does not need to create topics, read them, or join consumer groups. This guide puts every topic under the prefix gs., so one prefixed ACL covers all of them. The commands read the broker address and the administrator credentials from a client configuration file named admin.properties. Replace <broker-host> and the passwords.
-
Create the user. Create one SCRAM mechanism for each command, because Kafka refuses two credentials for the same user in one request:
kafka-configs.sh --bootstrap-server <broker-host>:9092 --command-config admin.properties \ --alter --entity-type users --entity-name gluesync \ --add-config 'SCRAM-SHA-256=[password=<a strong password>]' -
Allow the user to write to every topic whose name starts with
gs., and to describe them. Test and continue lists the topics, and a user that cannot describe a topic does not see it:kafka-acls.sh --bootstrap-server <broker-host>:9092 --command-config admin.properties \ --add --allow-principal User:gluesync \ --operation Write --operation Describe \ --topic gs. --resource-pattern-type prefixed -
Create the topic of the table. The agent never creates it. Use three partitions here, so that step 8 has something to show. Use a replication factor of
3on a production cluster:kafka-topics.sh --bootstrap-server <broker-host>:9092 --command-config admin.properties \ --create --topic gs.orders --partitions 3 --replication-factor 1 -
Check what you created:
kafka-topics.sh --bootstrap-server <broker-host>:9092 --command-config admin.properties \
  --describe --topic gs.orders
kafka-acls.sh --bootstrap-server <broker-host>:9092 --command-config admin.properties \
  --list --principal User:gluesync
|
You can let the broker create topics instead, with |
SQL
Run this on the PostgreSQL source. It is optional, but it makes the before image of an update complete. With the default replica identity, PostgreSQL sends only the key of the old row:
ALTER TABLE public.orders REPLICA IDENTITY FULL;UI
-
In the Control Plane, select Create your first pipeline, or the + button of the pipeline list if you already have pipelines. The Agents setup wizard opens;
-
In 1. Setup source, choose the PostgreSQL CDC agent tile and fill Base settings: Host name / Address, Port, Database name, Username and Password. Select Test and continue. The source appears with a green check mark. Select Next;
-
In 2. Setup target(s), search for
Kafkaand choose the Kafka agent tile under Event Streaming. In Base settings fill:-
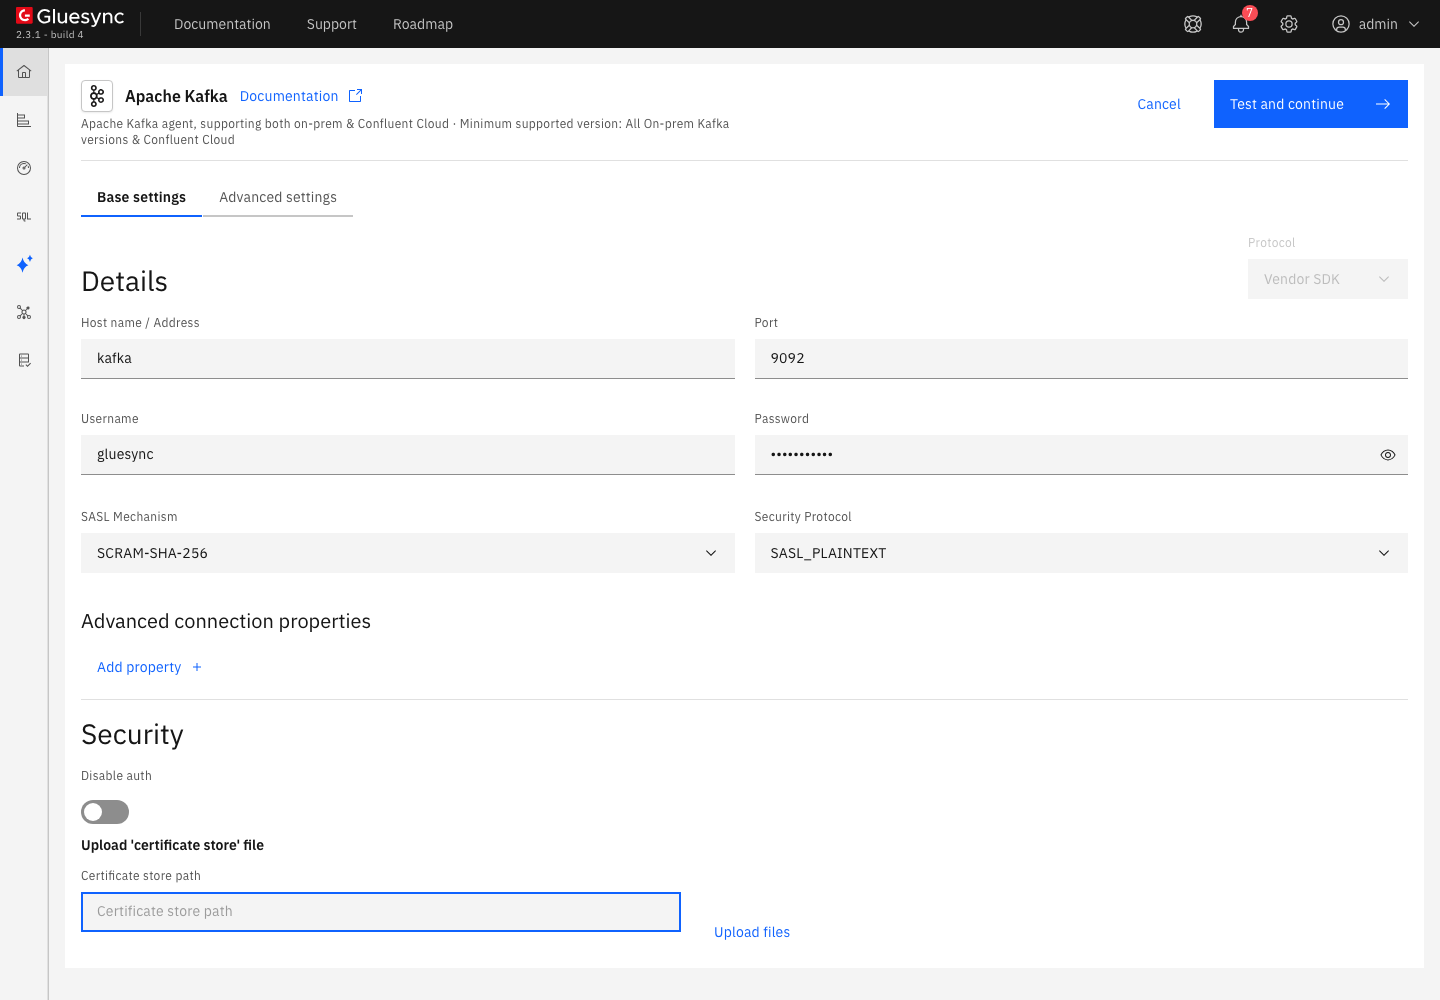
Host name / Address: the address of one broker. The agent finds the other brokers from the cluster metadata;
-
Port:
9092, or the port of the listener you use; -
Username and Password: the user of step 1;
-
SASL Mechanism:
SCRAM-SHA-256, the default, to match step 1; -
Security Protocol:
SASL_PLAINTEXTfor a listener without TLS. The default isSASL_SSL, which is for a listener with TLS (see step 10);
-
-
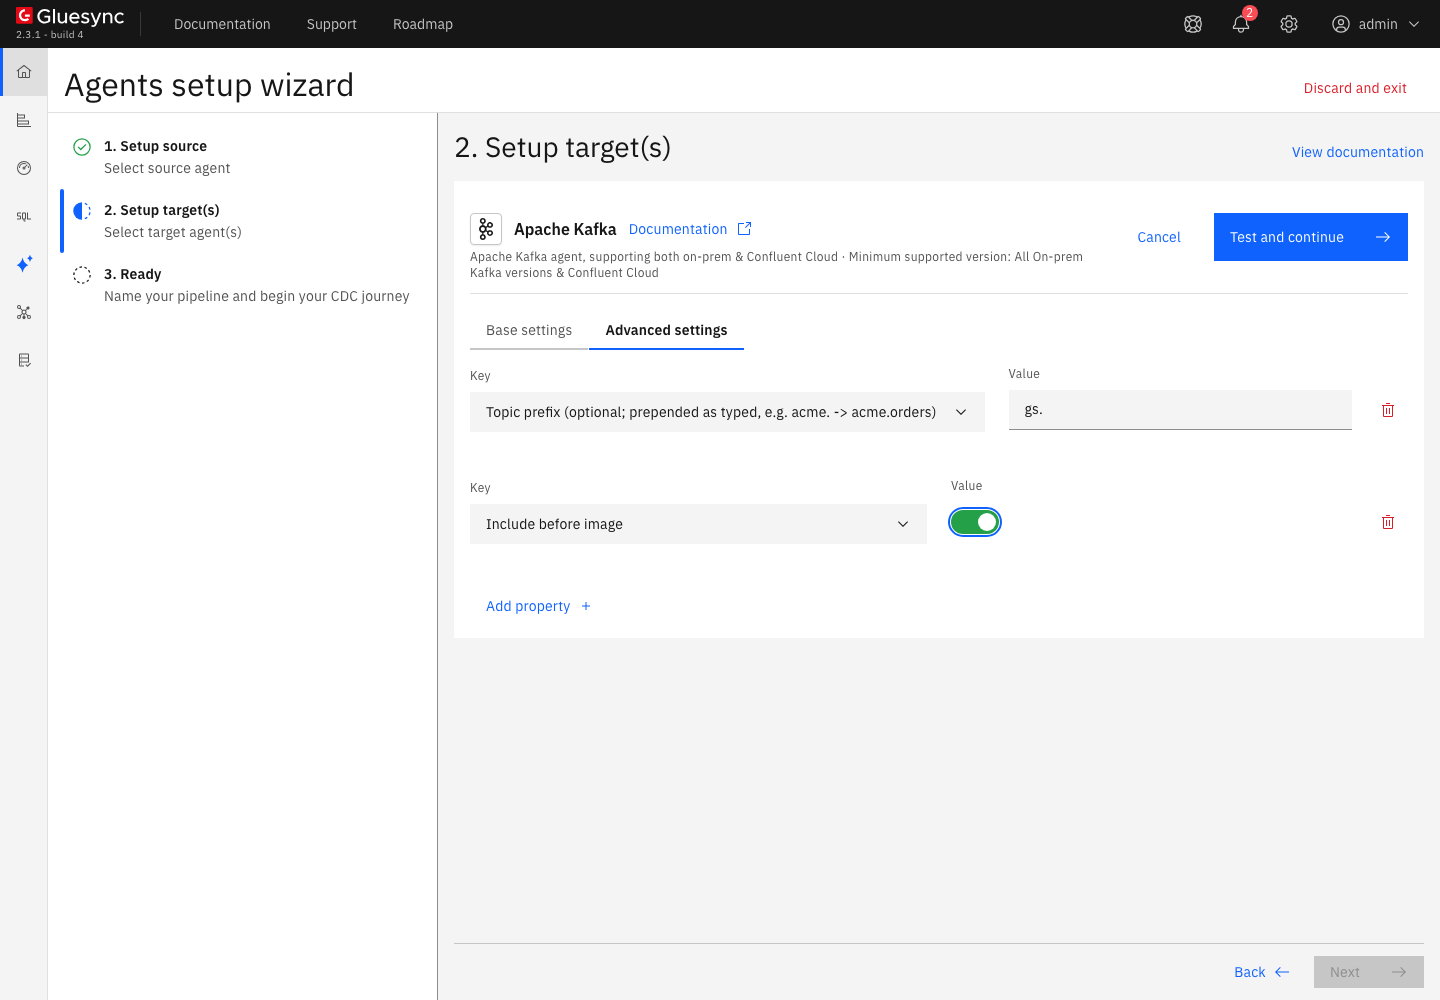
Open Advanced settings, select Add property, choose Topic prefix and enter
gs.as the value. Select Add property again, choose Include before image and switch it on; -
Select Test and continue. The target appears with a green check mark. Select Next, enter a Pipeline name and select Finish.
The agent adds no topic prefix to the message key. The prefix is only a part of the topic name, as acme. becomes acme.orders. Type the separator yourself. A prefix may contain letters, digits, ., _ and -, because that is what Kafka allows in a topic name. The Apache Kafka target reference describes every setting and the REST call for the same setup.
UI
-
In the pipeline, select Entities. The Add entities page opens with the Object browser. Expand the source schema
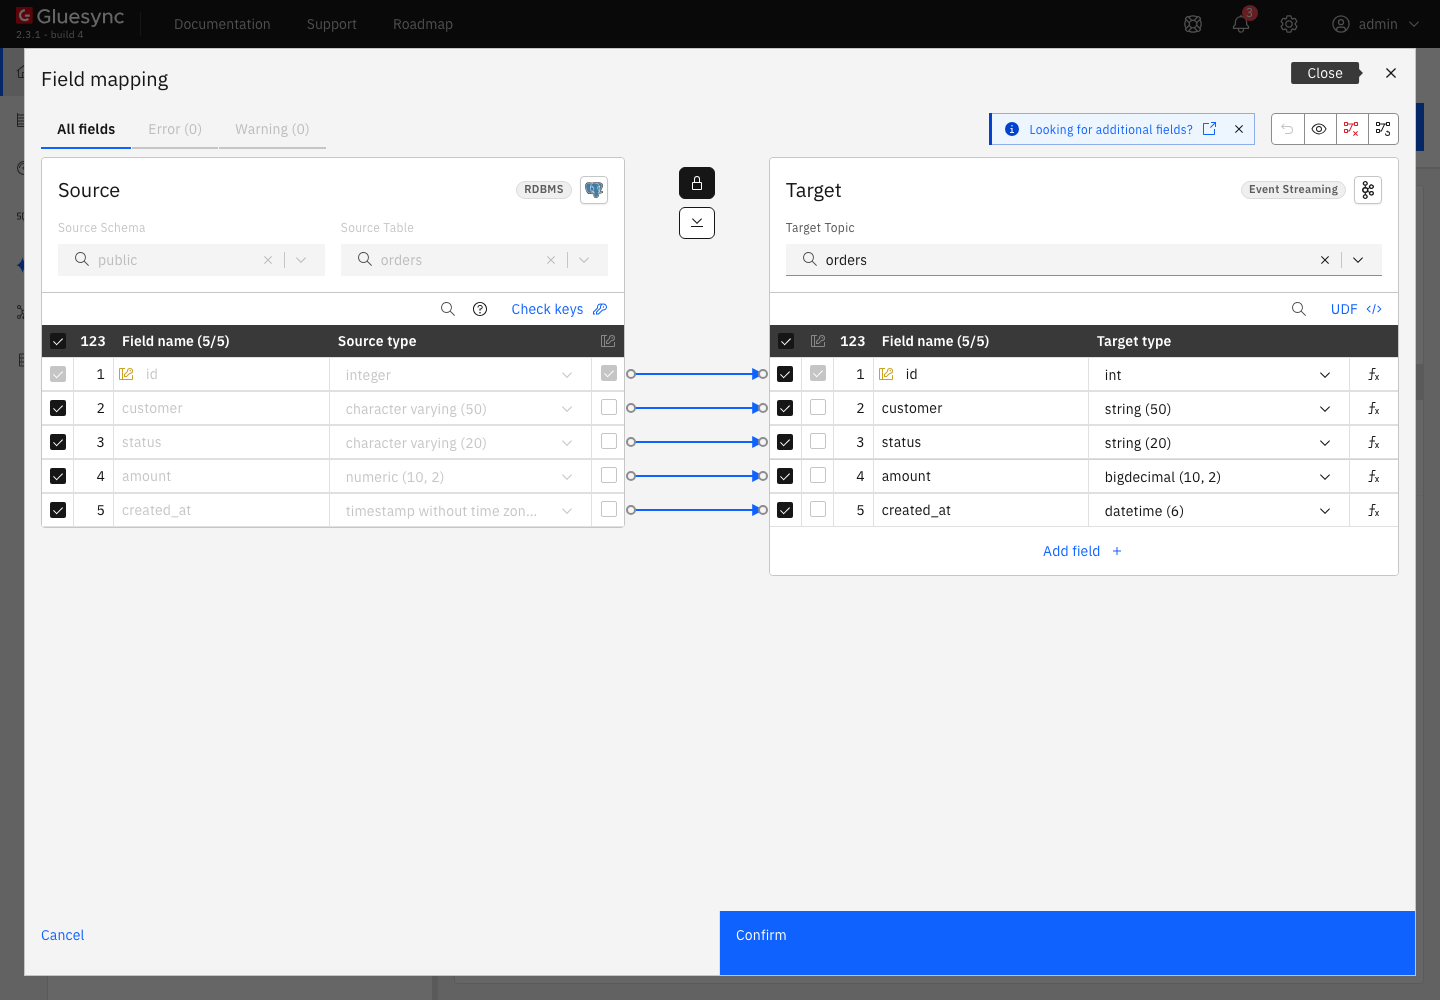
publicand select the tableorders. In Selected entities, select the mapping icon of the table. The Field mapping dialog opens; -
Look at the Target side. Target Topic is the topic name and it starts as the table name,
orders, without the schema. The topic the agent writes to is the prefix plus this name, heregs.orders. Leave it as it is; -
Select Confirm, then Confirm and continue.
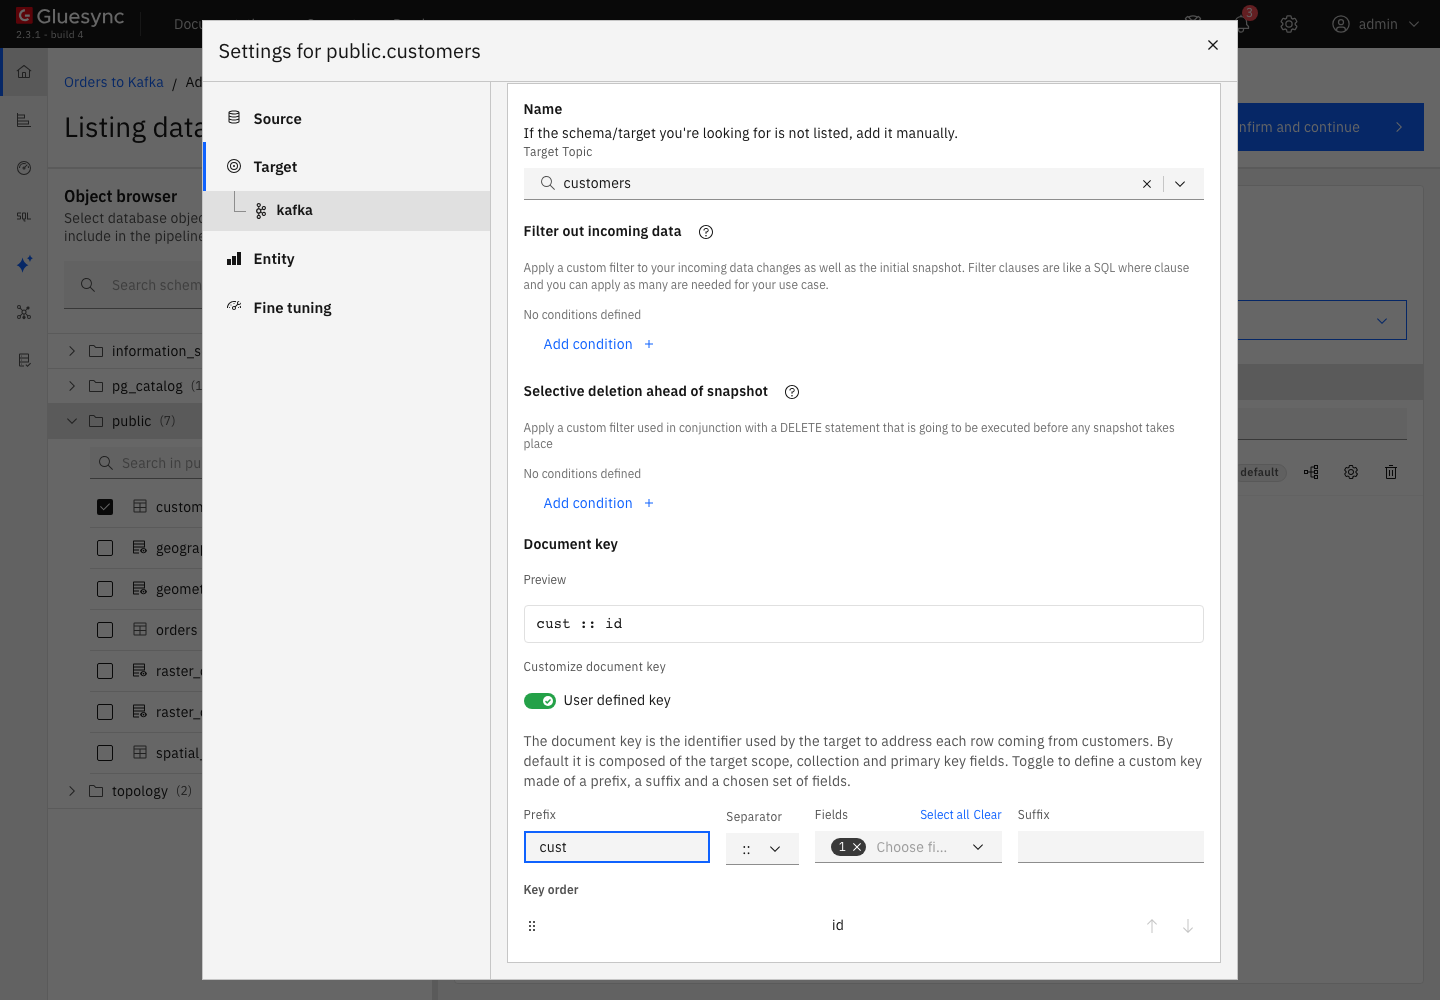
- Each message also carries a key, and Kafka uses the key to choose the partition. By default the key is the target name and the primary key, joined by
::, for exampleorders::1. The prefix of step 3 is not part of the key. To change it, select the gear icon of the table in Selected entities, select kafka under Target, and scroll to Document key. Switch off Default key to define a Prefix, a Separator, the Fields and a Suffix. The preview shows the result, for example `cust -
id`.
UI
-
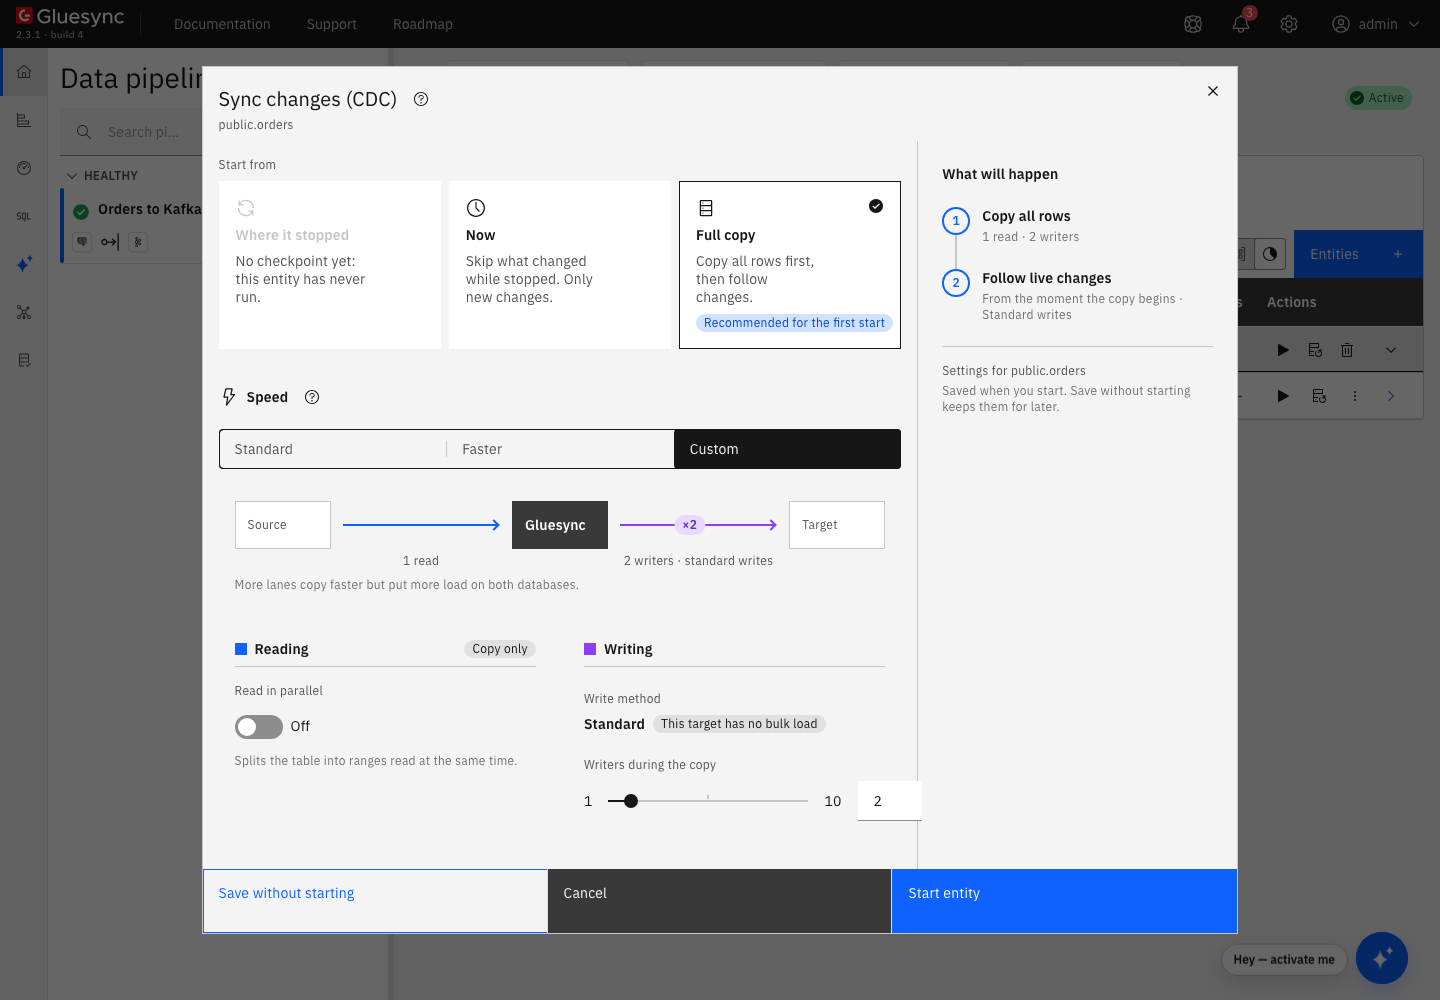
In the pipeline, select the play button of the entity. The Sync changes (CDC) dialog opens. Keep Start from on Full copy: it publishes all rows first and then follows the changes;
-
Select Speed, then Custom and See or change the details, to see how the agent writes. Write method shows Standard and says This target has no bulk load. Writers during the copy is the number of parallel writers,
2by default. Leave both as they are; -
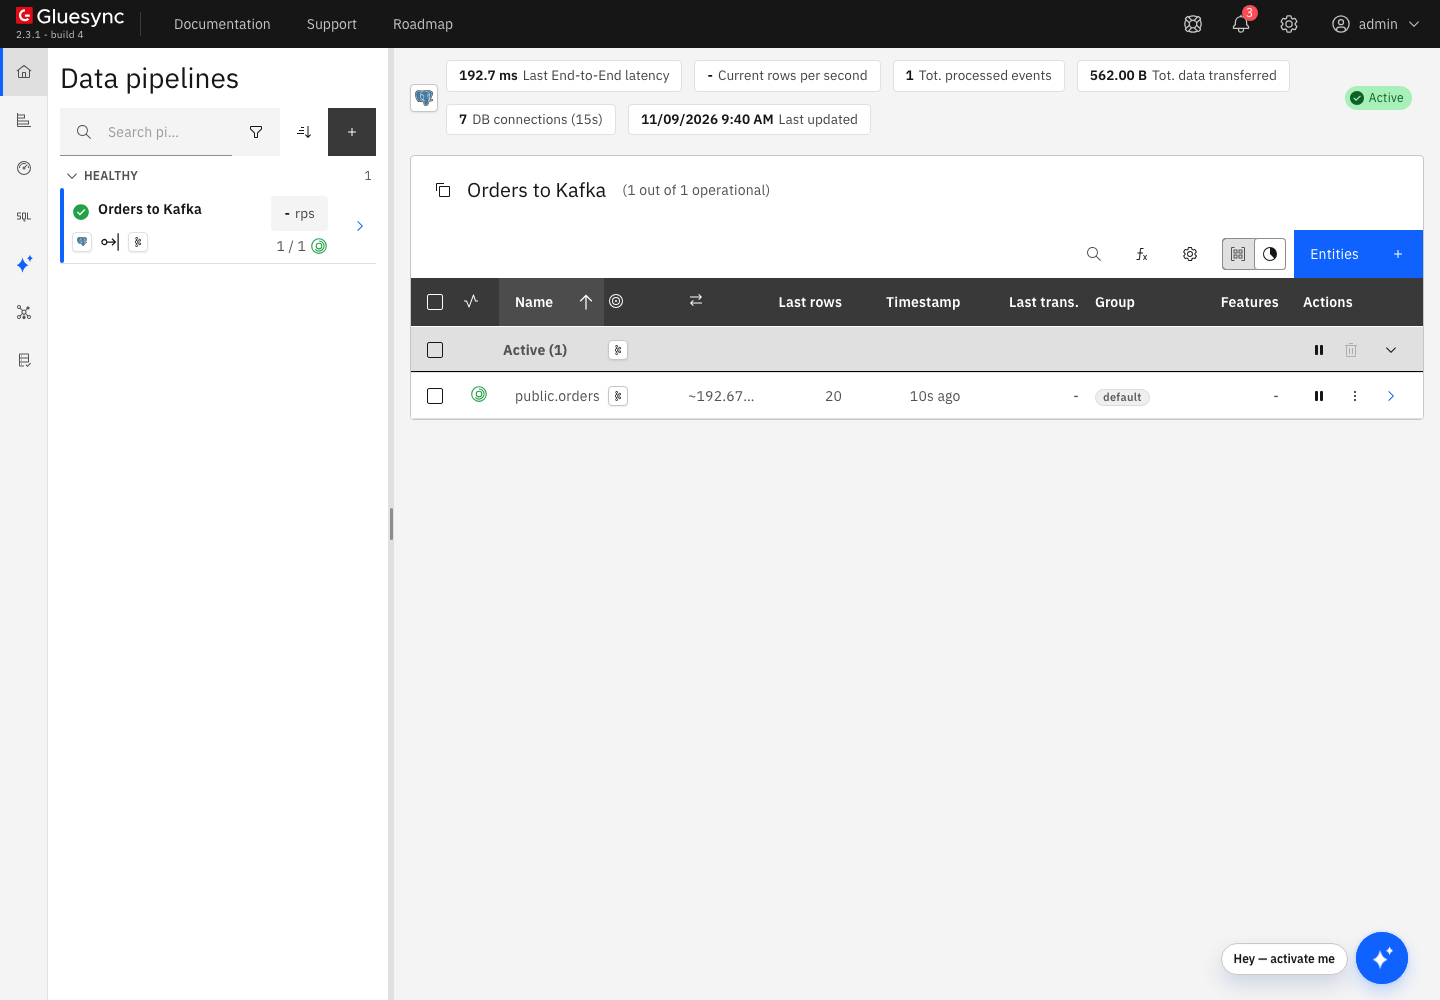
Select Start entity. The entity becomes Active and Last rows shows
20.
Check the number of messages on the broker. The three numbers are the end offsets of the three partitions, one for each line, and their sum must be the number of rows:
kafka-get-offsets.sh --bootstrap-server <broker-host>:9092 --command-config admin.properties \
--topic gs.ordersCLI
A consumer needs its own rights: Read on the topic, and Read on its consumer group. Create a reader that can only do that, so that you do not read with the administrator account:
kafka-configs.sh --bootstrap-server <broker-host>:9092 --command-config admin.properties \
  --alter --entity-type users --entity-name reader \
  --add-config 'SCRAM-SHA-256=[password=<a strong password>]'
kafka-acls.sh --bootstrap-server <broker-host>:9092 --command-config admin.properties \
  --add --allow-principal User:reader --operation Read --operation Describe \
  --topic gs. --resource-pattern-type prefixed
kafka-acls.sh --bootstrap-server <broker-host>:9092 --command-config admin.properties \
  --add --allow-principal User:reader --operation Read \
  --group console- --resource-pattern-type prefixed
Put the reader credentials in a file named reader.properties:
security.protocol=SASL_PLAINTEXT
sasl.mechanism=SCRAM-SHA-256
sasl.jaas.config=org.apache.kafka.common.security.scram.ScramLoginModule required username="reader" password="<password>";
Then read three messages from the start of the topic. The print.key and print.partition properties show the record key and the partition before each message:
kafka-console-consumer.sh --bootstrap-server <broker-host>:9092 \
  --consumer.config reader.properties \
  --topic gs.orders --from-beginning --max-messages 3 \
  --property print.key=true --property print.partition=true \
--property key.separator=' | 'The message is a JSON object with the same layout for every table:
| Field | Content |
|---|---|
|
The document key, the same text as the Kafka record key. |
|
The columns of the row after the change. It is missing for a delete. |
|
The columns of the row before the change. It only appears when Include before image is on. Snapshot rows have no previous state, so their before image lists every column with |
|
The primary key columns of the row. |
|
|
|
The time Gluesync built the message, as Unix time in seconds, in spite of the name. |
|
The source transaction id, as a text. Snapshot rows have none. |
Decimal values are written as text ("10.50") and timestamps as ISO text without a time zone. The data type mapping page lists the other types.
SQL + CLI
-
Run an insert, an update and a delete on the source:
INSERT INTO public.orders VALUES (21, 'Customer-21', 'NEW', 99.90, now()); UPDATE public.orders SET status = 'SHIPPED' WHERE id = 21; DELETE FROM public.orders WHERE id = 21; -
Read the whole topic and keep the lines of the key
orders::21. Use--from-beginning --timeout-ms 8000, and add| grep orders::21on the command line:kafka-console-consumer.sh --bootstrap-server <broker-host>:9092 \ --consumer.config reader.properties \ --topic gs.orders --from-beginning --timeout-ms 8000 \ --property print.key=true --property print.partition=true \ --property key.separator=' | ' | grep orders::21
For every delete the agent writes the delete message and then a tombstone with the same key. A consumer that rebuilds a table from the topic can treat the tombstone as the end of the key. On a compacted topic, Kafka removes the key itself after the topic’s delete retention time.
CLI
Kafka keeps order inside one partition and gives no order across partitions. The producer sends every message with its record key, and Kafka chooses the partition from the key. Every change of the key orders::21 therefore goes to the same partition, and a consumer sees them in the order of the source.
-
Read the partition of one key several times. The partition does not change:
kafka-console-consumer.sh --bootstrap-server <broker-host>:9092 \ --consumer.config reader.properties \ --topic gs.orders --from-beginning --timeout-ms 8000 \ --property print.key=true --property print.partition=true | grep orders::21 -
Plan the partition count before the first start. If you add partitions later, Kafka maps the same key to a partition by a different rule, so new messages of an existing key can land in another partition, and the order of that key is no longer guaranteed across the change.
|
During the snapshot, the agent writes with several writers (Writers during the copy). The rows of a snapshot therefore reach the topic in no fixed order. Rows have different keys, so this does not affect the order of the changes of one row. |
The agent delivers each message at least once. If a write fails and the entity retries, or if you start the entity with Full copy again, the same row can appear twice. Make consumers idempotent by key: apply the last message of each key, and do not count messages as rows.
UI
The producer settings are fixed in the agent. You change how much work each write does with the entity and snapshot settings:
| Setting | What it does |
|---|---|
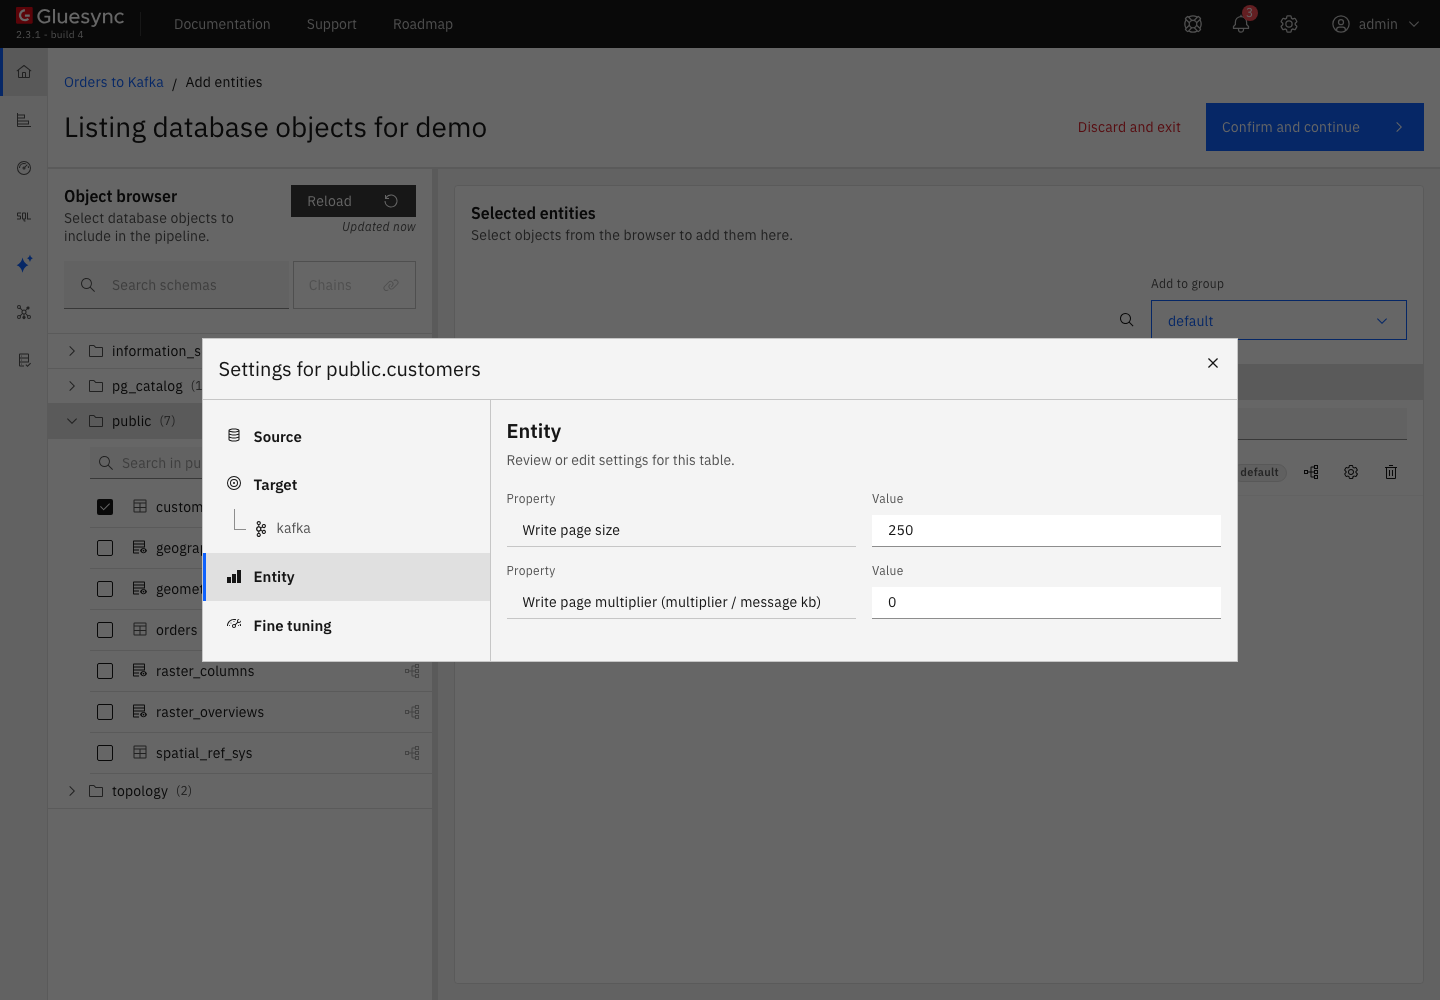
Write page size (entity settings, default |
The number of messages the agent builds and hands to the producer as one chunk. |
Write page multiplier (multiplier / message kb) (entity settings, default |
When it is more than |
Writers during the copy (start dialog, default |
The number of parallel writers during the snapshot. More writers copy faster and use more connections to the broker. |
Snapshot writing concurrency (entity Fine tuning) |
The number of writers for the entity. It is the setting behind Writers during the copy. |
To change the page size, open the settings of the table: in Selected entities, select the gear icon, then Entity. The change applies at the next start of the entity.
The agent publishes with a producer that batches: it waits up to 5 milliseconds, collects up to 256 KB for each partition, compresses with Snappy, and acknowledges with acks=1, the leader only. It never retries by itself: the entity retries a failed write. Because Kafka has no bulk load, the speed of the target is the speed of these batches and of your network and brokers. Read Tune replication throughput for the source side.
Use Transactions in the advanced settings of the target changes this. Each write then becomes a Kafka transaction, with idempotence and acks=all, so a consumer that reads with isolation.level=read_committed never sees a half-written page. The agent uses one transactional id for each entity, and it starts with gluesync-. The user needs the Write and Describe operations on those ids:
kafka-acls.sh --bootstrap-server <broker-host>:9092 --command-config admin.properties \
  --add --allow-principal User:gluesync \
  --operation Write --operation Describe \
  --transactional-id gluesync- --resource-pattern-type prefixed
To test it, open Edit target(s) as in step 10, select Advanced settings and Add property, choose Use Transactions, switch it on, select Test and continue, change a row, and read with --isolation-level read_committed in the consumer command.
UI
A listener with TLS uses the security protocol SASL_SSL (or SSL without SASL). The agent checks the broker certificate against a certificate store that you give it, and it does not check the host name in the certificate.
-
In the pipeline list, select the Kafka icon under the pipeline name. Edit target(s) opens;
-
Set Port to the TLS listener port, and Security Protocol to
SASL_SSL; -
In Security, under Upload 'certificate store' file, select Upload files to upload the file, or Use a path to give a path that Core Hub can read, for example
/certs/ca.pem. A PEM file holds the certificate of the CA that signed the broker certificate. Supported file types are pem, jks, json, txt, p8, cer, pfx, p12, key and crt; -
For a Java key store, select Add property under Advanced connection properties, choose Certificate Type and set it to
JKS. A Certificate store password field appears after you give the path. The default type isPEM; -
Select Test and continue.
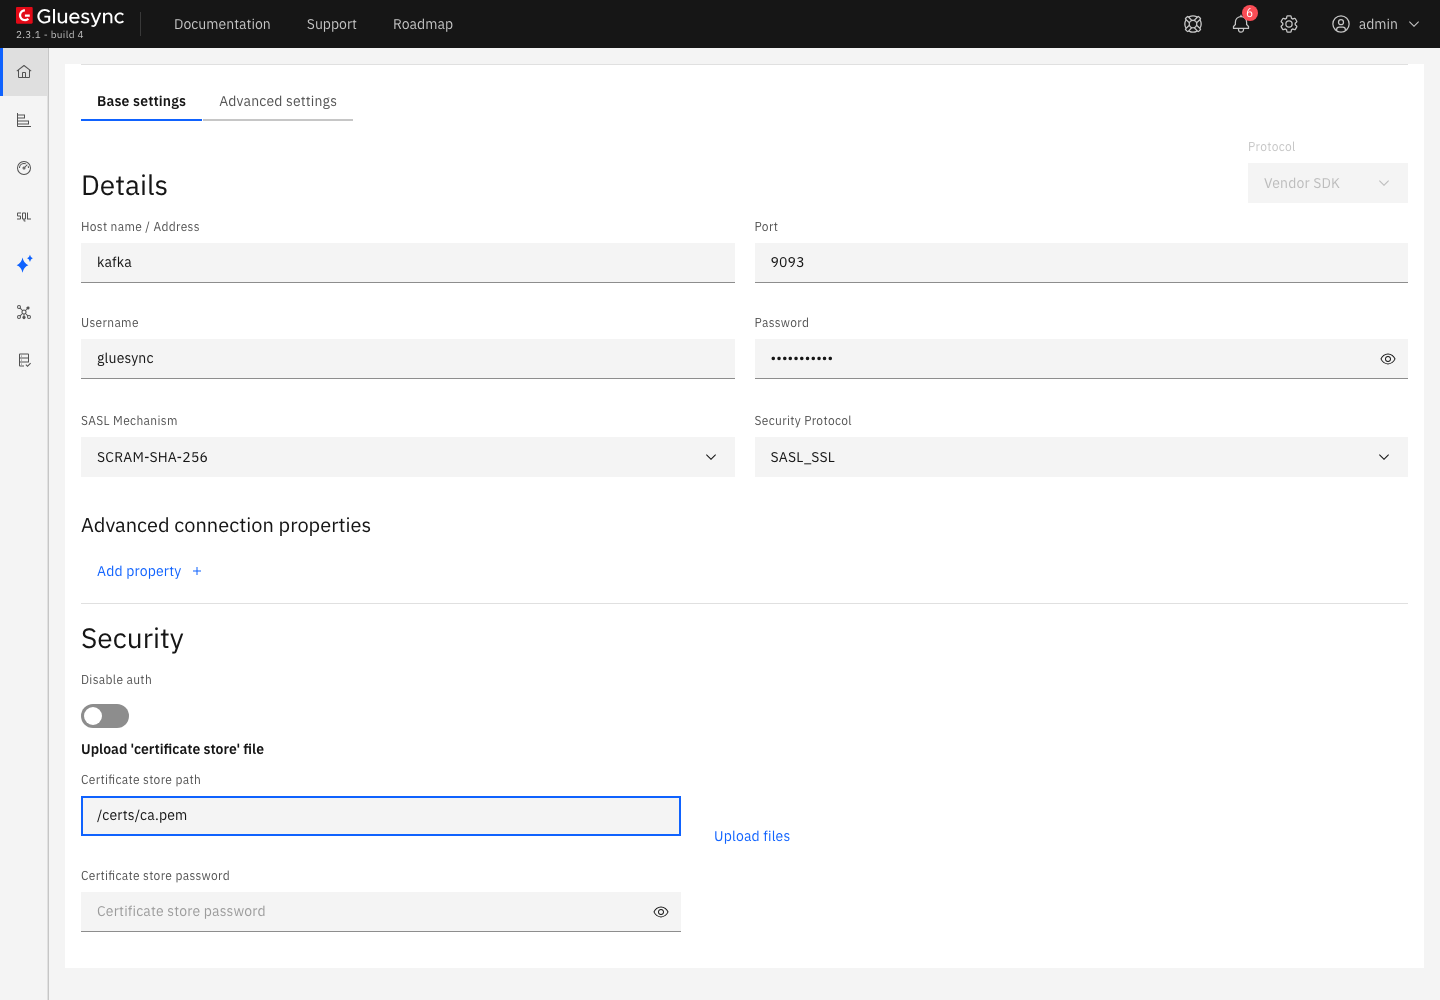
The Disable auth switch in the same page turns off SASL and uses no credentials. Use it only with a listener that does not ask for a login. The agent also supports Confluent Cloud, which this guide did not test. The Apache Kafka target reference lists the SASL mechanisms and security protocols the agent accepts.
CLI + UI
This step shows you the error that you will meet first if the access rules are wrong. Remove the write ACL, change a row, and watch the entity:
kafka-acls.sh --bootstrap-server <broker-host>:9092 --command-config admin.properties \
  --remove --allow-principal User:gluesync --operation Write \
  --topic gs. --resource-pattern-type prefixed --force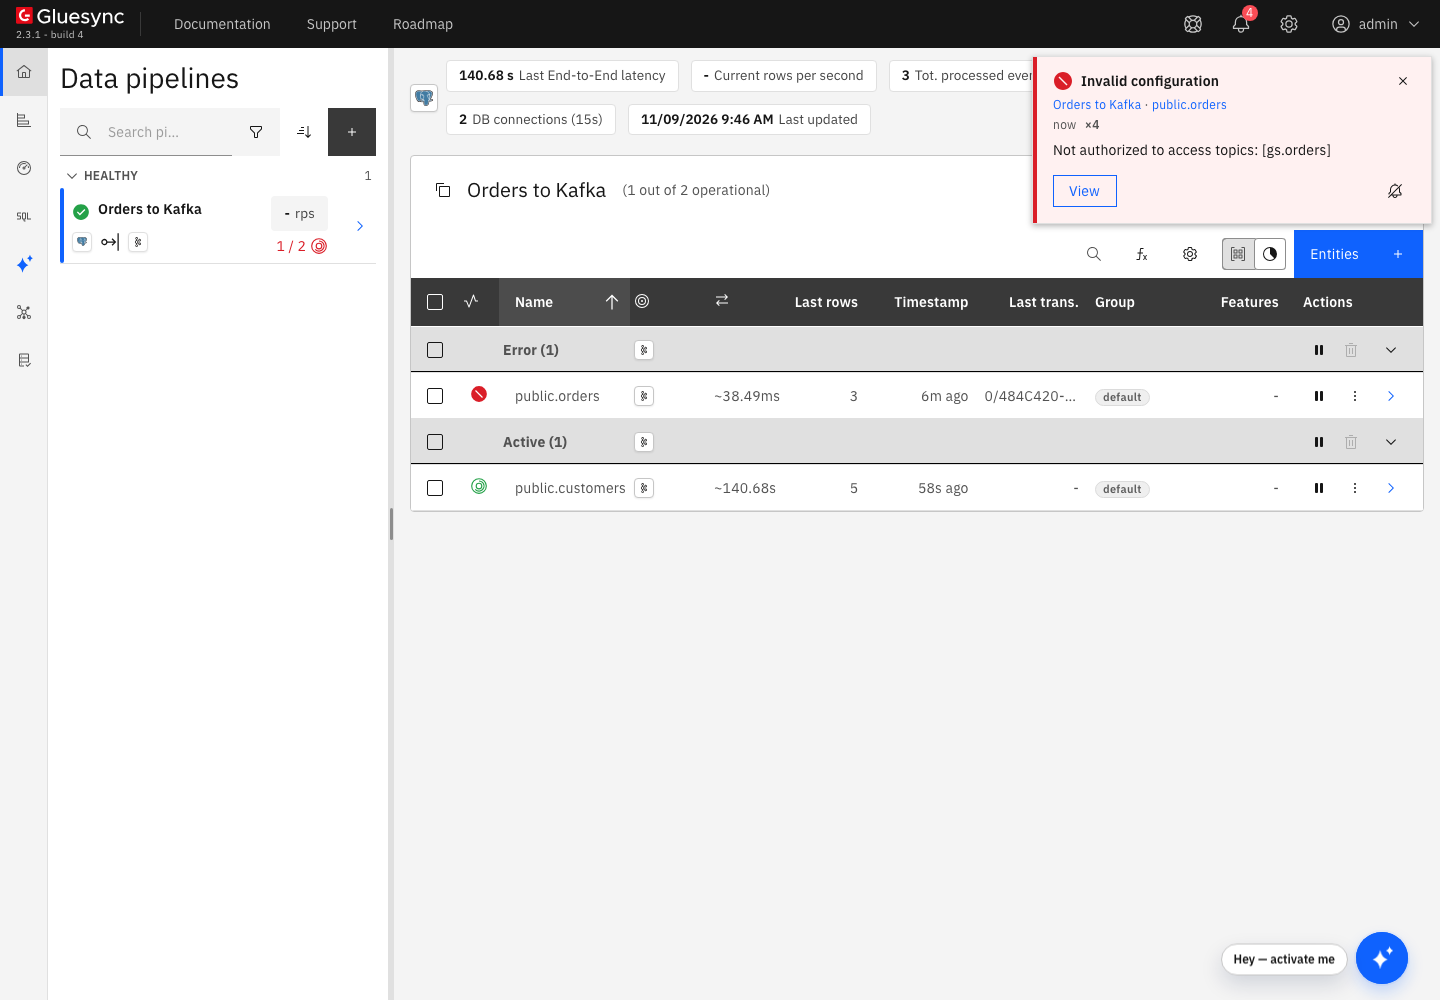
Add the ACL again with the command of step 1. The entity restarts by itself, and the change that failed is published.
Troubleshooting
| Problem | Possible cause | What to do |
|---|---|---|
Failed to save with |
The user does not exist, the password is wrong, or the user has no credential for the mechanism you chose |
Check the user with |
Test and continue waits about a minute and then fails with |
The agent cannot talk to the listener: the port is |
Check the port and the protocol of the listener in the |
Failed to save with |
The broker uses TLS and the agent has no certificate store, or the store does not hold the CA of the broker certificate |
Give the certificate store in Security (step 10). For a Java key store, also set Certificate Type to |
The entity goes to Error with Invalid configuration and |
The user has no |
Add the ACL for the new name, for example |
The entity stays in Snapshot with no rows, and the Core Hub log says |
The topic does not exist and the broker does not create topics automatically |
Create the topic (step 1) with |
The entity goes to Error with |
Use Transactions is on, and the user has no |
Add the ACL on the transactional id prefix |
|
You gave two SCRAM mechanisms in one |
Run the command once for each mechanism |
|
The reading user has no |
Add |
There are more messages than rows |
The snapshot ran twice, or the entity retried a page after an error. Delivery is at least once |
Expected. Make consumers apply the last message of each key. Recreate the topic before a clean start, and start with Full copy once |
|
The message comes from the snapshot, which has no previous state, or the source does not send old values |
For updates after the snapshot, run |
A consumer reads |
It is the tombstone that follows every delete |
Expected. Handle an empty value as the end of the key |
Related guides
Contact MOLO17 Support if you need assistance with a Kafka target.