Set up a Snowflake target with a least-privilege role
Gluesync writes to Snowflake through the Snowflake JDBC driver and a staging table. Each batch of rows goes to a staging table in a helper schema, and Snowflake then merges it into your table. This guide prepares a warehouse, a role and a user that hold only the grants Gluesync needs, signs the agent in with a programmatic access token (PAT) for an account that enforces multi-factor authentication (MFA), copies two PostgreSQL tables with a snapshot and CDC, and shows the statements that Gluesync runs in Snowflake. It also covers the type mapping choices that the Control Plane asks you to make, and the errors that a new setup is most likely to raise.
In this guide
You will create a warehouse, a role, a database schema for the data and a second schema for the staging tables. You will create a Snowflake user with an RSA key pair and a PAT, connect the Snowflake target, and choose a type for every column in the Field mapping dialog, including the length that Snowflake needs for text, VARIANT and binary columns. You will run a snapshot of 200,000 rows and live changes, check the row counts and the types in Snowflake, read the query history to see the PUT, COPY INTO and MERGE statements of each flush, and recover from the failures that are most likely on a new setup.
Quick information
Goal |
Replicate PostgreSQL tables to Snowflake with a snapshot, then keep them in sync with change data capture (CDC) |
Audience |
Data engineers and Snowflake administrators |
Level |
Intermediate |
Time required |
About 60 minutes |
Area |
Snowflake → SQL; Control Plane → Pipelines → Snowflake target → Base settings and Advanced settings; entity → Field mapping |
Applies to |
Gluesync 2.3 |
Before you begin
Make sure that:
-
You have a Snowflake account and a role that can create warehouses, roles, users and databases, such as
ACCOUNTADMIN. Snowflake is a target only: you need another database as the source. This guide was tested against a PostgreSQL 16 source and a live Snowflake account; -
Core Hub can reach your account host over HTTPS on port 443. The host looks like
<organization>-<account>.snowflakecomputing.com; -
You can run
opensslon a machine of your choice, to create an RSA key pair; -
The PostgreSQL source has logical replication on and the
wal2jsonoutput plugin installed. A plain PostgreSQL image without the plugin fails when you add an entity, withERROR: library "wal2json" may not be used as an output plugin; -
You can sign in to the Control Plane with a role that can create pipelines;
-
You have two source tables with a primary key. This guide uses
docsf.eventswith 200,000 rows (id bigintprimary key,kind varchar(20),val integer,amount numeric(12,2),created_at timestamp,note text) anddocsf.typed, a small table with one column of each common type.
|
The names in this guide are |
Guide steps
SQL
Gluesync does not need ACCOUNTADMIN. Sign in to Snowsight or snowsql as an administrator and run the statements below.
-
Create a small warehouse that suspends itself, and a role that can use it:
CREATE WAREHOUSE IF NOT EXISTS DOCSF_WH WAREHOUSE_SIZE = XSMALL AUTO_SUSPEND = 60 AUTO_RESUME = TRUE INITIALLY_SUSPENDED = TRUE; CREATE ROLE IF NOT EXISTS DOCSF_ROLE; GRANT USAGE ON WAREHOUSE DOCSF_WH TO ROLE DOCSF_ROLE; -
Create the database and let the role use it.
CREATE SCHEMAlets the agent create the staging schema when it needs one:CREATE DATABASE IF NOT EXISTS DOCSF_DB; GRANT USAGE, CREATE SCHEMA ON DATABASE DOCSF_DB TO ROLE DOCSF_ROLE; -
Create the schema that receives the data, and the staging schema. Give the role the right to read the schema and create tables in both:
CREATE SCHEMA DOCSF_DB.DOCSF;
GRANT USAGE, CREATE TABLE ON SCHEMA DOCSF_DB.DOCSF TO ROLE DOCSF_ROLE;

CREATE SCHEMA DOCSF_DB.GLUESYNC;
GRANT USAGE, CREATE TABLE ON SCHEMA DOCSF_DB.GLUESYNC TO ROLE DOCSF_ROLE;
The tables that Gluesync creates belong to the role, so the role needs no other grant on them. For tables that already exist and belong to another role, grant SELECT, INSERT, UPDATE, DELETE and TRUNCATE on them instead.
|
Create the schemas yourself. The Field mapping dialog lists only the schemas that the role can already see, and a new database has none for it: the Target Schema box stays empty and disabled until one exists. The staging schema |
SQL + CLI
A Snowflake account can enforce MFA for password sign-in, and a new user of such an account then cannot sign in with a password alone. A Gluesync target cannot answer an MFA prompt, so the agent signs in with a programmatic access token (PAT), which you put in the Password field. The target form also asks for a private key file, so you create an RSA key pair too.
-
Create the user and give it the role:
CREATE USER DOCSF_USER PASSWORD = '<a strong password>' MUST_CHANGE_PASSWORD = FALSE DEFAULT_ROLE = DOCSF_ROLE DEFAULT_WAREHOUSE = DOCSF_WH DEFAULT_NAMESPACE = DOCSF_DB; GRANT ROLE DOCSF_ROLE TO USER DOCSF_USER; -
Create a key pair. The private key is unencrypted PKCS#8, which is the format of the
.p8file that the target accepts:openssl genrsa 2048 | openssl pkcs8 -topk8 -inform PEM -out rsa_key.p8 -nocrypt openssl rsa -in rsa_key.p8 -pubout -out rsa_key.pub -
Register the public key on the user. Paste the lines of
rsa_key.pubwithout theBEGINandENDlines:ALTER USER DOCSF_USER SET RSA_PUBLIC_KEY = '<contents of rsa_key.pub without the header and footer>'; -
Create the PAT, restricted to the role of the agent. Snowflake requires a network policy for a user with a PAT. In a lab without one, the
MINS_TO_BYPASS_NETWORK_POLICY_REQUIREMENToption lets you create the token. In production, attach a network policy that allows the address of Core Hub, and leave the option out:ALTER USER DOCSF_USER ADD PROGRAMMATIC ACCESS TOKEN GLUESYNC_TOKEN ROLE_RESTRICTION = 'DOCSF_ROLE' DAYS_TO_EXPIRY = 90 MINS_TO_BYPASS_NETWORK_POLICY_REQUIREMENT = 480;
If your account does not enforce MFA for the user, the password of the user works in the Password field instead of a PAT. An existing user of the test account signed in with its password.
UI
-
In the Control Plane, select Create your first pipeline, or the + button of the pipeline list if you already have pipelines. The Agents setup wizard opens;
-
In 1. Setup source, choose the PostgreSQL CDC agent tile and fill Base settings: Host name / Address, Port, Database name, Username and Password of your source database. Select Test and continue, then Next;
-
In 2. Setup target(s), choose the Snowflake tile and fill Base settings:
-
Host name / Address: your account host, such as
myorg-myaccount.snowflakecomputing.com; -
Database name:
DOCSF_DB; -
Username:
DOCSF_USER; -
Password: the PAT of step 2;
-
Warehouse:
DOCSF_WH. The field starts asCOMPUTE_WH; -
Under Security, select Upload files and choose
rsa_key.p8. The form does not let you save until a file is uploaded. Leave Private Key Password empty for an unencrypted key;
-
-
Select Test and continue. The target appears with its user and host. Select Next, enter a Pipeline name and select Finish.
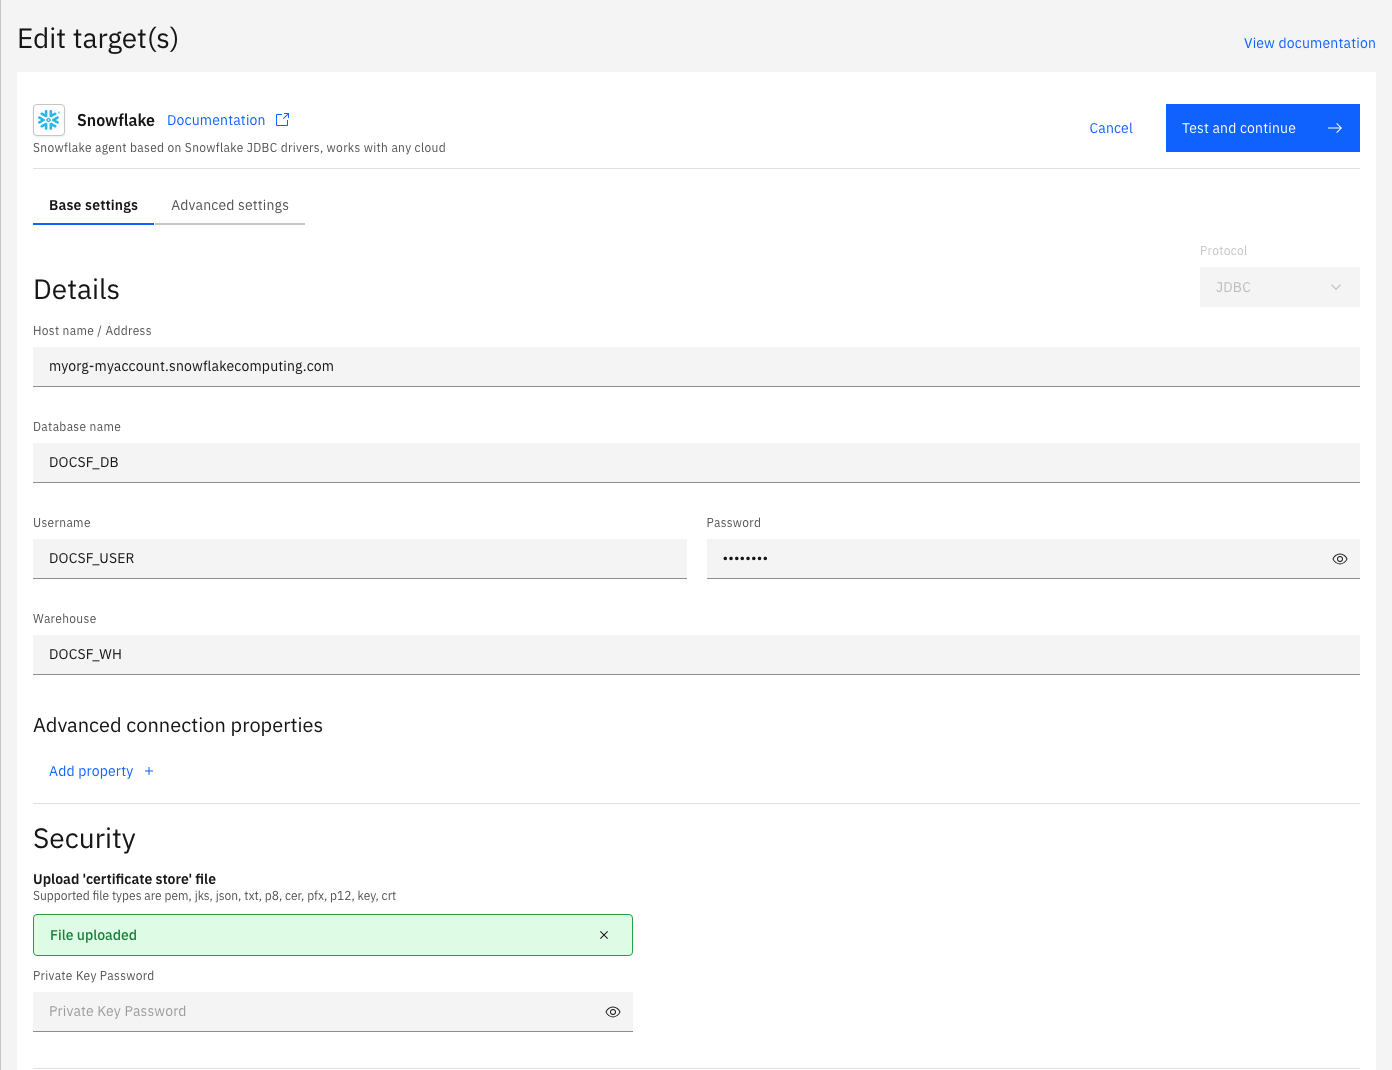
In the same form, Add property under Advanced connection properties offers three keys: Use connection pool, Gluesync schema name (necessary for bulk operations) and Disable automatic schema creation. Use the second one if you want a staging schema with another name than GLUESYNC. On the Advanced settings tab, Add property offers Disable truncate on target table before snapshot inserts.
UI
-
Open the pipeline and select *Entities *. The object browser lists the schemas of the source. Open `+docsf` and tick
events; -
The Field mapping dialog opens. Set Target Schema to
DOCSF. In Target Table, typeEVENTSand select Create table "EVENTS". Gluesync proposes a type for each column; -
Fix what the dialog marks. The
notecolumn ofeventsistext, and the dialog shows Missing required field until you give it a length. Snowflake text can hold up to 16,777,216 bytes: enter16777216in Length; -
Select Confirm. Gluesync shows the
CREATE TABLEstatement. Read it, then select Create table EVENTS. Gluesync runs it as your role; -
Do the same for
typed, with the types of the Data types section below, and unticktags. An array column cannot be loaded (step 8); -
Select Confirm and continue. The entities appear in the pipeline, on hold.
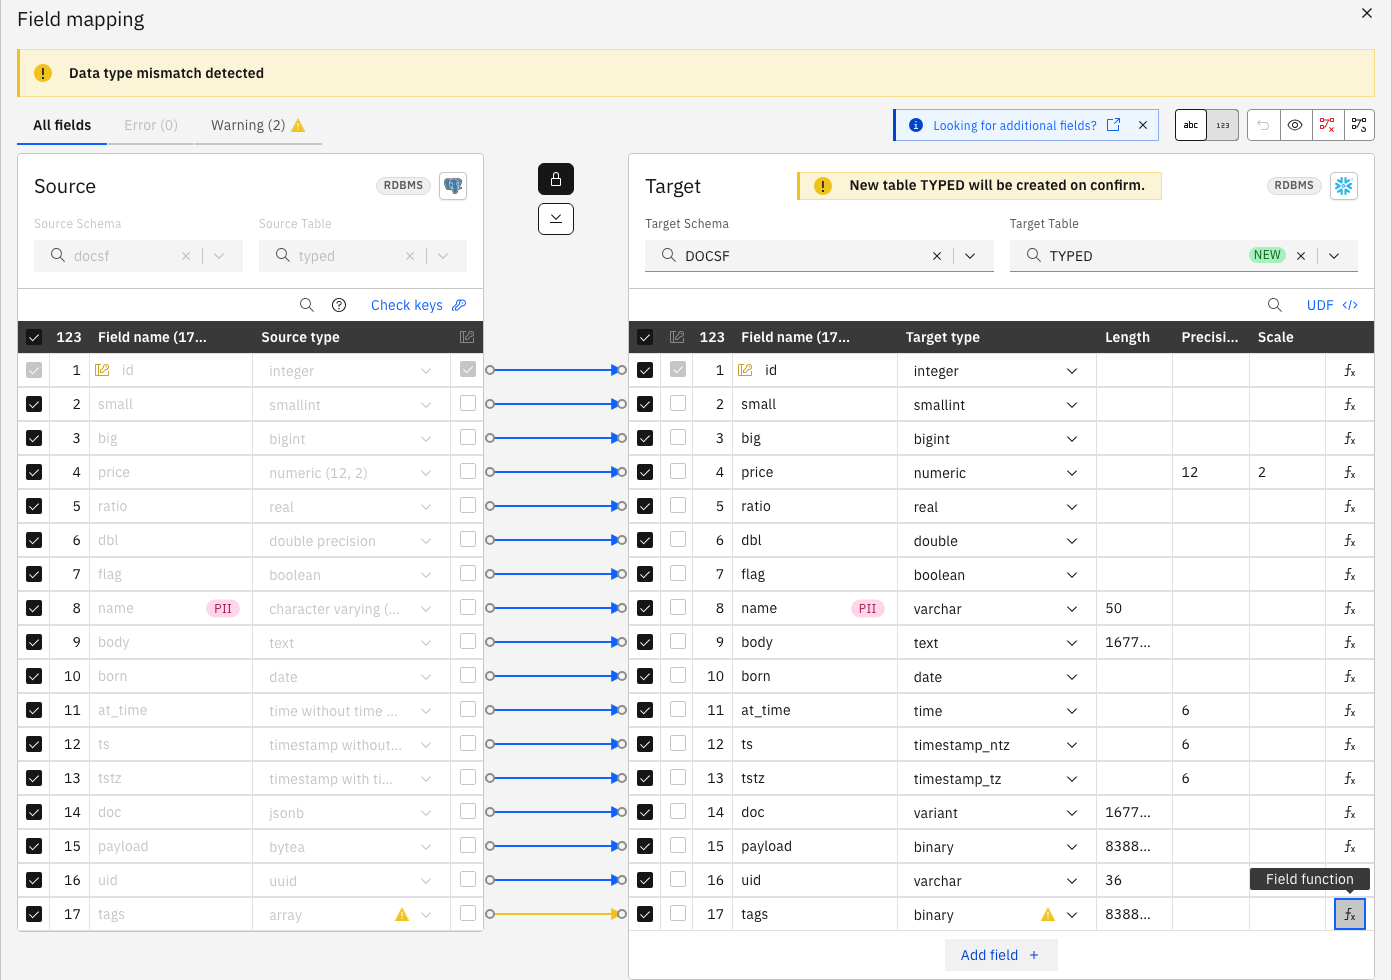
typed: every column that needs a length has one, and the two warnings are the array column.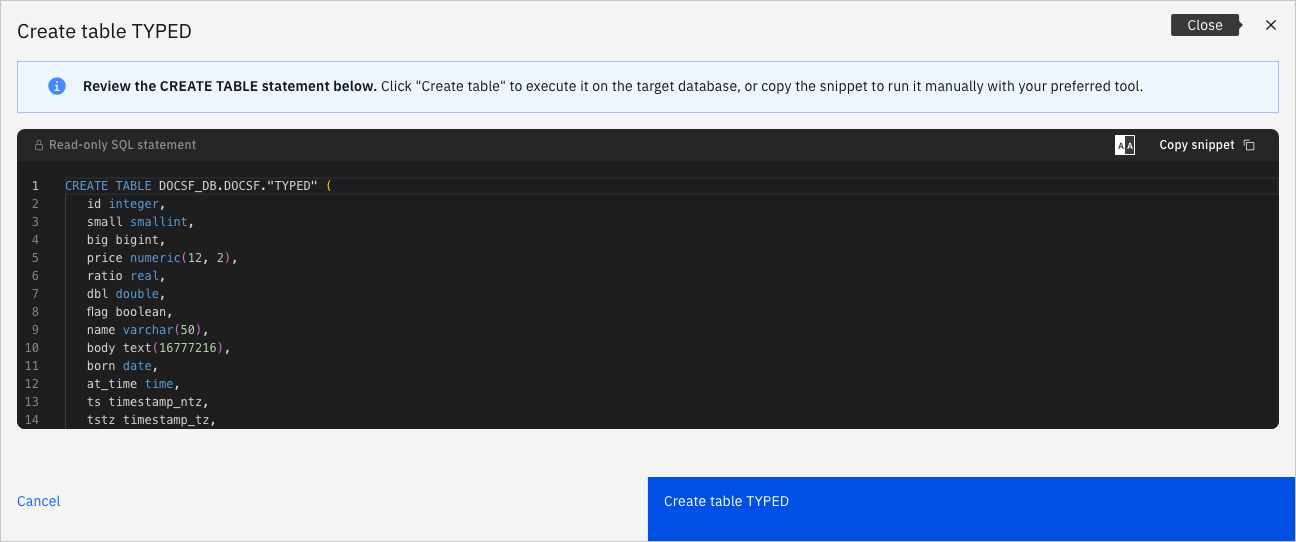
The save can take about 20 seconds because Gluesync prepares the staging tables. Wait for the pipeline page: if you select Confirm and continue again, you get every entity twice.
UI
-
In the row of
docsf.events, select the start icon. The Sync changes (CDC) dialog opens; -
Under Start from, keep Full copy, which the dialog recommends for the first start. Under Data already in the target, keep Keep and merge. Under Speed, keep Standard;
-
Select Start entity. Do the same for
docsf.typed.
The Faster and Custom speeds raise the number of parallel reads and writers during the copy. The Write method line of the Custom speed reads Standard and This target has no bulk load: the dialog has no bulk switch for Snowflake, and the agent always loads through the staging table.
UI + SQL
-
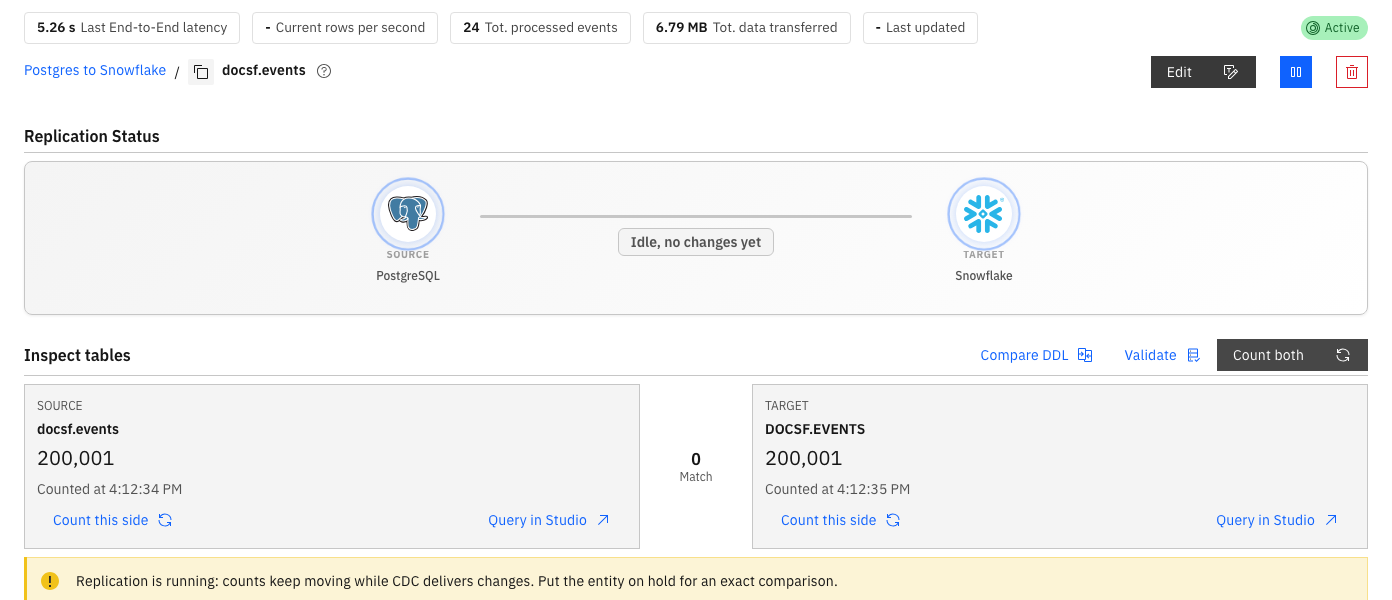
Open
docsf.eventsand select Count both under Inspect tables; -
In Snowflake, compare the counts and read a few rows:
SELECT COUNT(*) FROM DOCSF_DB.DOCSF.EVENTS; SELECT * FROM DOCSF_DB.DOCSF.TYPED ORDER BY ID; -
Read the query history of the user to see the statements of the flushes:
SELECT query_type, LEFT(query_text, 120) AS statement
FROM TABLE(DOCSF_DB.INFORMATION_SCHEMA.QUERY_HISTORY_BY_USER(USER_NAME => 'DOCSF_USER', RESULT_LIMIT => 200))
WHERE query_type IN ('PUT_FILES', 'COPY', 'MERGE', 'INSERT', 'TRUNCATE_TABLE')
ORDER BY start_time DESC;
SQL
-
In the source database, insert, update and delete rows:
INSERT INTO docsf.events VALUES (200001, 'click', 1, 1.5, now(), 'cdc insert'); UPDATE docsf.events SET val = -1, note = 'cdc update' WHERE id = 5; DELETE FROM docsf.events WHERE id = 6; UPDATE docsf.events SET kind = 'bulkupd' WHERE id BETWEEN 1000 AND 1999; -
After a few seconds, check Snowflake:
SELECT COUNT(*) FROM DOCSF_DB.DOCSF.EVENTS;
SELECT id, val, note FROM DOCSF_DB.DOCSF.EVENTS WHERE id IN (5, 6, 200001);
SELECT COUNT(*) FROM DOCSF_DB.DOCSF.EVENTS WHERE kind = 'bulkupd';
SQL + UI
Each error below was reproduced on a live account. The messages are quoted as the Control Plane shows them.
-
Sign in as a new user with a password. The target fails to save with Host Credentials Update Failed and
Failed to initialize pool: Multi-factor authentication is required for this account. Log in to Snowsight to enroll.Fix: create a PAT (step 2) and paste it into Password; -
Use a wrong password or token. The message is
Failed to initialize pool: Incorrect username or password was specified.In the tests, the target always signed in with the value of Password: a valid key, registered on the user and uploaded, did not replace a password that MFA refused; -
Set Warehouse to a name that does not exist. The connection is saved, and the page shows Host Credentials Update Failed:
The connection was saved, but agent <id> of pipeline <id> did not accept the new credentials: No active warehouse selected in the current session. Select an active warehouse with the 'use warehouse' command.Fix: use the name of a warehouse that the role can use. Select Test and continue again after the fix; -
Set Database name to one that does not exist. The message is
... did not accept the new credentials: Cannot perform SELECT. This session does not have a current database. Call 'USE DATABASE', or use a qualified name.; -
Set Host name / Address to an account that does not exist. The message is
... did not accept the new credentials: Failed to initialize pool: JDBC driver encountered communication error. Message: HTTP status=404.; -
Open the Field mapping dialog when the role sees no schema. The Target Schema and Target Table boxes stay disabled, and the Schemas Fetch answer is empty. Fix: create the schema and grant
USAGEandCREATE TABLEon it (step 1); -
Map a
textcolumn and leave the length at 0. The dialog shows Missing required field, and Confirm stays disabled. The same holds forvarchar,variantandbinarycolumns that the dialog proposes with a length of 0: enter a length. The maximum is 16,777,216 for text andVARIANT, and 8,388,608 for binary; -
Map a PostgreSQL array column (
text[]) toarrayor tovarchar. The dialog shows Incompatible data types and does not let you confirm. Onlybinaryis accepted, with a warning. Then the snapshot of the entity stops with Target write failed:The following string is not a legal hex-encoded value: 'a, b'plus the file, line and column. Fix: open the entity menu, select Edit mapping, untick the array column, and select Confirm and then Confirm and continue. Start the entity again; -
Add entities when the staging schema does not exist. The page shows The entity could not be saved and the notification Entity Upsert Failed:
SQL compilation error: Schema 'DOCSF_DB.GLUESYNC' does not exist or not authorized. Your primary role DOCSF_ROLE must have USAGE or any other privilege granted on SCHEMA DOCSF_DB.GLUESYNC.The agent creates the staging schema only when an entity has bulk operations switched on, and the Control Plane has no such switch for Snowflake. Fix: create the schema and grant it to the role (step 1), or the same with the name that you set in Gluesync schema name (necessary for bulk operations).

Data types
The proposal of the Field mapping dialog for a PostgreSQL source, and what Snowflake stored. You can change each type in the dialog from the list of Snowflake types that the agent supports: tinyint, byteint, smallint, int, integer, bigint, real, float4, float, float8, double, doubleprecision, decimal, numeric, number, boolean, varchar, char, character, text, string, variant, object, array, geography, geometry, binary, varbinary, vector, date, time, timestamp_ltz, timestamp_tz, datetime, timestamp and timestamp_ntz.
| Source type | Snowflake type | Note |
|---|---|---|
|
|
Snowflake keeps every integer type as |
|
|
Precision and scale kept |
|
|
Both become |
|
|
Kept |
|
|
Length kept |
|
|
Enter 16777216 as the length |
|
|
Kept |
|
|
Microseconds kept: |
|
|
The value is stored at offset 0: |
|
|
Set the type to |
|
|
Enter a length up to 8388608. The bytes are kept ( |
|
|
Set the length to 36 |
Arrays such as |
none that loads |
Only |
Bulk and throughput settings
The agent loads every single-table entity through the staging table. These settings change how fast it does that.
| Setting | Default | When to change it |
|---|---|---|
Speed in the start dialog |
Standard |
Use Faster or Custom for a large first copy. More parallel reads and writers copy faster and put more load on both databases |
Max Write Batch Size (entity Entity tab) |
100000 |
Rows of one write |
Max Delete Batch Size (entity Entity tab) |
1000 |
Rows of one delete |
Max Write Bulk Size (entity Entity tab) |
250000 |
Rows of one bulk write |
Warehouse (target) |
|
A larger warehouse runs each |
Use connection pool (target property) |
On |
Switch it off only for a test. The agent warns that the performance is lower |
Read Tune replication throughput for the settings that apply to every target. The agent writes through the user stage of the Gluesync user. A load that fails leaves its file there, so clean it with REMOVE @~ as that user if the stage grows.
Troubleshooting
| Problem | Possible cause | What to do |
|---|---|---|
Host Credentials Update Failed with |
The user signs in with a password and the account enforces MFA |
Create a programmatic access token for the user and put it in Password |
|
The user name, the password or the token is wrong, or the token expired |
Check the user, and create a new PAT if needed |
|
Warehouse names a warehouse that does not exist |
Set Warehouse to a warehouse the role can use, then select Test and continue |
|
Database name names a database that does not exist |
Fix the name, then select Test and continue |
|
Host name / Address is not an existing account host |
Use the host |
Target Schema and Target Table are disabled in Field mapping |
The role sees no schema in the database |
Create the schema and grant |
Missing required field on a |
The length is 0 |
Enter the length: 16777216 for text and |
Incompatible data types on an array column |
PostgreSQL arrays have no Snowflake type that Gluesync accepts, except binary |
Untick the column |
Target write failed: |
An array column is mapped to |
Edit the mapping and untick the column |
Entity Upsert Failed: |
The staging schema is missing, or the role cannot use it |
Create the schema and grant |
|
The PostgreSQL source does not have the |
Install |
Every entity appears twice after you add entities |
You selected Confirm and continue again while the first save was still running |
Delete the duplicates with Delete entity in the entity menu, and wait for the pipeline page next time |
Related guides
Contact MOLO17 Support if you need assistance with a Snowflake target.