Set up a MongoDB change streams source
The MongoDB agent reads changes with MongoDB change streams. A change stream needs a replica set, and Gluesync needs a user that can read the collection, open a change stream and run collMod on it. This guide shows how to check the replica set, create that user, connect Gluesync, copy a collection to PostgreSQL with a snapshot and CDC, stop and resume the entity, and recognize the errors you get when the replica set, the rights, the oplog or the document types do not fit.
In this guide
You will check that MongoDB runs as a replica set, create a role and a user for Gluesync, create the connection, map a collection to a PostgreSQL table, start a snapshot and CDC, check inserts, updates and deletes on the target, and stop and resume the entity. You will also see how the oplog window limits a resume, and what to do when it is too short. A symptom, cause and fix table closes the guide.
Quick information
Goal |
Replicate a MongoDB collection to a PostgreSQL table and confirm inserts, updates and deletes |
Audience |
Data engineers and MongoDB administrators |
Level |
Intermediate |
Time required |
About 45 minutes |
Area |
Control Plane → Data pipelines → Entities; |
Applies to |
Gluesync 2.3 |
Before you begin
Make sure that:
-
You have a MongoDB server that Core Hub can reach on port
27017by default. This guide was tested with MongoDB 8.0.3 as a one-node replica set with access control on; -
You can run
mongoshas an administrator of the server; -
You have a PostgreSQL database that Core Hub can reach, and a user that can create tables in it. The target is only there to check the result, any target works;
-
You can sign in to the Control Plane with a role that can create pipelines.
|
A standalone MongoDB server has no change streams, so Gluesync cannot capture changes from it. It can still run a snapshot, see A standalone server. The reference page MongoDB CDC with Gluesync: Change Streams Setup lists every connection option, MongoDB Atlas included. |
Guide steps
CLI
-
Connect to the server with
mongoshand run:rs.status().members.map(m => m.name + " " + m.stateStr) -
If the answer is an error, the server is standalone. Start
mongodwith the--replSetoption (or setreplication.replSetNamein the configuration file), then initiate a one-node set:rs.initiate({ _id: "rs0", members: [{ _id: 0, host: "<host>:27017" }] })With access control on, the members of a replica set also need a key file (the
--keyFileoption) or X.509 certificates.
CLI
Gluesync reads documents, opens a change stream on each collection that runs CDC, and, when an entity starts, runs collMod on that collection to turn on changeStreamPreAndPostImages. MongoDB then keeps the before and after image of each change, which Gluesync needs to read the document of a delete and to read the old and new values of an update. This costs storage on the source, and it is only turned on for the collections that run CDC. The collMod command is reserved to the dbAdmin role or to a custom role.
-
Sign in as an administrator and create a custom role. This is the role of the reference page: it reads and writes any database and may run
collMod:db.getSiblingDB("admin").runCommand({ createRole: "GluesyncUserRole", privileges: [ { resource: { db: "", collection: "" }, actions: [ "collMod" ] } ], roles: [ { role: "readWriteAnyDatabase", db: "admin" } ] }) -
For a source that only reads, a narrower role is enough. In our test this role let Gluesync browse the collections, run the snapshot, enable the images and follow the change stream. We did not test with fewer actions. Replace
shopwith your database:db.getSiblingDB("admin").runCommand({ createRole: "GluesyncSourceRole", privileges: [ { resource: { db: "shop", collection: "" }, actions: [ "find", "changeStream", "collMod", "listCollections", "listIndexes", "collStats", "dbStats" ] } ], roles: [] }) -
Create the user in the
admindatabase, with the role you chose:db.getSiblingDB("admin").createUser({ user: "gluesync", pwd: "<a strong password>", roles: [ { role: "GluesyncSourceRole", db: "admin" } ] })
|
The user lives in the |
CLI
Skip this step if you already have a collection and a table. The sample collection has a nested document, to show what Gluesync does with it. The PostgreSQL table is created first, so that the field mapping reads its types.
-
In
mongosh, create the collection:db = db.getSiblingDB("shop"); db.orders.insertMany([ { _id: 1, customer: "Acme Spa", status: "new", amount: 1500.50, quantity: 3, paid: true, created_at: new Date("2026-11-01T10:00:00Z"), tags: ["a", "b"], address: { city: "Milan", zip: "20100" } }, { _id: 2, customer: "Globex", status: "paid", amount: 99.99, quantity: 1, paid: false, created_at: new Date("2026-11-01T11:15:00Z") } ]); -
On the PostgreSQL database, create the table:
CREATE TABLE public.orders (
  _id integer PRIMARY KEY, customer varchar(100), status varchar(20),
  amount double precision, quantity integer, paid boolean,
  created_at timestamp(3), tags text[], address jsonb);
|
Give every field of a collection one BSON type. Gluesync reads a sample of documents to decide the type of a field. A field that holds an integer in one document and a double in the next stops the entity, see the troubleshooting table. In |
UI
-
Open Data pipelines;
-
Select the + button (Create pipeline), or Create your first pipeline on a new installation. The Agents setup wizard opens on 1. Setup source;
-
In Search, type
mongoand select the MongoDB CDC agent tile under NoSQL. The form that opens is titled MongoDB;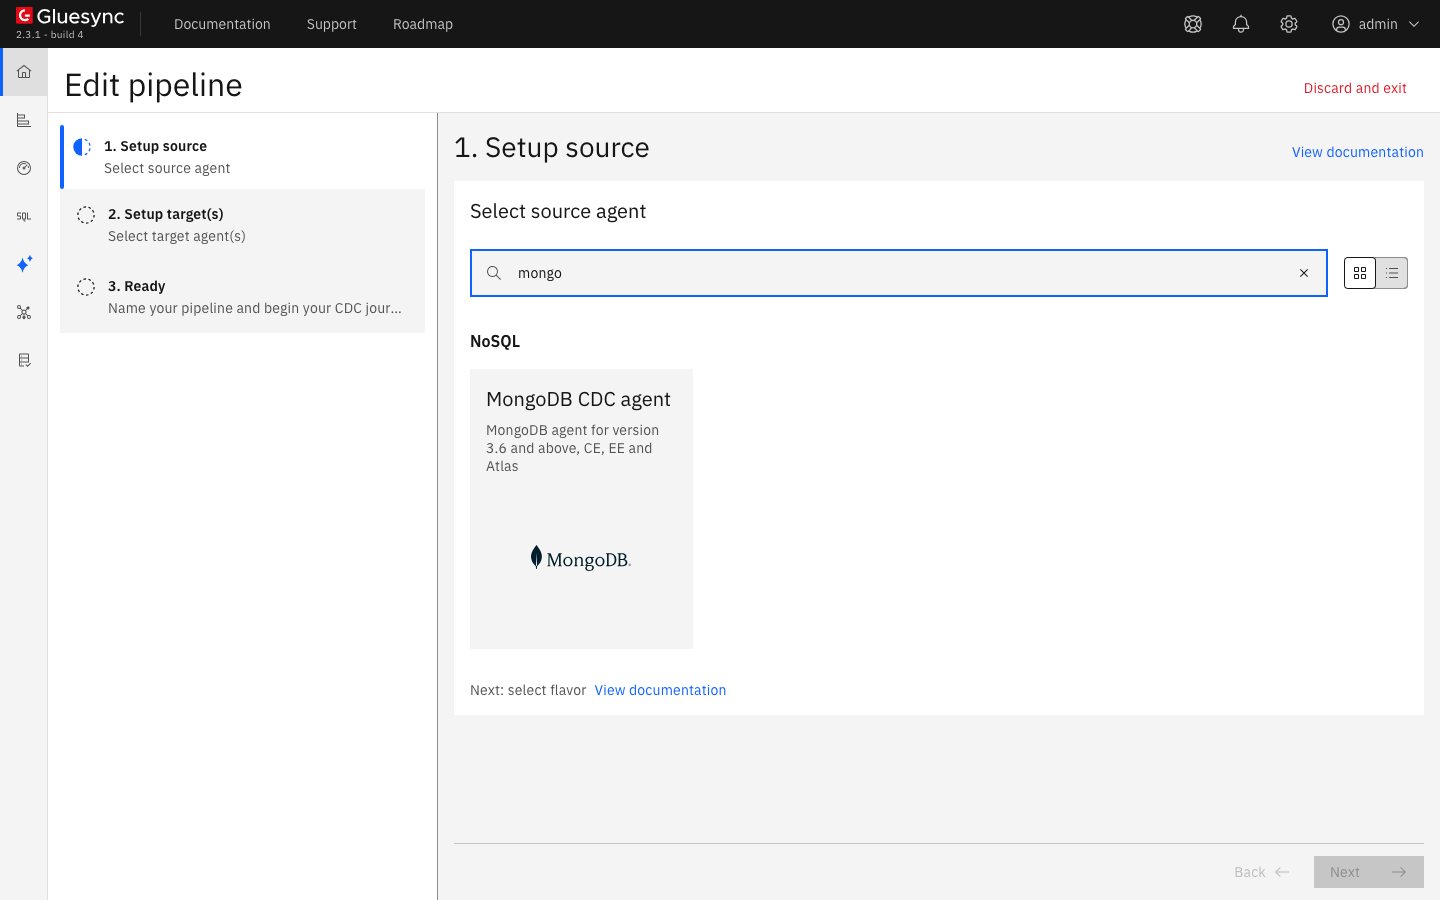
-
Enter Host name / Address, Port (
27017), Database name (the database that holds the collections,shophere), Username and Password; -
Under Advanced connection properties, select Add property, pick
Auth Databasein Key and enteradminin Value. The other keys are Connection Timeout Seconds, Read Timeout Seconds, Use Dns Seed List (for an Atlas SRV address), Replica Set and Direct connection;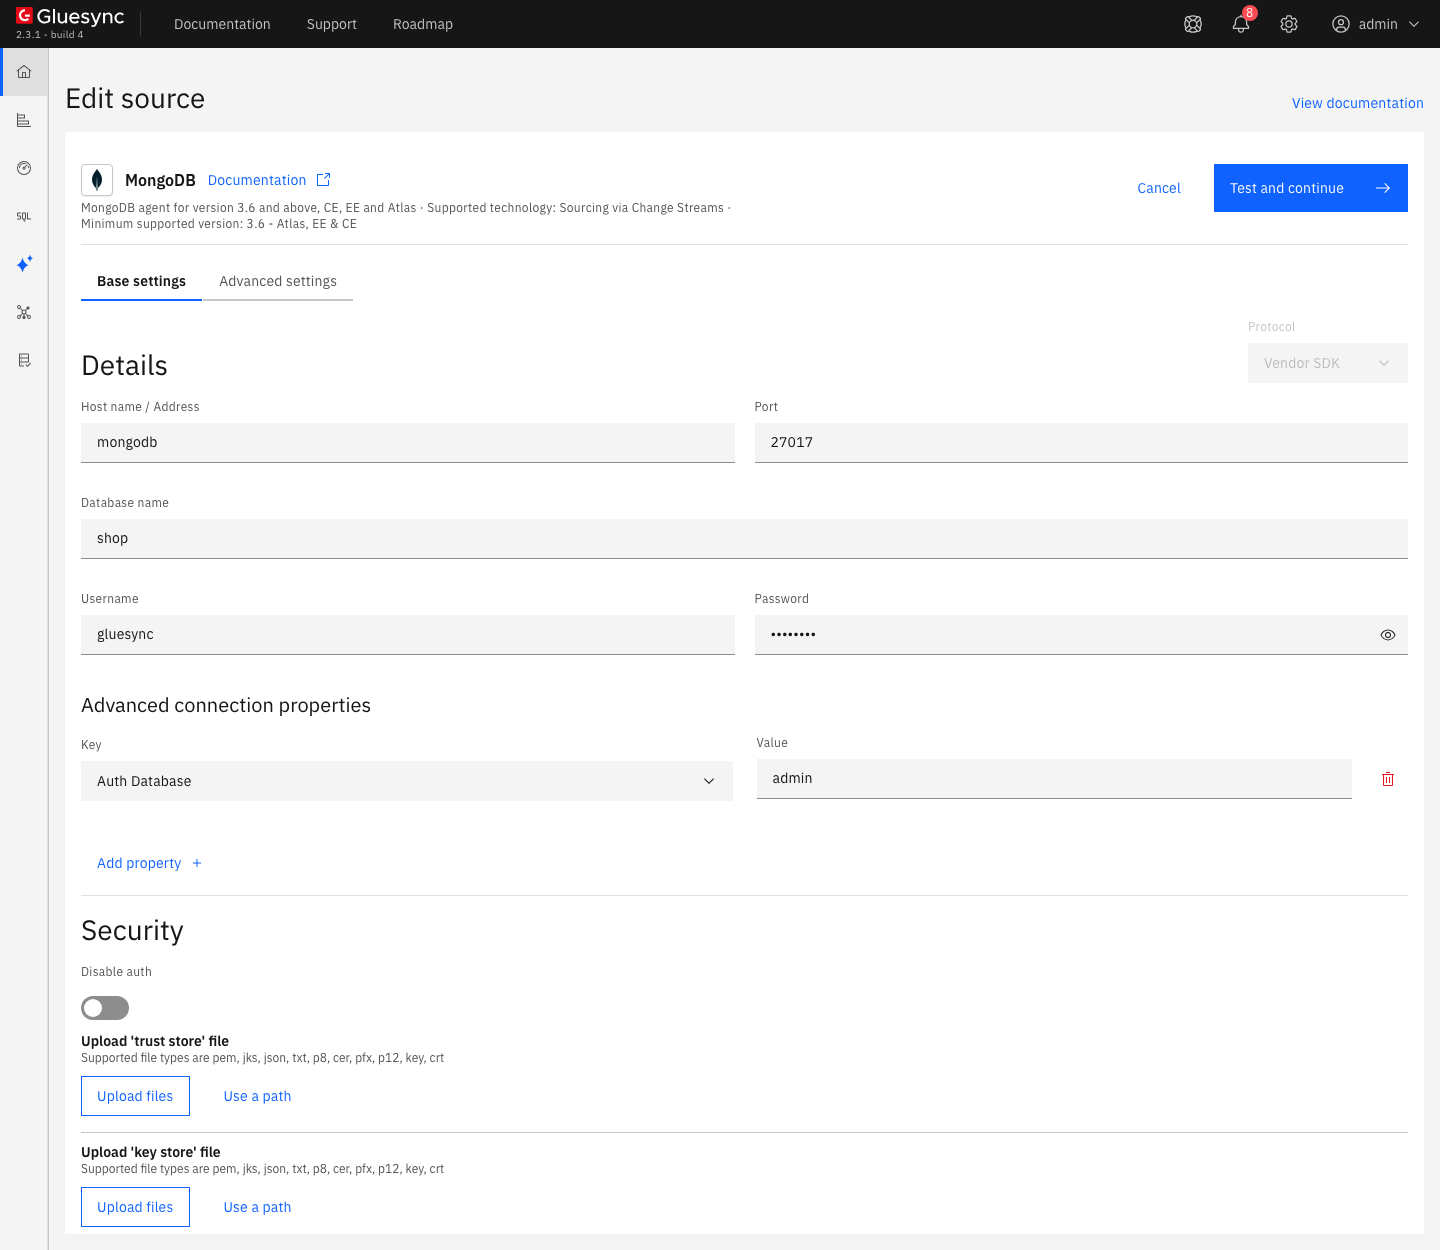
-
Optional: turn on Disable auth for a server without access control. Under Security, Upload 'trust store' file, Upload 'key store' file and Upload 'certificate store' file take the TLS files, each with Upload files or Use a path;
-
Select Test and continue, then Next;
-
On 2. Setup target(s), search for
postgres, select the PostgreSQL CDC agent tile, enter the connection of your PostgreSQL database, and select Test and continue and Next; -
On 3. Ready, enter a Pipeline name and select Finish.
|
|
UI
-
In the pipeline, select Entities. The Add entities page opens;
-
In the Object browser, expand the database
shopand tickorders. The Field mapping dialog opens; -
Set Target Schema to
publicand Target Table toorders. Gluesync reads the table and links every field that has a column of the same name. The_idfield is marked as the key, because it is the primary key of the table; -
Untick the row
addresson the source side. The dialog unticks its column on the target side too. See Data type notes for why;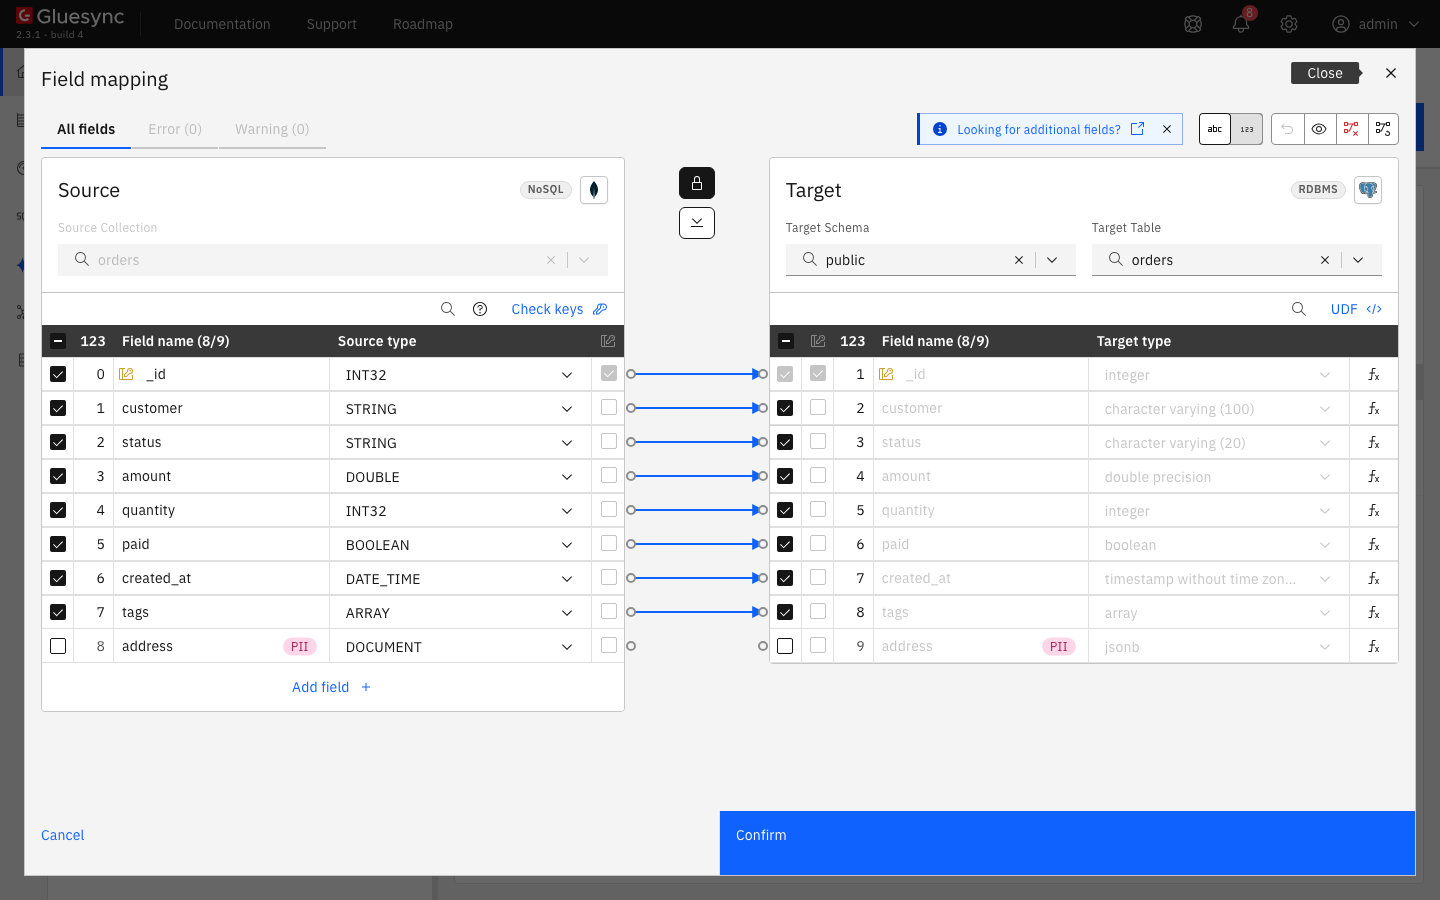
-
Select Confirm, then Confirm and continue. The entity
shop.ordersis in the Hold group.
UI
-
In the row of the entity, select the start icon (Start). The dialog Sync changes (CDC) opens;
-
In Start from, keep Full copy (marked Recommended for the first start) and keep Keep and merge under Data already in the target;
-
Select Start entity.
If the entity fails to start with the notification Entity Upsert Failed and the error 13 (Unauthorized), the user cannot run collMod: see the troubleshooting table.
CLI
-
Read the target table:
SELECT _id, customer, status, amount, created_at, tags FROM public.orders ORDER BY _id; -
Change the source. These commands insert, update and delete a document:
db = db.getSiblingDB("shop"); db.orders.insertOne({ _id: 3, customer: "Initech", status: "new", amount: Double(10.10), quantity: 2, paid: false, created_at: new Date(), tags: ["x"] }); db.orders.updateOne({ _id: 2 }, { $set: { status: "shipped", amount: 120.75 } }); db.orders.deleteOne({ _id: 1 }); -
Read the table again.
UI
Gluesync saves a position in the change stream, the resume token of the last change it delivered. When you start the entity again it asks MongoDB to replay everything after that token.
-
In the row of the entity, select the pause icon (Pause), then Pause entity;
-
In
mongosh, change the source while the entity is stopped:db = db.getSiblingDB("shop"); db.orders.insertOne({ _id: 6, customer: "Oscorp", status: "new", amount: Double(7), quantity: 1, paid: true, created_at: new Date() }); db.orders.updateOne({ _id: 3 }, { $set: { status: "shipped" } }); db.orders.deleteOne({ _id: 2 }); -
Select the start icon. In Start from, Where it stopped is now available and selected (Continue from the last checkpoint. Nothing is lost.). Select Start entity.
The oplog window
MongoDB can only replay a change while the change is still in the oplog of the replica set. The time between the oldest and the newest entry is the oplog window. If you stop an entity for longer than that, the saved token is gone and MongoDB refuses it with ChangeStreamHistoryLost.
-
Read the window on the primary:
rs.printReplicationInfo()The line
log length start to endis the window. -
Make the oplog big enough to cover your longest stop, plus the time you need to notice it. The size is in megabytes:
db.adminCommand({ replSetResizeOplog: 1, size: <size in MB> })
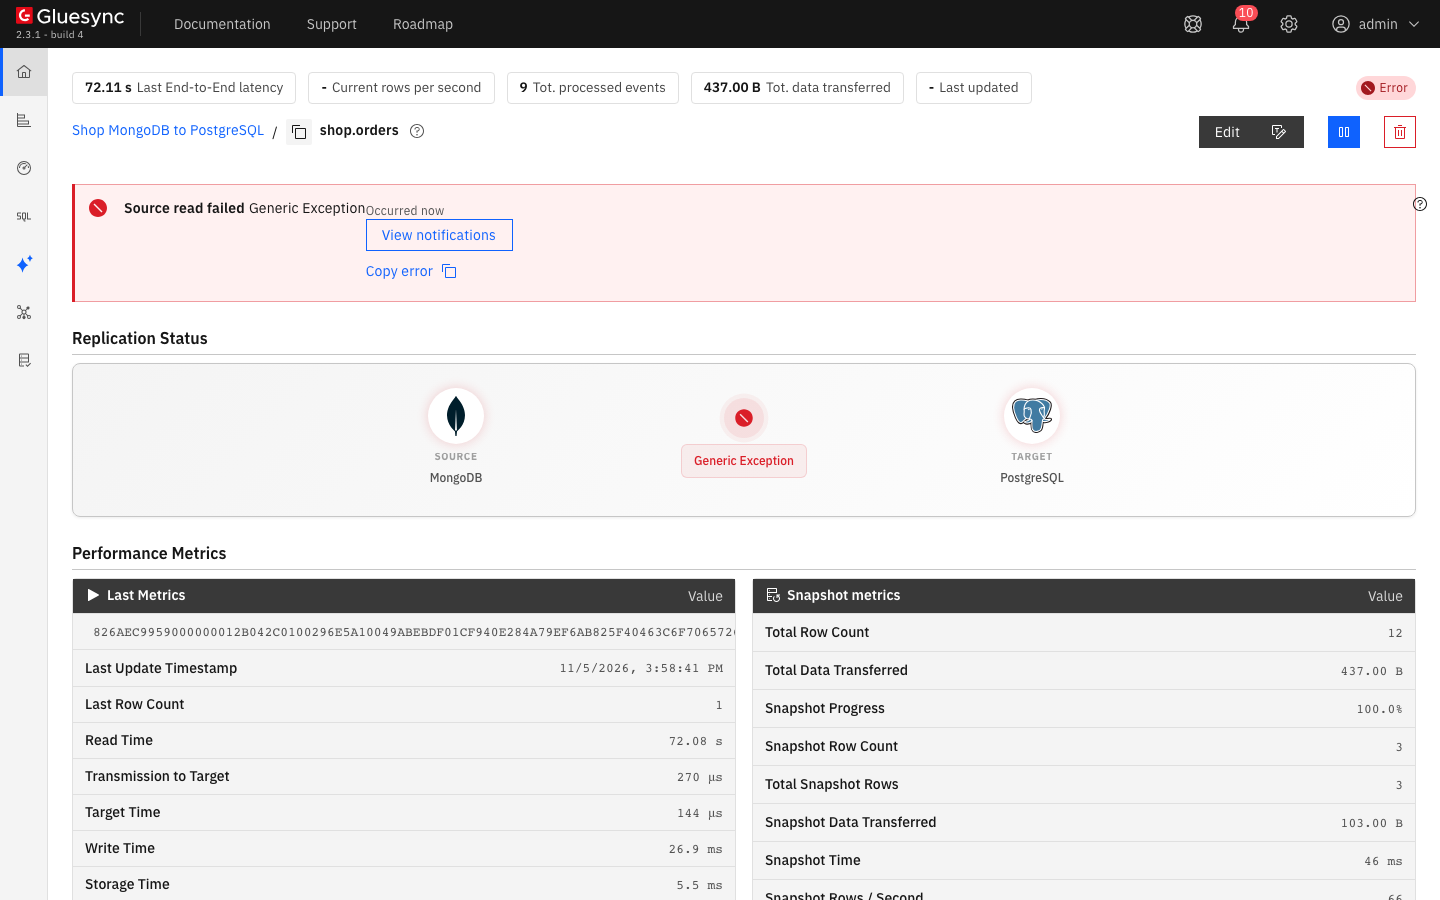
We reproduced the failure. We shrank the oplog of the test server to 990 MB, paused the entity, and wrote about 4 GB of other data. After that, starting the entity from Where it stopped failed on every attempt. The entity page showed Source read failed with the message Generic Exception, and the Core Hub log held the line Reset last event id checkpoint due to lost history issue for shop.orders followed by ChangeStreamHistoryLostException. Start the entity with Full copy to recover, see the troubleshooting table.
Data type notes
Gluesync reads a sample of the documents to find the fields and their BSON types, and shows them in the field mapping. What we saw with the collection above:
| Source field | Gluesync type | Target column and notes |
|---|---|---|
|
|
|
|
|
|
|
|
|
|
|
|
|
|
|
|
|
|
|
|
|
|
|
The GA field mapping marks a |
The source types in the mapping are STRING, REGULAR_EXPRESSION, OBJECT_ID, BOOLEAN, INT32, INT64, DOUBLE, DECIMAL128, DATE_TIME, DATE, TIME, BINARY, DOCUMENT and ARRAY.
Settings that change the read
The source settings are on the pipeline, in the gear menu → Edit source. The Advanced settings tab offers, after Add property: Source change retention in hours, Enable Recursion Protection, Query Studio maxTimeMS, Schema discovery sample size and Technical fields. The reference page MongoDB source advanced settings explains each one. Turn on Enable Recursion Protection only for two-way pipelines that write to the same collection.
The entity settings are in the three-dot menu of the entity → Edit settings → Fine tuning:
| Setting | What it does |
|---|---|
Max number of items per iteration on fetch |
The window of documents read at once ( |
Max CDC message size (KB) |
The size of a packet of changes ( |
Max snapshot page size (KB) |
The size of a snapshot page. Empty means the default, |
Polling interval (ms) |
The time between two polls of the source ( |
Snapshot writing concurrency |
The number of threads that write one transaction during the snapshot, from 1 to 10 ( |
Snapshot only |
The entity runs the snapshot and never opens a change stream. |
The Speed choices of the start dialog (Standard, Faster, Custom) and Bulk load are write-path choices on the target. See Tune replication throughput.
A standalone server
With Snapshot only on, an entity ran its snapshot against a standalone server and stopped in the Hold group, with no error. Without it, the snapshot ran too, and then the start failed on the change stream (see the troubleshooting table). Use Snapshot only for a one-time copy, and a replica set for CDC.
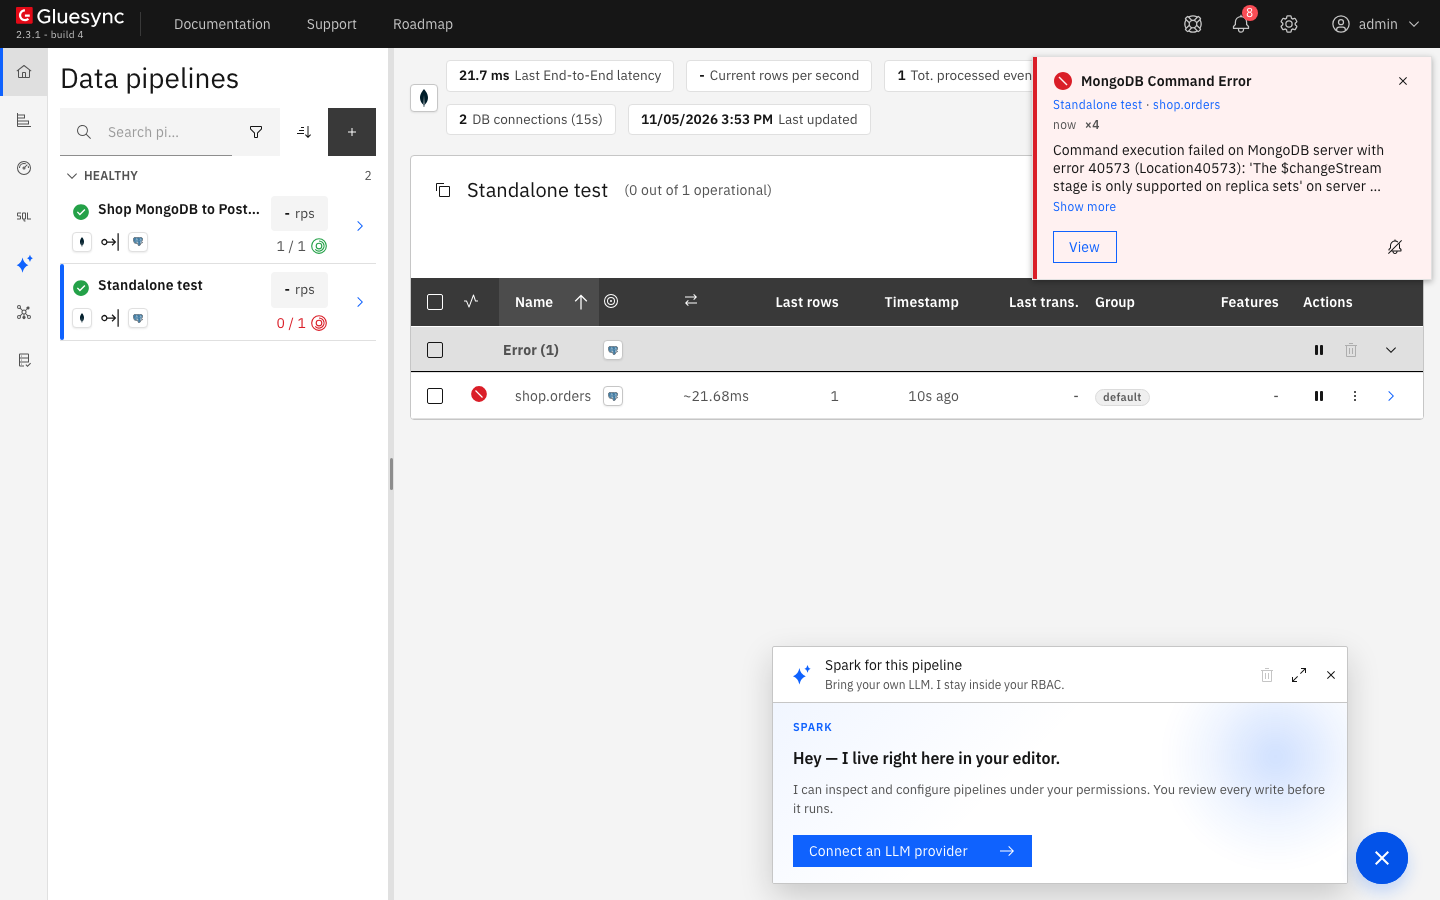
Troubleshooting
| Problem | Possible cause | What to do |
|---|---|---|
Test and continue fails with Failed to save and |
The user is defined in the |
Add the property |
Test and continue fails with |
The user name or the password is wrong. |
Check them with |
The notification Entity Upsert Failed with |
The user cannot run |
Grant |
The notification MongoDB Command Error with |
The server is standalone. |
Run MongoDB as a replica set (step 1), or turn on Snapshot only in the entity settings for a one-time copy. |
Source read failed with |
A field typed |
Store one type per field ( |
The mapping shows Incompatible data types on a |
A nested document cannot be linked to a PostgreSQL column in the GA field mapping, and it cannot be read as text. |
Untick the field in the mapping, and keep the source type |
The mapping shows Field function is required or define a UDF and Confirm is disabled |
A column of the target table is ticked, and no source field is linked to it. |
Untick the column, or link a field to it. |
Source read failed, |
The saved resume token is older than the oplog window. MongoDB answers |
Start the entity with Full copy. With Keep and merge, the target keeps rows that were deleted on the source during the gap: choose Empty the table first to remove them. Then make the oplog bigger (The oplog window). |
A document you deleted on the source is still in the target after a Full copy |
Keep and merge only overwrites rows with the same key. |
Start with Empty the table first, or delete the row on the target. |