Set up a YugabyteDB source and target
The YugabyteDB agent reads and writes through the YSQL API with the YugabyteDB JDBC smart driver. As a source it reads changes from a logical replication slot decoded with the wal2json plugin. As a target it writes with batched upserts. This guide creates the users and grants for both roles, replicates a table with an array column from one YugabyteDB database to another with a snapshot followed by live changes, and shows the failures you are most likely to meet.
In this guide
You will check the replication slot limit, create a source user with the REPLICATION attribute and a target user with the grants the writer needs, and create the tables. You will create the two connections in the Control Plane, map a table with an array column to a table that already exists, and start the entity with a full copy. You will check an insert, an update and a delete on the target, pause and resume the entity, and read the numbers of a 200,000-row copy.
Quick information
Goal |
Replicate YugabyteDB tables, arrays included, with a snapshot followed by change data capture (CDC), and keep the users, slots and grants healthy |
Audience |
Data engineers and database administrators who own a YugabyteDB cluster |
Level |
Intermediate |
Time required |
About 45 minutes |
Area |
YugabyteDB → YSQL users and grants; Control Plane → Pipelines → YugabyteDB agent → Base settings; entity → start dialog |
Applies to |
Gluesync 2.3 |
Before you begin
Make sure that:
-
You have a YugabyteDB cluster and you can run YSQL as an administrator such as
yugabyte. This guide was tested with YugabyteDB 2026.1 (PostgreSQL 15.12-YB), started withyugabytedas a single node; -
Core Hub can reach the YSQL port,
5433by default, of the node you use; -
You can sign in to the Control Plane with a role that can create pipelines;
-
You know that one replication slot is created for each entity that follows changes. The server limit
max_replication_slotsmust cover them; -
You have a source database and a target database. This guide uses one database,
demo, with two schemas:srcfor the source andtgtfor the target. Both roles use the same agent, so everything you read for the source also applies to a YugabyteDB that is only a source, and the grants for the target apply to a YugabyteDB that is only a target.
|
The messages quoted in this guide were captured in the Control Plane and in the Core Hub log with YugabyteDB 2026.1 as both source and target. The options of the agent are listed in the YugabyteDB CDC reference and in the YugabyteDB target reference. |
Guide steps
SQL
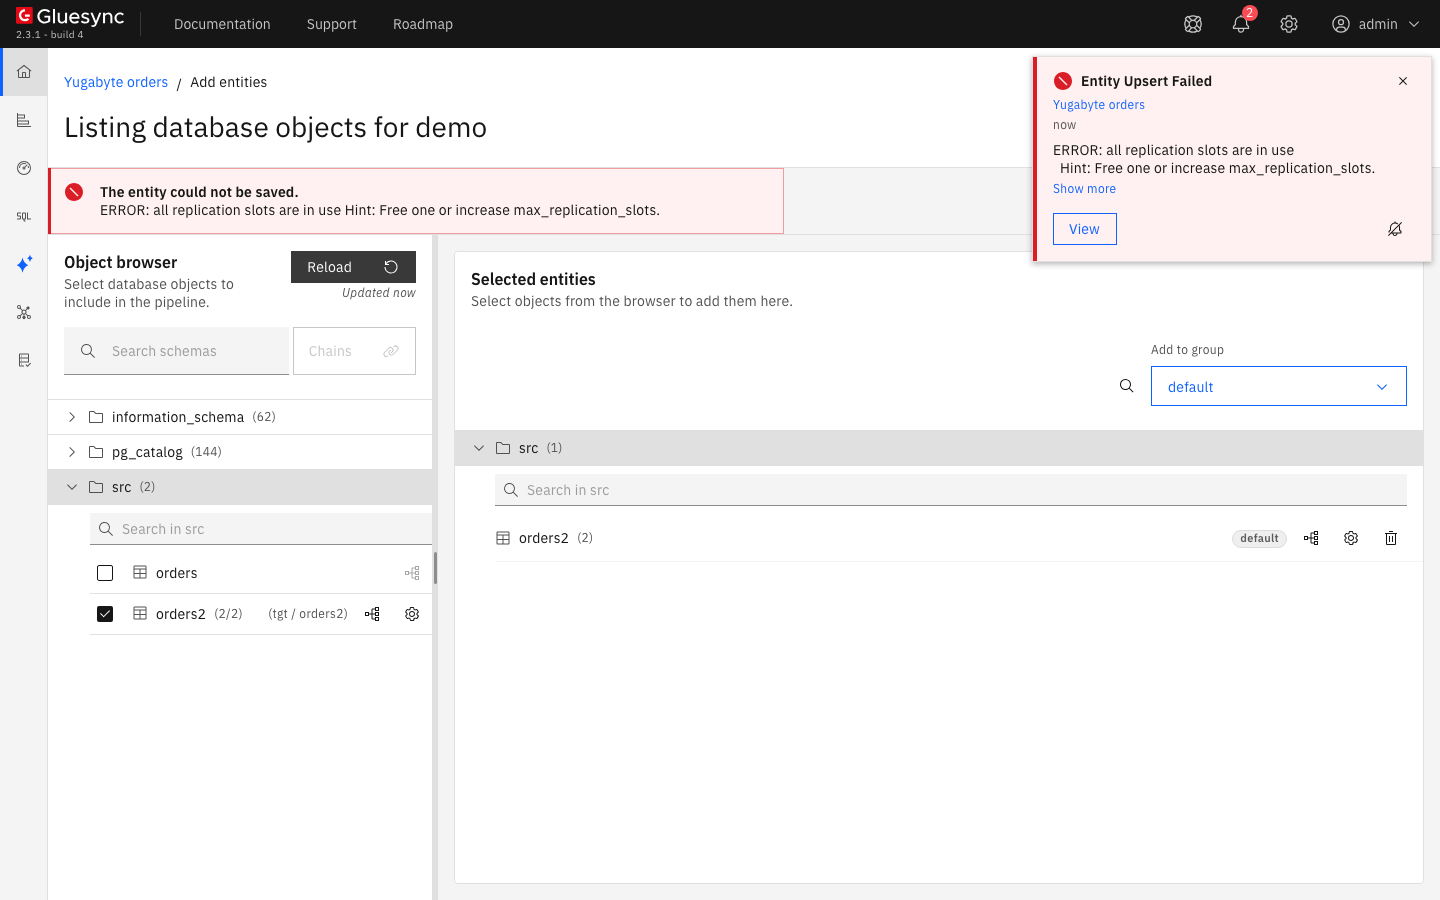
Gluesync creates one replication slot, named gs_<entity id>_slot, for each entity that follows changes. A slot is created when you add the entity, not when you start it. Read the limit and the slots that exist:
SHOW max_replication_slots;
SELECT slot_name, plugin, active FROM pg_replication_slots;
SELECT version();
An entity that is snapshot-only gets no slot, and a slot of an entity that you delete is dropped. On YugabyteDB, the limit of slots is a server setting. The YugabyteDB documentation describes max_replication_slots and cdc_max_virtual_wal_per_tserver: change them with your cluster tooling and restart the servers.
|
SQL
Gluesync does not need a superuser. The source user needs the REPLICATION attribute and SELECT on the tables it copies. The target user needs to read and write the target tables. Connect to the database as an administrator and replace the passwords:
CREATE DATABASE demo;
\c demo

CREATE USER gluesync_src WITH REPLICATION LOGIN PASSWORD '<a strong password>';
CREATE USER gluesync_tgt WITH LOGIN PASSWORD '<another strong password>';

CREATE SCHEMA src;
CREATE SCHEMA tgt;

CREATE TABLE src.orders (
  id        integer PRIMARY KEY,
  customer  text NOT NULL,
  amount    numeric(12,2),
  tags      text[],
  placed_at timestamptz DEFAULT now()
);
INSERT INTO src.orders VALUES
  (1, 'Acme',    10.50, '{rush,gift}', now()),
  (2, 'Globex',  99.99, '{}',          now()),
  (3, 'Initech', NULL,  NULL,          now());

-- source user: read the source schema, now and for tables created later
GRANT USAGE ON SCHEMA src TO gluesync_src;
GRANT SELECT ON ALL TABLES IN SCHEMA src TO gluesync_src;
ALTER DEFAULT PRIVILEGES IN SCHEMA src GRANT SELECT ON TABLES TO gluesync_src;
The default privileges apply to the tables created by the role that runs the statement. Repeat the grants for every other schema you replicate.
Now create the target table as the target user, so that the user owns it. The table needs the same array column. Gluesync cannot propose an array type when it creates a table (see the troubleshooting table), so you create the table yourself:
GRANT USAGE ON SCHEMA tgt TO gluesync_tgt;
GRANT CREATE ON SCHEMA tgt TO gluesync_tgt;
GRANT TEMPORARY ON DATABASE demo TO gluesync_tgt;
-- connect as gluesync_tgt
CREATE TABLE tgt.orders (
id integer PRIMARY KEY,
customer text NOT NULL,
amount numeric(12,2),
tags text[],
placed_at timestamptz
);For a target table that another role owns, grant what the writer uses instead of CREATE:
GRANT SELECT, INSERT, UPDATE, DELETE ON tgt.orders TO gluesync_tgt;
GRANT TRUNCATE ON tgt.orders TO gluesync_tgt; -- only for "Empty the table first"|
A table with a primary key works with the default replica identity: in the test, an update and a delete reached the target after |
UI
-
In the Control Plane, select Create your first pipeline, or the + button of the pipeline list if you already have pipelines. The Agents setup wizard opens;
-
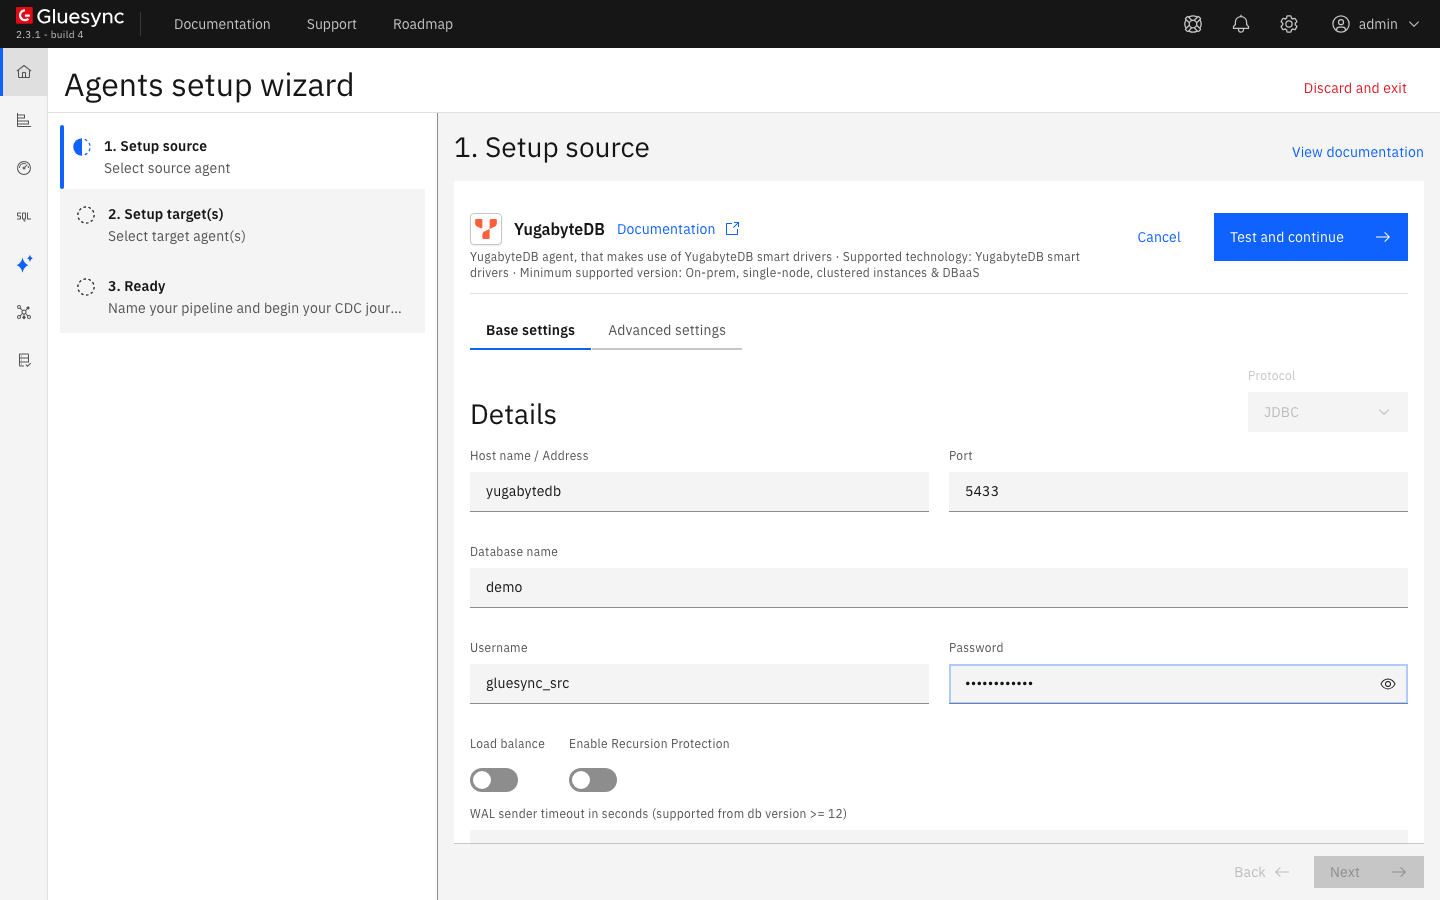
In 1. Setup source, choose the YugabyteDB tile and fill Base settings:
-
Host name / Address: the DNS name or address of the node, as Core Hub sees it;
-
Port:
5433, or the YSQL port of your cluster; -
Database name: the database that holds the tables. A slot reads one database;
-
Username and Password: the source user of step 2;
-
-
Keep Load balance and Enable Recursion Protection off. Turn on Load balance only for a multi-node cluster, and add the other nodes under Settings → Additional hosts in the format
host1:port1,host2:port2. Keep Enable Recursion Protection off, unless the same database is also a target of a bidirectional setup, see Set up bidirectional replication with recursion protection; -
Select Test and continue. The source appears with a green check mark.
-
Select Next. In 2. Setup target(s), choose the YugabyteDB tile again and fill the same fields with the target user of step 2. Select Test and continue, then Next;
-
Enter a Pipeline name and select Finish.
|
In a lab that you start with |
UI
-
In the pipeline, select Entities. The Add entities page opens with the Object browser. Expand the schema
srcand tick the tableorders. The Field mapping dialog opens; -
Under Target, choose the Target Schema
tgt, then choose the existing tableordersin Target Table. The dialog shows the five columns joined by arrows, with no error; -
Select Confirm, then Confirm and continue on the Add entities page.
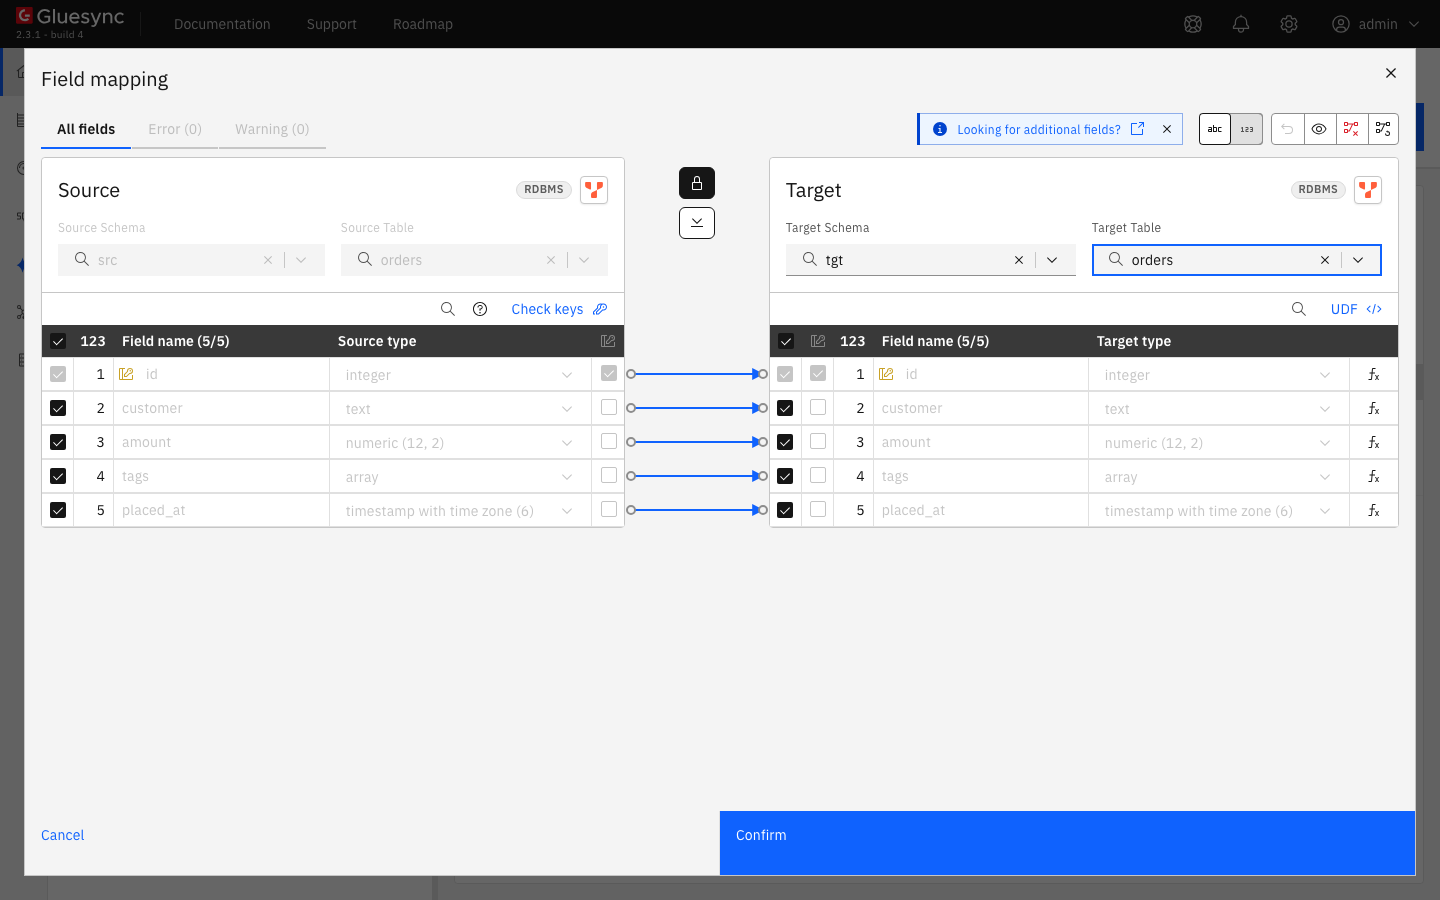
tags keeps its type on both sides and the dialog shows no errors.UI + SQL
-
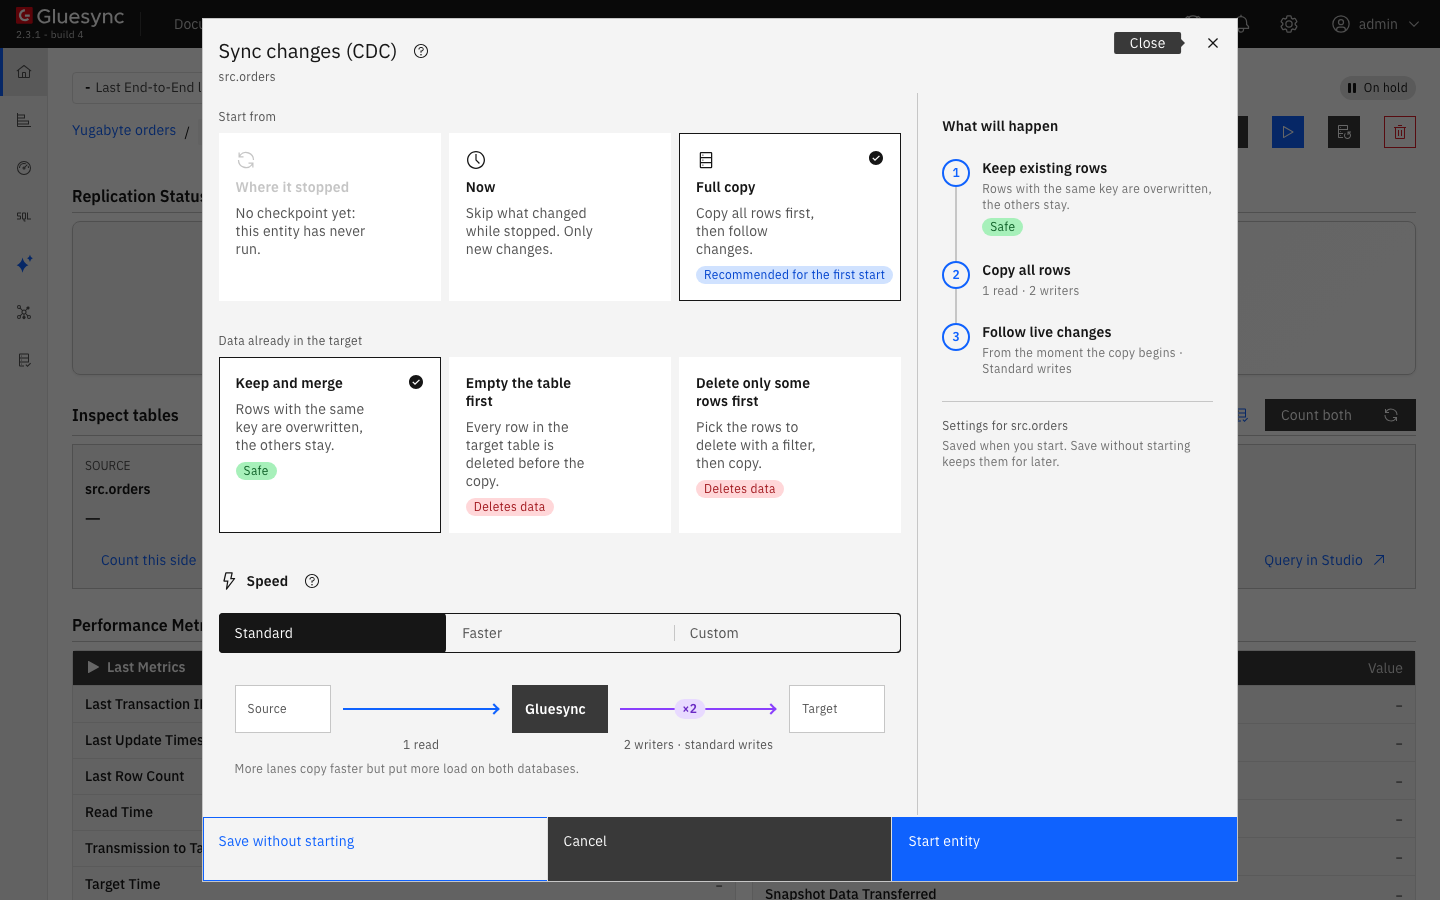
On the row of the entity, select the play button. The Sync changes (CDC) dialog opens;
-
Under Start from keep Full copy, Recommended for the first start. The other choices are Where it stopped, which is not available before the first run, and Now, which skips what changed before the start;
-
Under Data already in the target keep Keep and merge, and under Speed keep Standard;
-
Select Start entity.
Check the target and the slot:
SELECT * FROM tgt.orders ORDER BY id;
SELECT slot_name, plugin, active FROM pg_replication_slots;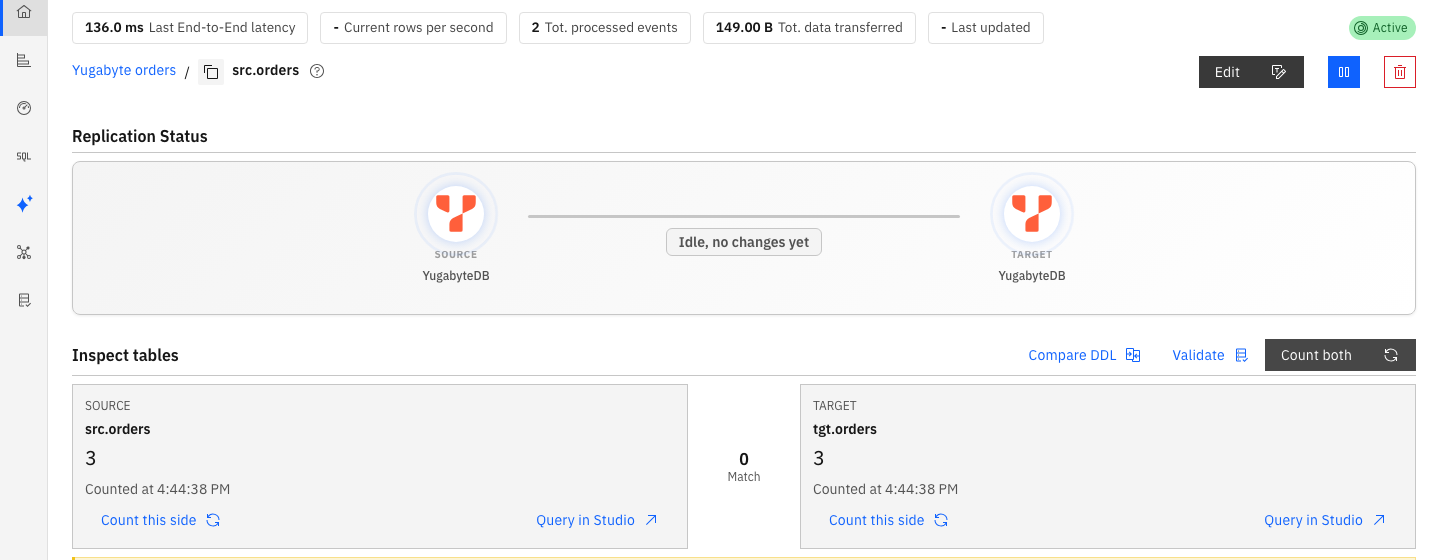
SQL
On the source, insert, update and delete one row each, with an array in the insert and in the update:
INSERT INTO src.orders VALUES (4, 'Umbrella', 5.00, '{a,b}', now());
UPDATE src.orders SET amount = 11.25, tags = '{rush,gift,vip}' WHERE id = 1;
DELETE FROM src.orders WHERE id = 2;
After a few seconds, read the target:
SELECT id, customer, amount, tags FROM tgt.orders ORDER BY id;UI + SQL
Pausing an entity keeps its slot, so the source keeps the log that the entity has not read. Resuming with Where it stopped continues from the last checkpoint.
-
Select the pause button of the entity, then Pause entity. The entity goes to Hold;
-
On the source, insert a row;
-
Select the play button, keep Where it stopped and select Start entity.
In the test the server refused to drop the slot of a paused entity (ERROR: replication slot "gs_<entity id>_slot" is active), so a slot cannot be dropped by mistake during a pause. Do not rely on it for a long pause: check pg_replication_slots before a resume.
|
UI
The YugabyteDB target has no bulk load: in the start dialog, Speed → Custom shows Write method Standard with the badge This target has no bulk load. The levers are the number of readers and writers and the size of a batch.
-
In the start dialog, under Speed select Faster or Custom to raise the parallel reads of the source and the writers of the target. More lanes copy faster and put more load on both databases. Faster sets four reads and four writers;
-
In the entity page, Entity Settings → Advanced settings holds Max Write Batch Size and Max Delete Batch Size, both
1000by default. A batch of 2,000 query parameters or more, which means rows times columns, is written through a temporary table that is merged into the target table. Smaller batches are merged with one statement; -
For the source, the Query parallelism of the snapshot is
4by default, see YugabyteDB source advanced settings. See also YugabyteDB target advanced settings; -
If a row with the same key is already there stays on Upsert: Gluesync updates the rows that exist and inserts the others.
In the test, a table of 200,000 rows with three columns (integer, text, numeric(12,2)) copied in 20.1 seconds with Standard, about 9.9 thousand rows per second. The same copy with Faster took 21.8 seconds. The lab was one YugabyteDB node that was both source and target, so the server was the limit, not the number of lanes. Test the setting on your own cluster, and watch the load of the nodes. See Tune replication throughput.
Troubleshooting
| Symptom or message | Cause | Fix |
|---|---|---|
|
The source user has no |
Run |
|
The server has no free slot for a new entity. |
List the slots with |
|
The Database name of the connection is wrong. |
Correct the name in Base settings and select Test and continue. |
|
The target user cannot write the table, because another role owns it and the user has no grant. |
Run |
|
|
Run |
The Field mapping dialog shows Error (3) for a new target table: |
The target type list of the agent has no array type, and a new |
Create the table yourself with the array column, as in step 2, and map the entity to it: the dialog then shows no error. Keep the same element type on both sides. |
The cluster keeps log files and its disk grows |
A slot is not advancing: the entity is paused, in error, the target is slow, or a slot is left from a deleted pipeline. |
Check |