Set up a SingleStore target with bulk loads
SingleStore spreads every table over its leaf nodes by a shard key, and it stores a table as a rowstore or as a columnstore. Both choices decide how Gluesync can write to the table. This guide creates a SingleStore user with only the grants Gluesync needs, chooses the table type, the shard key and the unique key, connects the target, copies a PostgreSQL table with standard writes and with bulk load, follows live changes, and shows the errors you are most likely to meet on a new setup.
In this guide
You will create a database and a user with least grants, including the separate GLUESYNC schema that the bulk path needs. You will create a columnstore table and a rowstore table, and learn the rule that links the shard key to the unique key. You will connect the SingleStore target, add one entity that Gluesync creates the table for and one that uses a table you created, run a snapshot with standard writes, repeat it with bulk load and compare the time, and follow inserts, updates and deletes with CDC. A table at the end lists the errors that were reproduced for this guide.
Quick information
Goal |
Replicate a PostgreSQL table to SingleStore with a snapshot and with bulk load, then keep it in sync with change data capture (CDC) |
Audience |
Data engineers and database administrators who own a SingleStore cluster |
Level |
Intermediate |
Time required |
About 45 minutes |
Area |
SingleStore → SQL; Control Plane → Pipelines → SingleStore target → Base settings and Advanced settings; entity → start options and Edit settings |
Applies to |
Gluesync 2.3 |
Before you begin
Make sure that:
-
You have a SingleStore database that Core Hub can reach on port
3306(the MySQL protocol port), and you can run SQL on it as an administrator. SingleStore is a target only: you need another database as the source. This guide was tested with thesinglestoredb-devcontainer image; -
You have a source that Core Hub can read with CDC. This guide uses PostgreSQL 16 with
wal_level = logical, set up as in Set up a PostgreSQL WAL source; -
You can sign in to the Control Plane with a role that can create pipelines;
-
You have source tables with a primary key. This guide uses a PostgreSQL table
public.eventswith 200,000 rows (id bigintprimary key,kind varchar(20),val integer,amount numeric(12,2),created_at timestamp,note text) and a tablepublic.readingswith 1,000 rows (id bigintprimary key,device integer,taken_at timestamp(6),temp double precision,status varchar(10)).
|
The statements and the messages quoted in this guide were run and captured against a SingleStore server and the Control Plane that ships with Gluesync 2.3. The |
Guide steps
SQL
Gluesync does not need an administrator. Connect to SingleStore as an administrator and run the statements below. Replace the database name and the password.
-
Create the target database, the user, and the grants on the target database:
CREATE DATABASE demo;
CREATE USER 'gluesync'@'%' IDENTIFIED BY '<a strong password>';
GRANT SELECT, INSERT, UPDATE, DELETE ON demo.* TO 'gluesync'@'%';
These four grants are enough to write, update and delete rows, and to empty a table before a snapshot, in tables that already exist. Add
CREATEon the database if you want Gluesync to create the target tables for you (step 4). -
Create the schema that the bulk path uses for its staging tables, and grant on it. The agent calls it
GLUESYNCand creates it when it is missing, but a user without the globalCREATEprivilege cannot create a database, so you create it:CREATE DATABASE GLUESYNC; GRANT SELECT, INSERT, UPDATE, DELETE, CREATE, DROP ON GLUESYNC.* TO 'gluesync'@'%';CREATElets the agent create one staging table for each entity that has bulk operations.DROPlets it remove that table when you delete the entity. WithoutDROPeverything else works, and the staging table stays inGLUESYNCafter you delete the entity. If you do not use bulk operations, you do not need this schema. To use another name, set Gluesync schema name in step 3. -
Check the grants:
SHOW GRANTS FOR 'gluesync'@'%';
If a grant is missing, the setup fails with a specific message. The troubleshooting table at the end lists them.
SQL
SingleStore keeps a table either in memory as a rowstore or on disk as a columnstore. As a rule of thumb, a columnstore suits large tables that you scan and aggregate, and a rowstore suits small tables with many single-row reads and updates. Gluesync writes to both.
Two rules matter for Gluesync:
-
A standard write is an upsert:
INSERT … ON DUPLICATE KEY UPDATE. It updates a row only if the table has a unique key on the entity key. Without one, every update adds a new row; -
SingleStore only accepts a unique key that contains every column of the shard key. A table with a primary key and no explicit shard key is sharded by the primary key, which always satisfies the rule.
-
Create a columnstore table with a sort key for range reads, and a rowstore table. Leave out
CREATE ROWSTOREand the table is a columnstore ifdefault_table_typeiscolumnstore, which is the default of the container image used here:CREATE TABLE demo.readings ( id BIGINT NOT NULL, device INT, taken_at DATETIME(6), temp DOUBLE, status VARCHAR(10), SORT KEY (taken_at), SHARD KEY (id), PRIMARY KEY (id) ); CREATE ROWSTORE TABLE demo.orders_small ( id INT NOT NULL, customer VARCHAR(50), total DECIMAL(10,2), PRIMARY KEY (id) ); -
Check what SingleStore made of the first table:
SHOW CREATE TABLE demo.readings\G -
See the shard key rule fail, so that you recognize the message. This statement shards by
customer, which the primary keyiddoes not contain:CREATE TABLE demo.bad ( id INT NOT NULL, customer VARCHAR(10), PRIMARY KEY (id), SHARD KEY (customer) );
-
|
If the primary key must be wider than the shard key, put the shard key columns into the key: |
UI
-
In the Control Plane, select Create your first pipeline, or the + button of the pipeline list if you already have pipelines. The Agents setup wizard opens;
-
In 1. Setup source, choose the PostgreSQL CDC agent tile and fill Base settings: Host name / Address, Port, Database name, Username and Password of your source database. Select Test and continue. The source appears with a green check mark. Select Next;
-
In 2. Setup target(s), choose the SingleStore agent tile and fill Base settings:
-
Host name / Address: your SingleStore aggregator;
-
Port:
3306; -
Database name:
demo; -
Username and Password: the user of step 1;
-
-
Select Test and continue. The target appears with a green check mark. Select Next, enter a Pipeline name and select Finish.
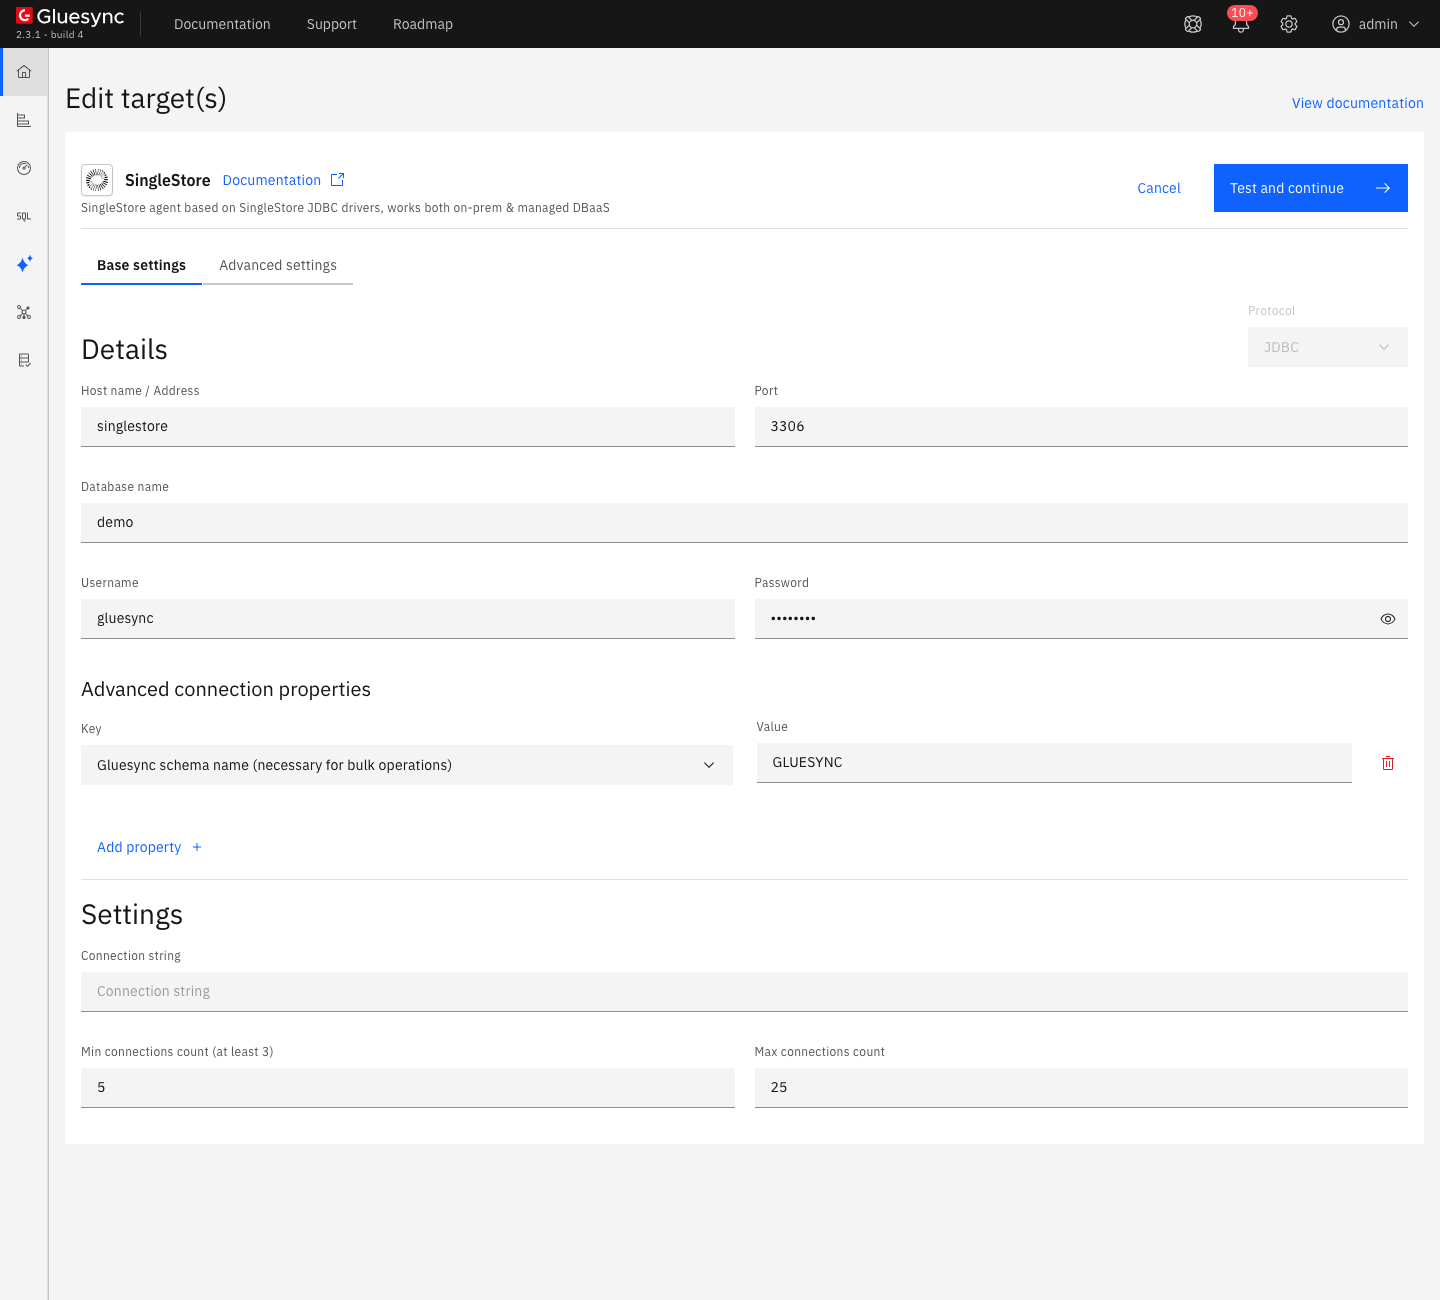
GLUESYNC by default.The connection form has three more places for settings:
-
Under Advanced connection properties, select Add property to set Use connection pool, Gluesync schema name (necessary for bulk operations) and Disable automatic schema creation. With the last one on, the agent checks that the schema exists and refuses to start a bulk entity when it does not, instead of trying to create it;
-
In the Advanced settings tab, select Add property to set Load balancing mode, Use server prepared statements and Disable truncate on target table before snapshot inserts;
-
Connection string, Min connections count (at least 3) and Max connections count are under Settings. The pool defaults to 5 and 25 connections.
For TLS and the REST API setup, see the SingleStore target reference.
UI
-
In the pipeline, select Entities. The Add entities page opens with the Object browser. Expand the source schema
publicand select the tableevents. The Field mapping dialog opens; -
Under Target, choose the Target Schema
demo. In Target Table typeeventsand choose Create table "events". The dialog shows New table events will be created on confirm. and the proposed target types; -
Fix the proposals that SingleStore cannot use:
-
The
notecolumn istextand its Length is0. The dialog shows the error Missing required field and Confirm stays disabled. Enter a length, for example1000; -
The proposal for a
timestamp with time zonecolumn isdatetimeoffset, which SingleStore does not have. Change the type todatetime. The dialog marks the column with a yellow warning, Data type mismatch detected, and the value is stored as UTC; -
A
byteacolumn is proposed asvarbinarywithout a length, which SingleStore rejects. Change the type tobloband enter a length such as65535;
-
-
Select Confirm. The Create table events dialog shows the Read-only SQL statement. Read it, then select Create table events to run it on SingleStore;
-
Back on the Add entities page, select Confirm and continue.
The statement for the events table has this form:
CREATE TABLE `demo`.`events` (
   id bigint,
   kind varchar(20),
   val int,
   amount numeric(12, 2),
   created_at datetime,
   note text,
   PRIMARY KEY (
      id
   )
)
It has no ROWSTORE keyword, so the table has the default table type of your server. Check what SingleStore made of it:
SHOW CREATE TABLE demo.events\GSee Target table creation for the dialog.
UI
-
In the pipeline, select Entities and then, in the Object browser, the table
readings. In the Field mapping dialog choose the Target Schemademo, and in Target Table choose the existing tablereadings. The mapping loads the types from SingleStore. Confirm and Confirm and continue as before; -
Do the same for
orders_smallif you created it in step 2.
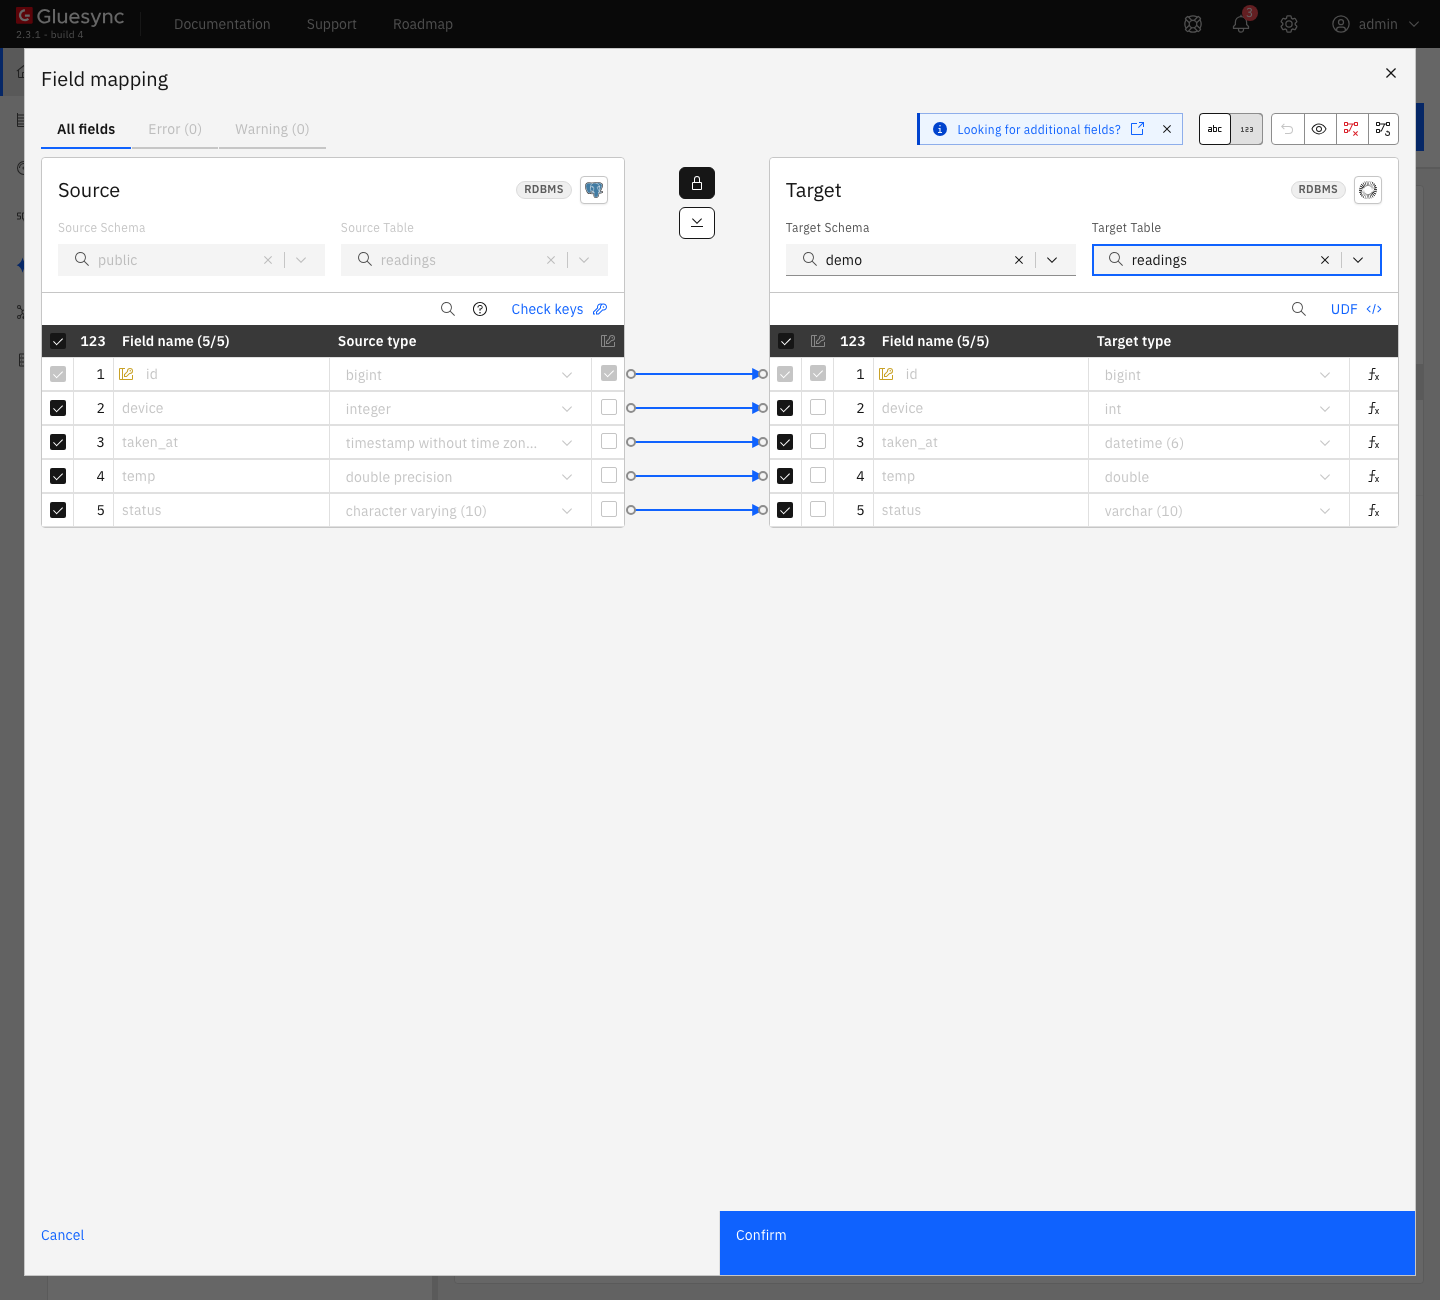
datetime (6) and the primary key on id.A target table without a unique key on the entity key gets a warning in the same dialog. Create a table without a key to see it:
CREATE TABLE demo.ledger (id INT, memo VARCHAR(40), amount DECIMAL(10,2), SHARD KEY (id));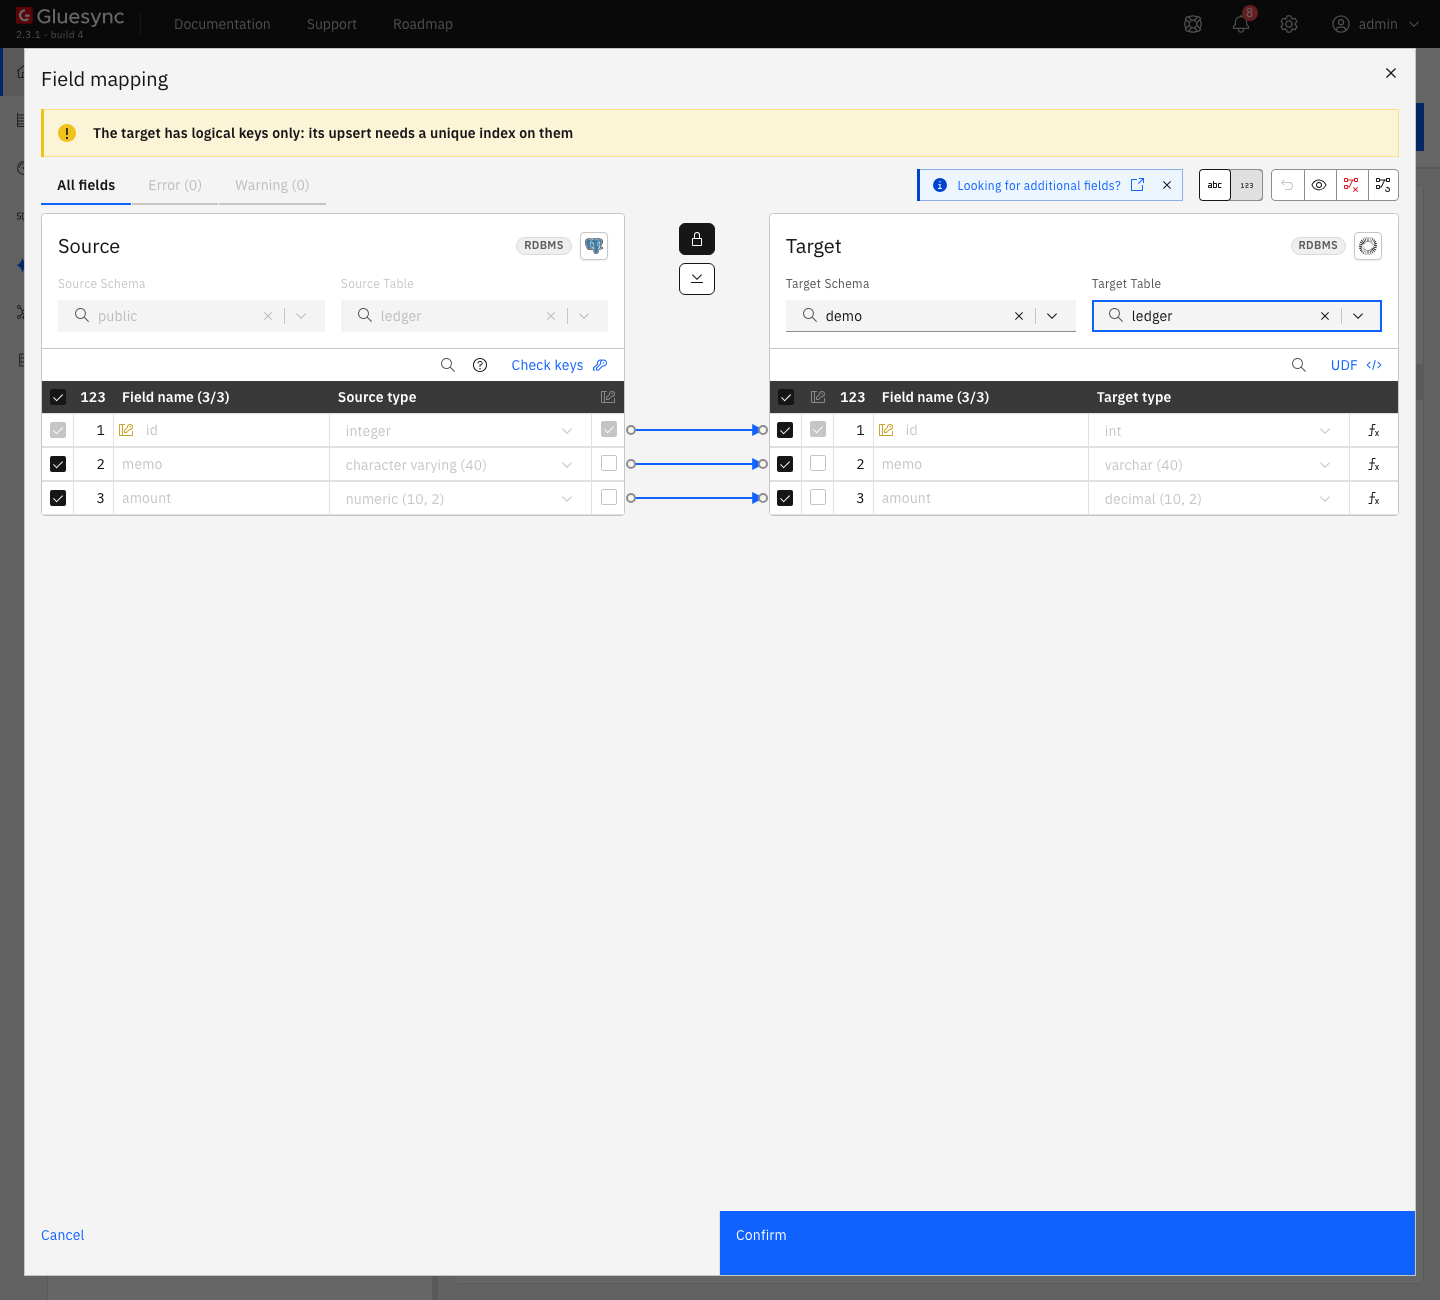
UI + SQL
Standard writes use JDBC batches. This is the default, and it is the baseline for the next step.
-
In the pipeline, find the entity
public.events. On Hold, select the start options button, the one next to the play button. The Snapshot (copy-only) dialog opens; -
Keep Keep and merge under Data already in the target and Standard under Speed. The summary shows 2 writers · standard writes. Select Start snapshot.
Check the rows in SingleStore:
SELECT count(*) FROM demo.events;
SELECT * FROM demo.events WHERE id IN (1, 200000);|
A |
UI + SQL
Bulk load writes the rows to a CSV file in Core Hub, loads the file into a staging table with LOAD DATA LOCAL INFILE, and applies it to the target table in one step. The staging table lives in the GLUESYNC schema. Bulk operations are a setting of each entity, and the snapshot and live changes are separate.
-
On Hold, select the start options button of
public.eventsagain; -
Under Data already in the target select Empty the table first. Under Speed select Custom;
-
In the Writing column, under During the copy select Bulk load, and under During live changes select Bulk load. The diagram shows the Bulk lane into a Staging table, and the field Writers during the copy turns off: bulk load writes in one stream;
-
Tick I understand that rows in the target will be deleted and select Start snapshot. The settings are kept for the next start.
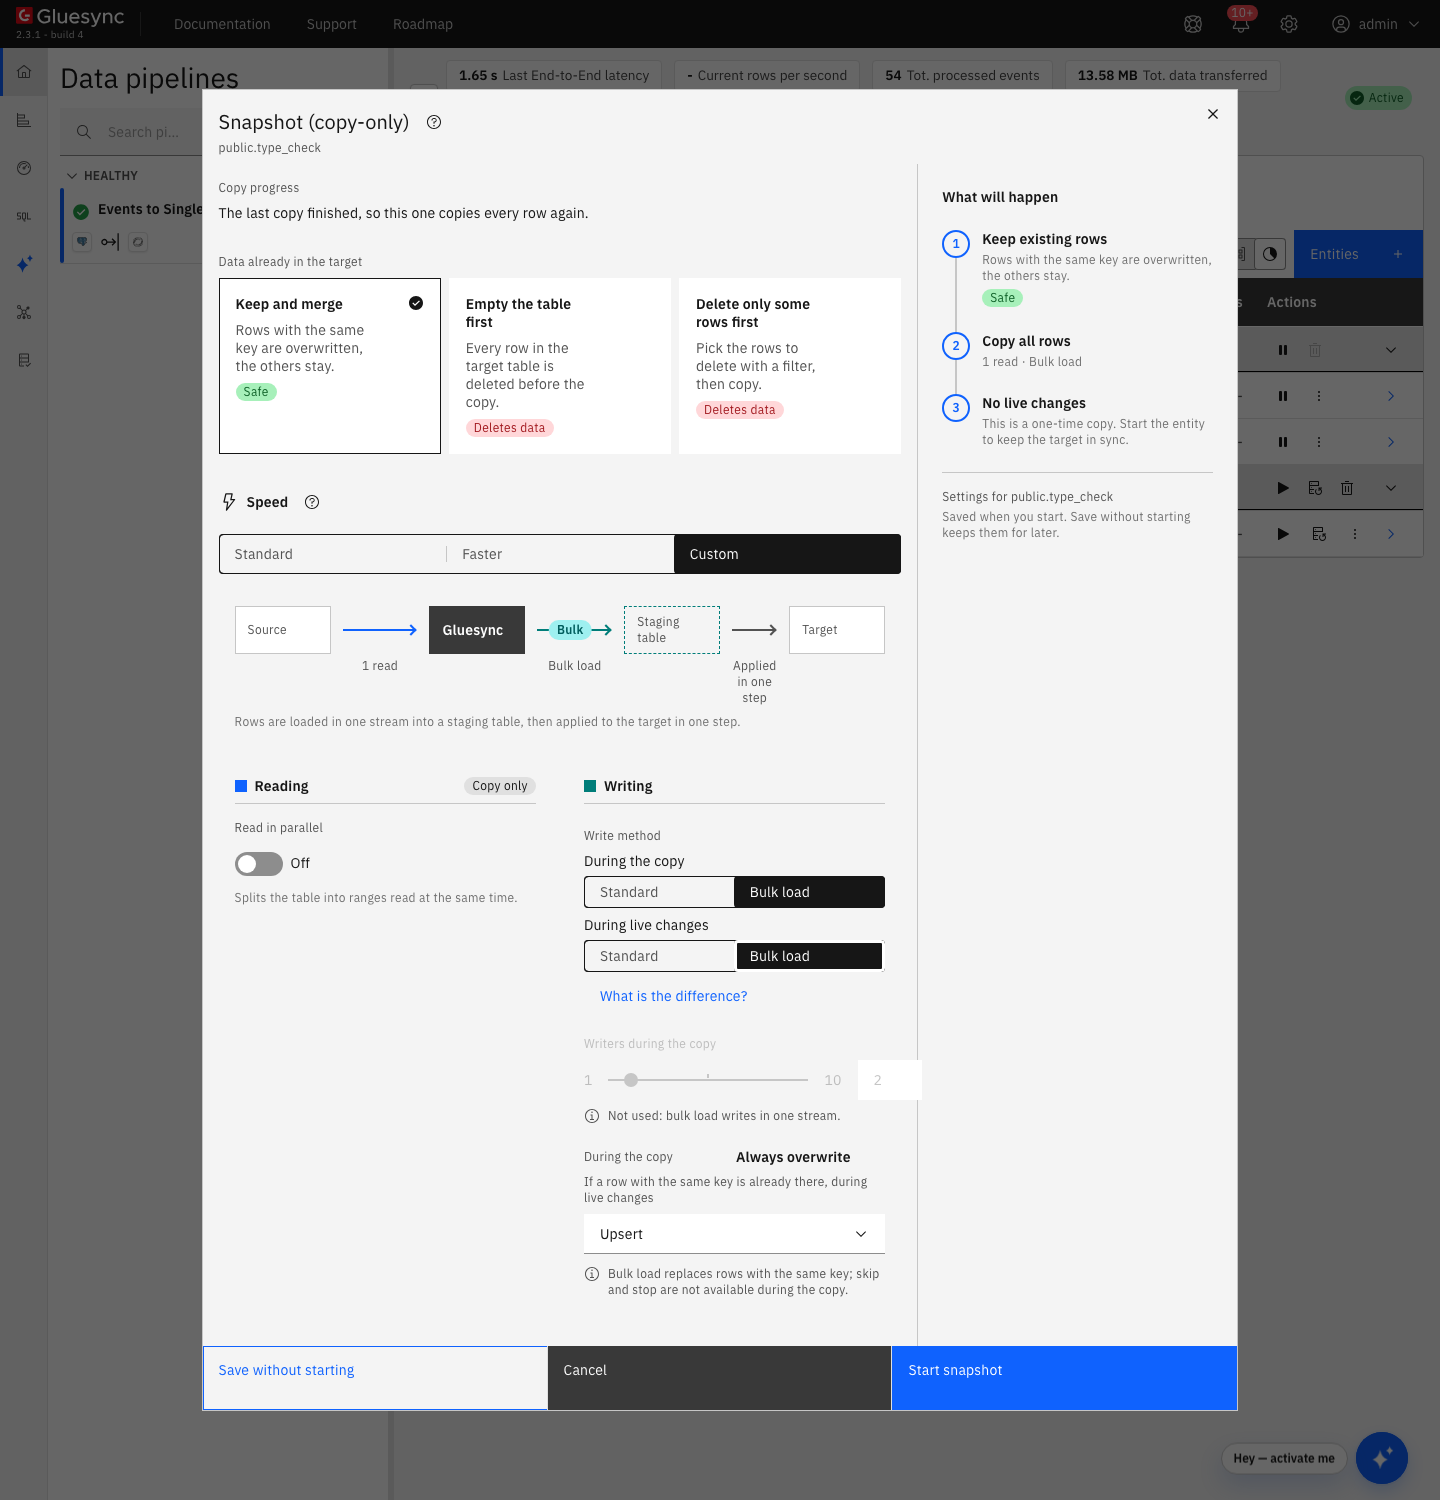
Check the rows and the staging table:
SELECT count(*) FROM demo.events;
SHOW TABLES IN GLUESYNC;
SHOW CREATE TABLE GLUESYNC.<staging table>\G
Then read the Core Hub log for the load:
docker logs <core hub container> 2>&1 | grep -E "LOAD DATA returned|Executing merge"Two entities that write into the same target table each get their own staging table.
See Bulk load for how it works for every target.
UI + SQL
The copy-only snapshot leaves the entity on Hold. Start it to follow the changes, then change the source and read the target.
-
Select the play button of the entity. The Sync changes (CDC) dialog opens. Under Start from choose Now, because the rows are already in the target. The Writing column shows Bulk load under During live changes. Select Start entity. The entity becomes Active;
-
On the source, insert, update and delete one row each:
INSERT INTO events VALUES (200001, 'new', 1, 1.5, now(), 'inserted'); UPDATE events SET val = -1, note = 'updated' WHERE id = 5; DELETE FROM events WHERE id = 6; -
After a few seconds, read the three keys and look for duplicates on SingleStore:
SELECT id, kind, val, note FROM demo.events WHERE id IN (5, 6, 200001) ORDER BY id;
SELECT count(*) FROM demo.events;
SELECT count(*) FROM (SELECT id FROM demo.events GROUP BY id HAVING count(*) > 1) d;
|
With bulk operations during CDC, an update is not an |
SQL + UI
Each error below was reproduced by removing one grant or changing one setting. The troubleshooting table at the end lists them with the cause. The most common three:
-
Delete the
GLUESYNCschema (or the grants on it) and start an entity with bulk operations. A toast shows Entity Upsert Failed with(conn=<number>) Access denied for user 'gluesync'@'%' to database 'GLUESYNC'. Fix: run the statements of step 1.2; -
Remove
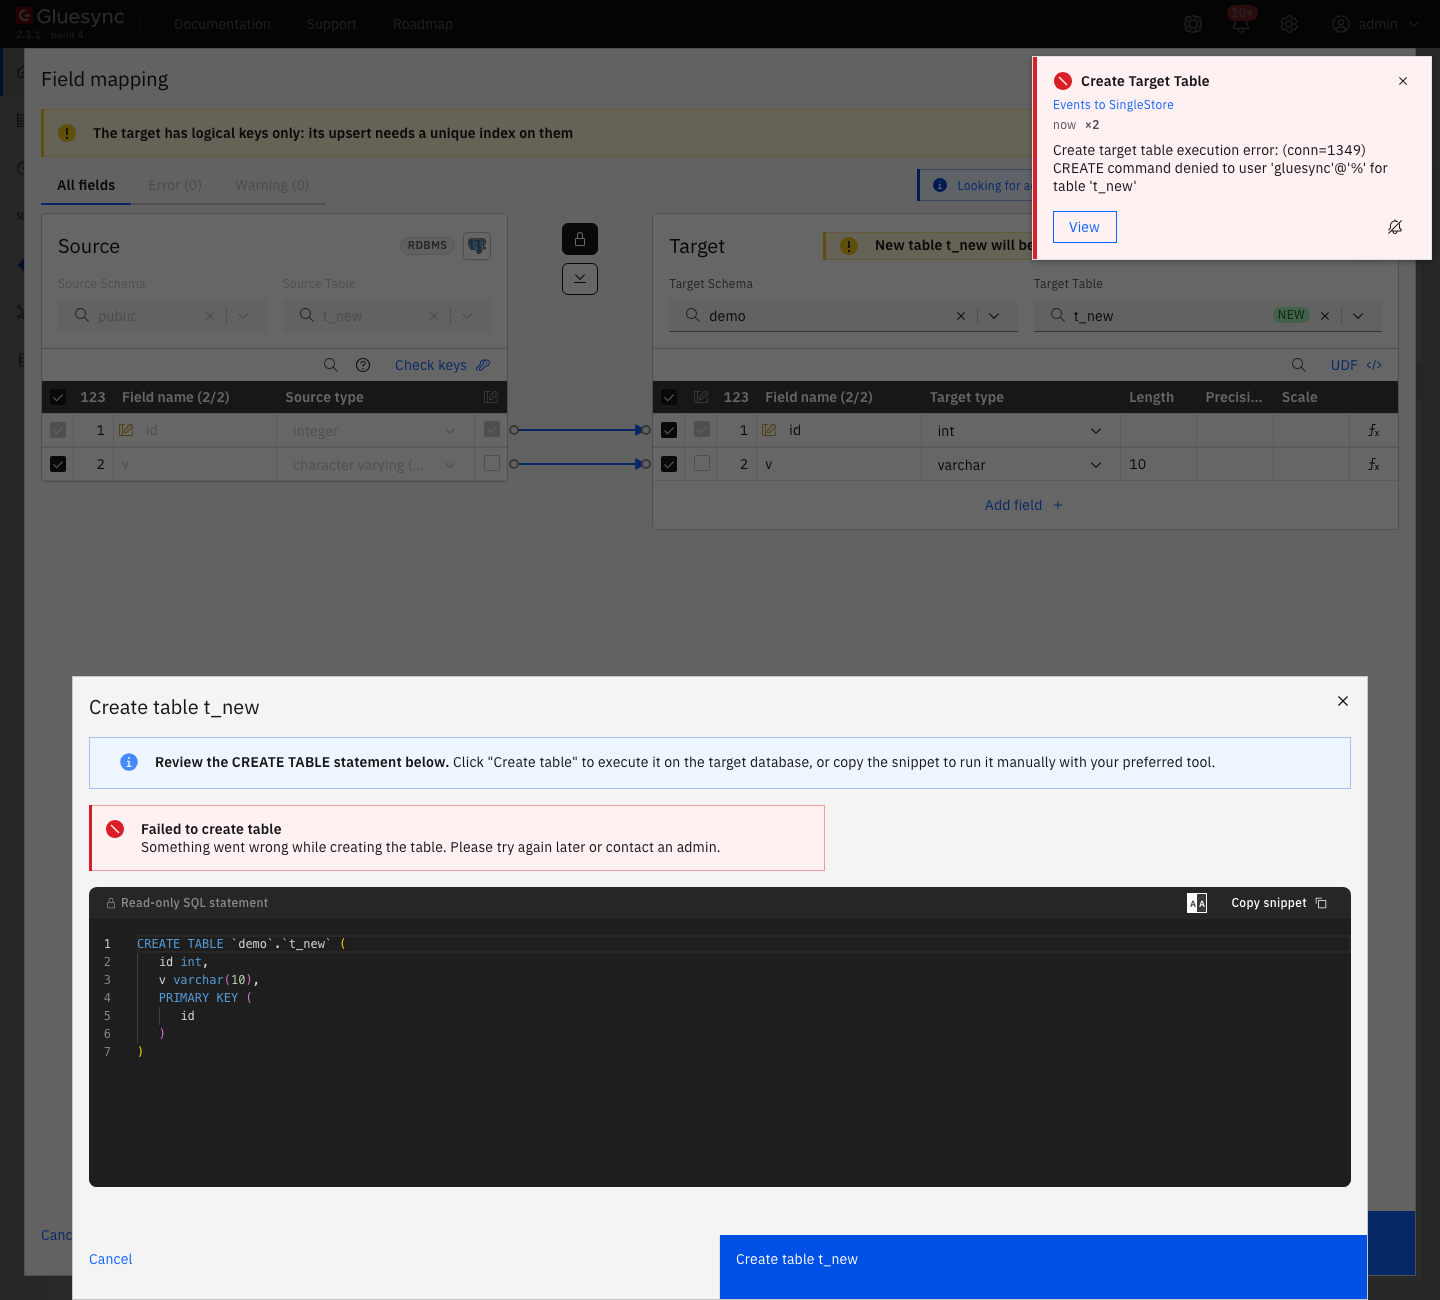
CREATEfrom the target database and select Create table. The toast shows Create Target Table withCreate target table execution error: (conn=<number>) CREATE command denied to user 'gluesync'@'%' for table 't_new'. Fix: grantCREATEon the database, or create the table yourself and choose it in Target Table; -
Map a
timestamp with time zonecolumn todatetimeoffsetand select Create table. The dialog shows Failed to create table and the toast showsYou have an error in your SQL syntax; check the manual that corresponds to your MySQL server version for the right syntax to use near 'datetimeoffset,. Fix: change the type todatetime.
Data types
The proposal in the Field mapping dialog for a PostgreSQL source is below. The agent reference lists the alternatives for each Gluesync type in SingleStore target. Values were read back from SingleStore after a snapshot with standard writes.
| Source type | SingleStore type | Note |
|---|---|---|
|
|
Values written unchanged |
|
|
Keep the precision and the scale of the source |
|
|
|
|
|
Stored as |
|
|
|
|
|
Whole seconds only, see the note in step 6 |
|
|
The instant is stored as UTC. With bulk load, a column of this type makes the bulk write fail and fall back, see the troubleshooting table |
|
|
A |
|
|
The dialog needs a length for it. An existing |
|
|
The bytes are kept: |
|
|
The text is kept, with the spacing of |
|
|
Use a length of 36 |
The target dialog also offers tinyint, mediumint, year, tinytext, mediumtext, longtext, tinyblob, mediumblob, longblob, enum, set, geography and geometry.
Bulk and throughput settings
| Setting | Default | When to change it |
|---|---|---|
Speed in the start dialog: Standard, Faster, Custom |
Standard |
Custom gives separate write methods for the copy and for live changes, and the number of writers |
Writers during the copy (standard writes) |
2 |
Between 1 and 10. More writers copy faster and load the SingleStore aggregator more. Not used with bulk load |
Bulk load during the copy and during live changes |
Off |
Turn it on for large tables and for sustained change rates. See the numbers in step 7 |
Max Write Batch Size (entity settings) |
500 |
The upper limit of rows in one batch of standard writes |
Max Delete Batch Size (entity settings) |
1000 |
The upper limit of rows in one delete batch |
Max Write Bulk Size (entity settings) |
250000 |
The upper limit of rows in one bulk file |
Min connections count, Max connections count |
5, 25 |
Raise the maximum if several entities write at the same time |
Disable truncate on target table before snapshot inserts |
Off |
Turn it on if the agent must not truncate the target table before the snapshot inserts |
The entity settings are under the ⋮ menu of the entity, Edit settings, then Entity. Snapshot writing concurrency and the bulk switches are under Fine tuning. Read Tune replication throughput for the settings that apply to every target. TLS for the connection is in Enable HTTPS and TLS to databases.
Troubleshooting
| Problem | Possible cause | What to do |
|---|---|---|
Failed to save with |
The password is wrong, or the user is not allowed from the address of Core Hub |
Fix the password. Create the user for the host that Core Hub connects from, or |
Failed to save with |
The database does not exist, or the user has no grant on it |
Create the database and run the grants of step 1 |
Failed to save with |
Core Hub cannot resolve or reach the host or the port |
Check the host name, the port and the firewall between Core Hub and SingleStore |
Entity Upsert Failed: |
An entity has bulk operations, and the |
Create the schema and run the grants of step 1.2. To use another schema, set Gluesync schema name |
Create Target Table: |
The user has no |
Grant |
Failed to create table with |
The mapping proposes |
Change the target type to |
Failed to create table with |
A |
Change the type to |
Missing required field in the Field mapping dialog, and Confirm is disabled |
The Length of a |
Enter a length |
The yellow banner The target has logical keys only: its upsert needs a unique index on them, and updates add rows |
The target table has no unique key on the entity key. With standard writes, |
Create the table with a primary key or a unique key that contains the shard key. Or turn on bulk load for live changes: it deletes by the key and inserts. See Choose keys for tables without a primary key |
|
The shard key has a column that the primary key or the unique key does not contain |
Add the column to the key, or shard by a column of the key |
The log shows |
The column is a |
Use standard writes for an entity that has such a column, or keep the column out of the entity |
A staging table stays in |
The user has no |
|
A |
The agent writes whole seconds |
Plan for whole seconds. See the note in step 6 |
|
SingleStore does not change a column type of a columnstore table in place |
Create the table again with the right type, or copy it to a new table |
Related guides
Contact MOLO17 Support if you need assistance with a SingleStore target.