Set up a GridGain target with the thin client
GridGain keeps its data in caches, and its SQL layer shows a cache as a table. The Gluesync GridGain agent talks to that SQL layer over the thin client: it reads the catalog, and it writes each batch of changes with one multi-row MERGE INTO statement. This guide prepares a GridGain 8 cluster, creates a user, creates the target table, connects Gluesync, copies a PostgreSQL table with a snapshot and live changes, secures the connection, and explains the settings and the errors that you are most likely to meet.
In this guide
You will activate a cluster that uses native persistence, turn authentication on and create a user for Gluesync, and create the target table with the cache settings that you want. You will create the GridGain target connection, map a PostgreSQL table to the table, run a snapshot and CDC, and check the rows with SQL. You will also connect over TLS, read how the write batch settings work, and recover from the failures that are most likely on a new setup.
Quick information
Goal |
Replicate a PostgreSQL table to a GridGain SQL table with a snapshot, then keep it in sync with change data capture (CDC) |
Audience |
Data engineers and GridGain or Apache Ignite administrators |
Level |
Intermediate |
Time required |
About 60 minutes |
Area |
GridGain → SQL and control utility; Control Plane → Pipelines → GridGain target → Base settings and Advanced settings; entity → Edit settings |
Applies to |
Gluesync 2.3 |
Before you begin
Make sure that:
-
You have a GridGain 8 cluster. This guide was tested with GridGain Community Edition 8.9, one node, native persistence on, authentication on. The agent reference lists GridGain 8.8 and later in GridGain agent for Gluesync. GridGain is a target only: you need another database as the source;
-
Core Hub can open a connection to the thin client port of a node,
10800by default; -
You can run SQL on the cluster as an administrator, with
sqllineor any JDBC tool, and you can run the control utilitycontrol.shon a node; -
You can sign in to the Control Plane with a role that can create pipelines;
-
You have a source that Core Hub can read with CDC. This guide uses PostgreSQL with
wal_level = logical, prepared as in Set up a PostgreSQL WAL source, and a tableshop.orderswith 5,000 rows:idbigintprimary key,customervarchar(40),amountnumeric(10,2),qtyinteger,paidboolean,created_attimestamp, andnotetext.
|
The messages quoted in this guide were captured in the Control Plane and in the Core Hub log of Gluesync 2.3, against GridGain Community Edition 8.9. A cluster that is not on native persistence starts active, so step 1 does not apply to it. |
Guide steps
CLI
A node that uses native persistence starts in the state INACTIVE, and it refuses every SQL statement until you activate the cluster. This is the usual first failure of a new setup: the connection test of the Control Plane fails with the message shown in the troubleshooting table.
-
Check that the thin client port is enabled in the node configuration. The
clientConnectorConfigurationbean of the lab node is:<property name="clientConnectorConfiguration"> <bean class="org.apache.ignite.configuration.ClientConnectorConfiguration"> <property name="host" value="0.0.0.0"/> <property name="port" value="10800"/> <property name="thinClientEnabled" value="true"/> <property name="jdbcEnabled" value="true"/> </bean> </property> -
Activate the cluster once, from any node:
/opt/gridgain/bin/control.sh --set-state ACTIVE --yesWhen authentication is on (step 2), add
--userand--password, or the utility waits for them at a prompt.
SQL
-
Turn authentication on in the node configuration, next to the native persistence settings, and restart the node:
<bean id="ignite.cfg" class="org.apache.ignite.configuration.IgniteConfiguration"> <property name="authenticationEnabled" value="true"/> ... </bean> -
Activate the cluster as in step 1, with
--user ignite --password ignite. These are the credentials of the default administrator. -
Connect as that administrator, change its password, and create the user that Gluesync uses. Quote the user name, so that GridGain stores it exactly as
gluesync, the way you type it in the form.ALTER USER "ignite" WITH PASSWORD '<a strong password>'; CREATE USER "gluesync" WITH PASSWORD '<a strong password>';
SQL
Create the table yourself, with unquoted names, before you map the entity. The Gluesync MERGE INTO statement writes the column names without quotes, so GridGain looks for them in upper case. A table that has lower-case column names, like the one that the Create table option of the field mapping dialog proposes, fails at the first write (see the troubleshooting table).
-
Create the table and choose its cache settings in the
WITHclause:CREATE TABLE PUBLIC.ORDERS ( ID BIGINT PRIMARY KEY, CUSTOMER VARCHAR(40), AMOUNT DECIMAL(10,2), QTY INT, PAID BOOLEAN, CREATED_AT TIMESTAMP, NOTE VARCHAR(1000) ) WITH "CACHE_NAME=orders,TEMPLATE=PARTITIONED,BACKUPS=1";CACHE_NAMEis the name of the cache that stores the rows. Without it, GridGain names the cacheSQL_PUBLIC_ORDERS.TEMPLATE=PARTITIONEDspreads the rows over the nodes, andBACKUPS=1keeps one copy of each partition on another node. The primary key of the table is the key that Gluesync uses to find a row for an update and a delete, and it must be the same set of columns as the primary key of the source. -
Look at the result in the catalog. This is the query that Gluesync uses to list the tables, so a cache that has no SQL table does not appear in the Control Plane:
SELECT TABLE_NAME, CACHE_NAME FROM SYS.TABLES WHERE SCHEMA_NAME = 'PUBLIC';
UI
-
In the Control Plane, select Create your first pipeline, or the + button of the pipeline list if you already have pipelines. The Agents setup wizard opens;
-
In 1. Setup source, choose the PostgreSQL CDC agent tile and fill Host name / Address, Port, Database name, Username and Password. Select Test and continue, then Next;
-
In 2. Setup target(s), search for
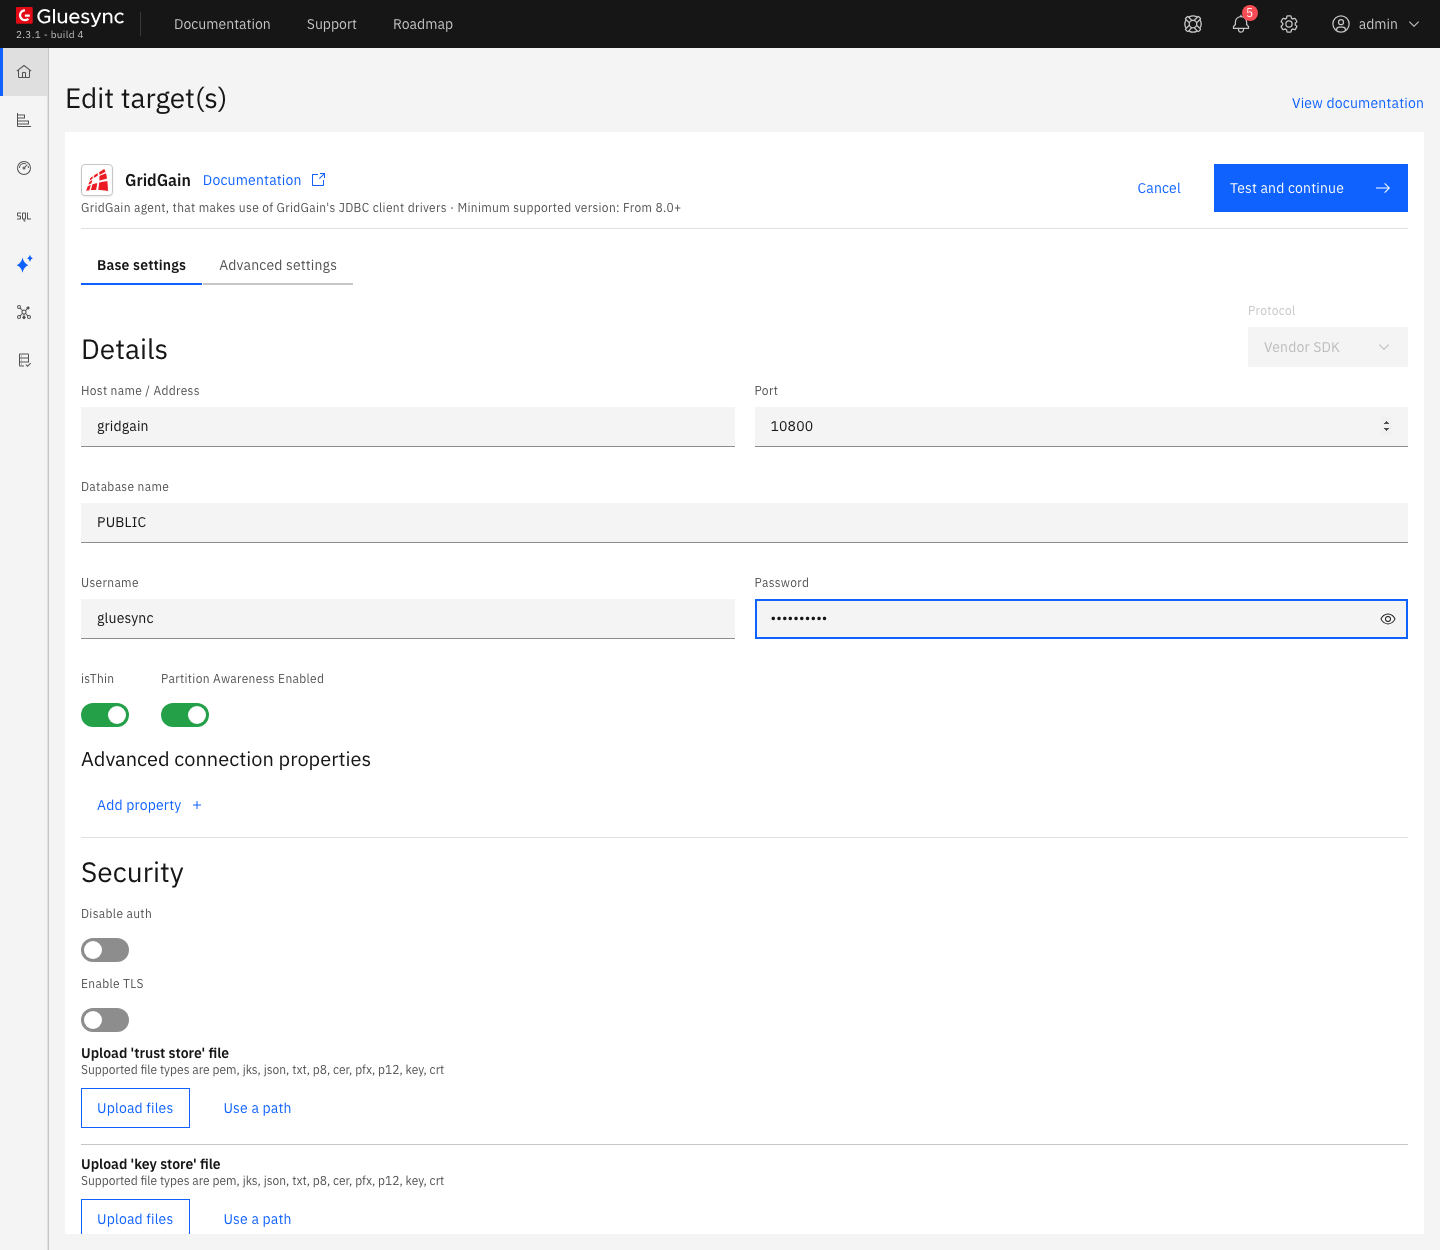
gridgainand select the GridGain agent tile under RDBMS. Fill Base settings:-
Host name / Address: a node of the cluster, as Core Hub sees it;
-
Port:
10800, the default; -
Database name: a value that the form requires. The connection does not use it to choose a schema: you choose the schema, for example
PUBLIC, when you map each entity; -
Username and Password: the user of step 2;
-
-
Keep isThin on. It is the thin client, which the agent reference recommends. Keep Partition Awareness Enabled on, its default: the agent adds
partitionAwareness=trueto the connection; -
Leave Disable auth off for a cluster with authentication. For a cluster without it, turn it on, and still enter a user name and a password: the form refuses an empty value, and the cluster ignores it;
-
Select Test and continue, then Next, enter a Pipeline name and select Finish.
|
When you open Edit target for a target whose first test failed in the wizard, the form can be empty. Fill the host, the port and the other values again before you select Test and continue. |
UI
-
In the pipeline, select Entities. The Add entities page opens;
-
In the Object browser, expand the schema
shopand tickorders. The Field mapping dialog opens; -
In Target Schema, choose
PUBLIC. In Target Table, chooseORDERS; -
Check the links. Gluesync links the source fields to the target columns by name, without regard to the case, and takes the key from the primary key of the table. Select Confirm, then Confirm and continue.
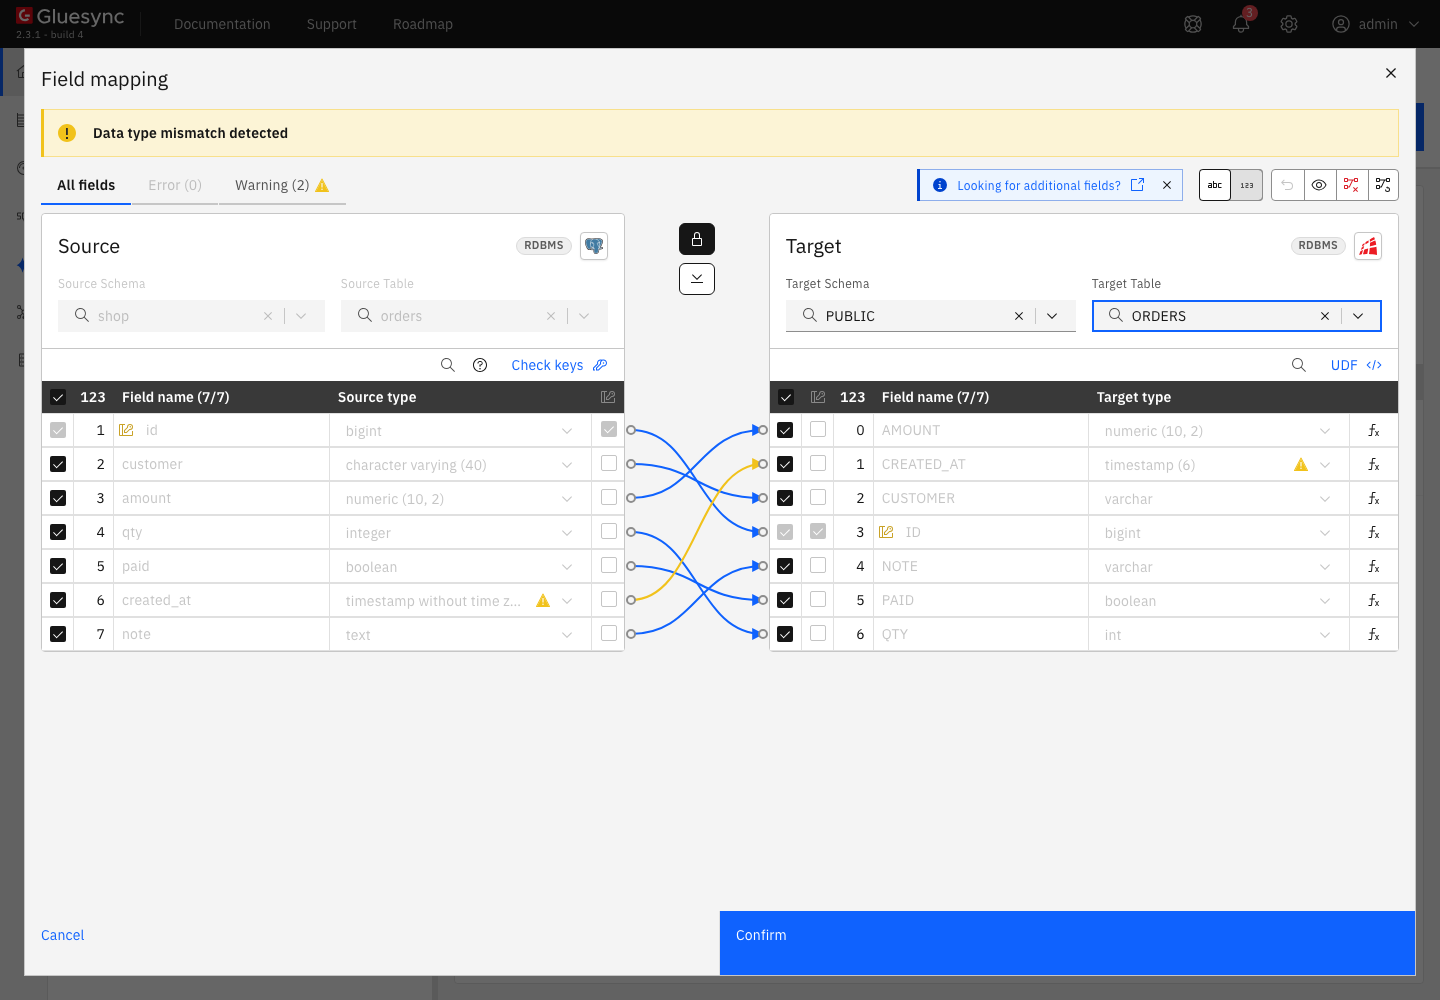
shop.orders to the existing table PUBLIC.ORDERS: every field is linked by name, and the key is ID.|
Choose a primary key for tables that have none before you add the entity. Read Choose keys for tables without a primary key and Choose a key strategy. |
UI
-
In the row of the entity, select the start icon (Start). The dialog Sync changes (CDC) opens;
-
In Start from, keep Full copy, marked Recommended for the first start;
-
In Data already in the target, keep Keep and merge. Rows with the same key are overwritten, and the others stay. Do not choose Empty the table first on GridGain without reading the next paragraph and the troubleshooting table;
-
Select Start entity.
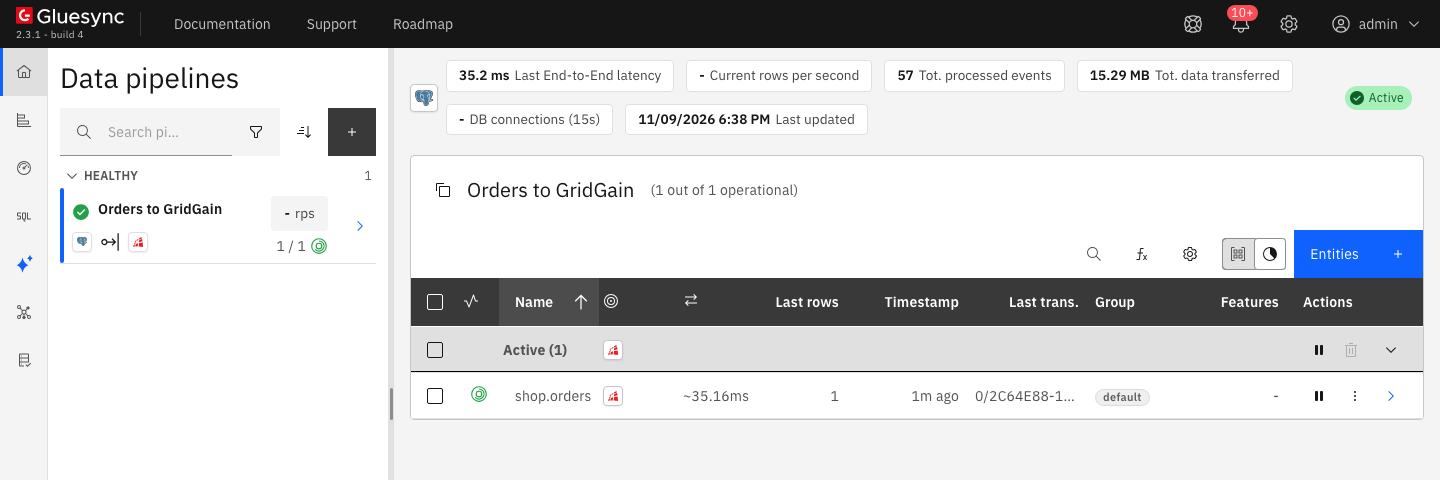
Empty the table first sends TRUNCATE TABLE to GridGain, and GridGain 8 has no such statement. The entity goes to the Error group with the notification SQL and the text shown in the troubleshooting table. Empty the table yourself with DELETE FROM PUBLIC.ORDERS; and keep Keep and merge, or turn on the target property that skips the truncate, see Snapshot options.
SQL
-
Count the rows and compare with the source:
SELECT COUNT(*) FROM PUBLIC.ORDERS; -
Change the source, then read the same rows on the target. On PostgreSQL:
INSERT INTO shop.orders VALUES (5001, 'new customer', 99.90, 3, true, '2026-11-09 10:15:30.123456', 'inserted'); UPDATE shop.orders SET qty = 777, note = 'updated' WHERE id = 1; DELETE FROM shop.orders WHERE id = 2; -
On GridGain, read the rows after a few seconds. Cast the timestamp to text to see every digit:
SELECT ID, QTY, NOTE, CAST(CREATED_AT AS VARCHAR) AS TS FROM PUBLIC.ORDERS WHERE ID IN (1, 2, 5001);
CLI + UI
Skip this step for a cluster that accepts plain connections. The thin client needs three things on the server and two on the client:
-
On the server, create a key store and, for the client, a trust store and a key store. The Ignite thin driver does not initialize without a client key store, even when the server does not ask for a client certificate. In a test setup:
keytool -genkeypair -alias gridgain -keyalg RSA -keysize 2048 -validity 365 -dname "CN=<node host name>" -ext "SAN=dns:<node host name>" -keystore server.jks -storepass <password> -keypass <password> keytool -exportcert -alias gridgain -keystore server.jks -storepass <password> -file server.cer keytool -importcert -noprompt -alias gridgain -file server.cer -keystore trust.jks -storepass <password> keytool -genkeypair -alias gluesync -keyalg RSA -keysize 2048 -validity 365 -dname "CN=gluesync" -keystore client.jks -storepass <password> -keypass <password> -
Turn TLS on for the thin client in the node configuration, with the key store of the server, and restart the node. Replace
STORE_PASSWORDwith the password of the key store:<bean class="org.apache.ignite.configuration.ClientConnectorConfiguration"> <property name="port" value="10800"/> <property name="thinClientEnabled" value="true"/> <property name="sslEnabled" value="true"/> <property name="useIgniteSslContextFactory" value="false"/> <property name="sslContextFactory"> <bean class="org.apache.ignite.ssl.SslContextFactory"> <property name="keyStoreFilePath" value="/tls/server.jks"/> <property name="keyStorePassword" value="STORE_PASSWORD"/> </bean> </property> </bean> -
Copy
trust.jksandclient.jksto a folder that Core Hub can read, for example/opt/gluesync/data/tls/; -
In the Control Plane, select the gear of the pipeline, then Edit target. Leave Enable TLS off and paste a Connection string with the plain paths of the two files:
jdbc:ignite:thin://<node host name>:10800?sslMode=REQUIRE&sslTrustCertificateKeyStoreUrl=/opt/gluesync/data/tls/trust.jks&sslTrustCertificateKeyStorePassword=<password>&sslClientCertificateKeyStoreUrl=/opt/gluesync/data/tls/client.jks&sslClientCertificateKeyStorePassword=<password>&partitionAwareness=trueThe Username and Password of the form still apply. Select Test and continue.
|
In our test of Gluesync 2.3, Enable TLS with a trust store and a key store, uploaded or given as a path, could not connect to GridGain. The agent adds the prefix |
Snapshot options and write batches
Two groups of settings change how Gluesync writes to GridGain.
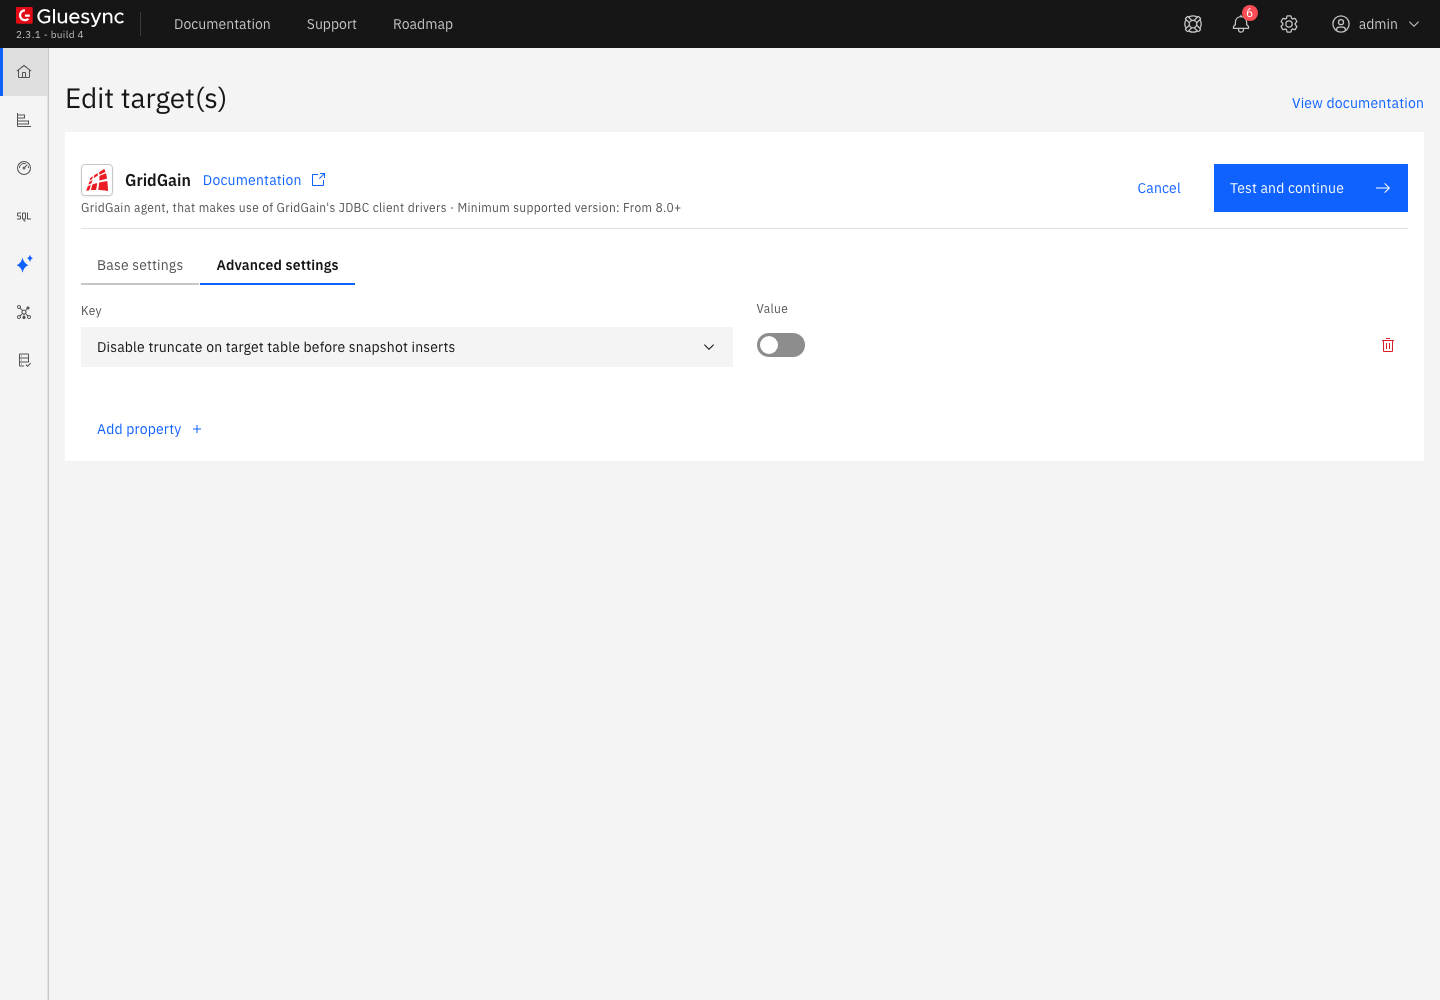
On the target, under Advanced settings of Edit target, Add property offers two keys:
-
Disable truncate on target table before snapshot inserts: turn it on to skip the
TRUNCATE TABLEstatement. With the switch on, a start with Empty the table first runs without the error and does not empty the table. We saw an entity that was in error with the truncate message resume and load all its rows by itself after we turned this property on and selected Test and continue; -
Cache Template: the cache template name,
PARTITIONEDby default. We did not see an effect on the table that the field mapping dialog creates, whose statement has noWITHclause. Set the cache options in your ownCREATE TABLEstatement, as in step 3.
On the entity, select the three-dot menu, Edit settings, then the Entity tab:
-
Max Write Batch Size:
1000by default. The number of rows in oneMERGE INTOstatement; -
Max Delete Batch Size:
1000by default. The number of keys in one delete batch.
Data types
When you map to an existing table, the target types are the types of your columns. When you let Gluesync create the table, the dialog proposes a type for each source column. The table below is what the dialog proposed for a PostgreSQL source in our test. GridGain has these types: varchar, char, varbinary, timestamp, time, date, numeric, smallint, int, bigint, float, double and boolean.
| PostgreSQL type | Proposed GridGain type | Note |
|---|---|---|
|
|
Values written unchanged |
|
|
|
|
|
Keep the precision and the scale of the source |
|
|
|
|
|
The dialog shows Missing required field until you enter a length, for example |
|
|
|
|
|
|
|
|
Change it to |
|
|
Change it to |
|
|
|
|
|
The dialog asks for a length. An array shows a warning, because it has no matching type |
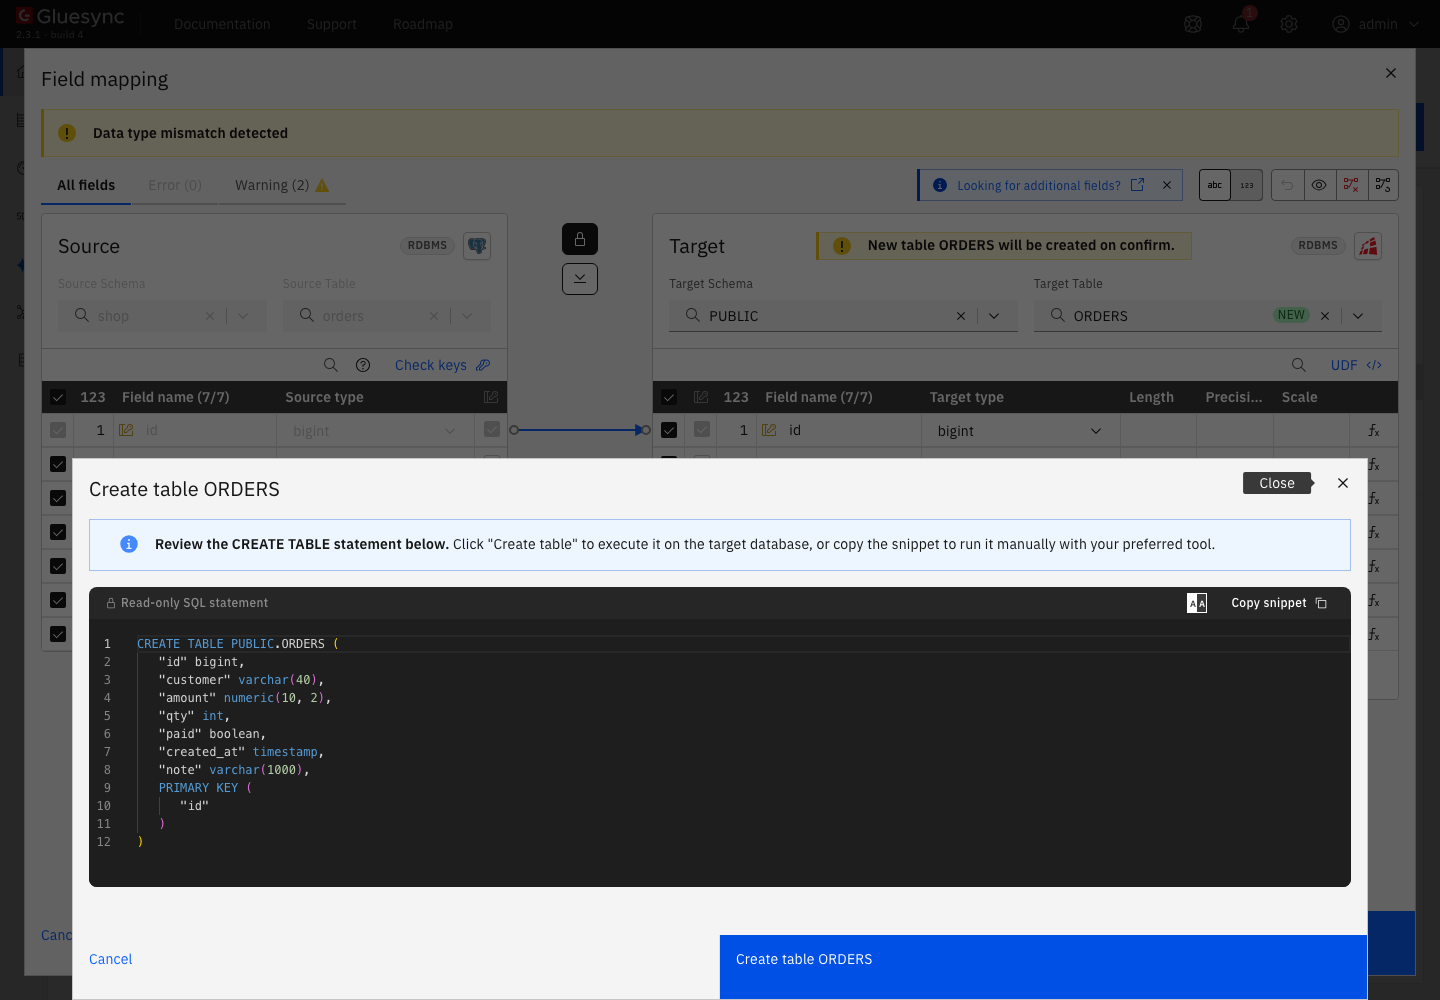
Set the types in the field mapping dialog before you confirm it, or create the table yourself as in step 3. The dialog also shows the statement that it will run, in a read-only Create table window:
Bulk and throughput settings
| Setting | Default | When to change it |
|---|---|---|
Max Write Batch Size (entity) |
|
The rows of one |
Min connections count and Max connections count (target, Settings) |
|
The pool of connections of the agent. Raise the maximum when many entities write at the same time |
Partition Awareness Enabled (target) |
On |
Adds |
Speed in the start dialog |
Standard, one reader and two writers |
More writers copy faster but load GridGain more, see the Tune replication throughput guide |
The Core Hub log shows each write at debug level, for example Insert batch for entity shop.orders from null to null took 155ms for a snapshot batch. Read Read Gluesync logs and diagnose errors to find them.
Troubleshooting
| Symptom | Cause | Fix |
|---|---|---|
Test and continue fails with Failed to save: |
The cluster uses native persistence and nobody activated it. |
Run |
The user name and the password fields show Required with Disable auth on |
The form requires both values, even for a cluster without authentication. |
Enter any user name and password. The cluster ignores them. |
Failed to save: |
A wrong user or password, or a user that does not exist. The agent sends the user name even when Disable auth is on. |
Create the user (step 2) or fix the password, leave Disable auth off for a cluster with authentication, and select Test and continue again. The pipeline recovers without a restart. |
Failed to save: |
The node is not reachable, or the cluster uses TLS for the thin client and the connection of Gluesync does not. We reproduced the second case. |
Check the host and the port from Core Hub. For TLS, follow the TLS step. |
Failed to save: |
Enable TLS has a trust store and no key store. The thin driver needs a key store. |
Add a client key store, as in the TLS step. |
Failed to save: |
The agent puts the prefix |
Leave Enable TLS off and use the Connection string of the TLS step. |
Notification Syntax Error when the entity starts: |
The table has lower-case, quoted column names, for example because the Create table option of the field mapping created it. The statement of the agent uses unquoted names, which GridGain reads as upper case. |
Create the table with unquoted names (step 3) and map the entity to it. In our test the entity resumed and loaded the rows by itself after we replaced the table. To point an entity at another table, pause it, delete it and add it again. |
Notification SQL and the entity in the Error group after a start with Empty the table first: |
GridGain 8 does not support |
Use Keep and merge, empty the table with |
The field mapping shows Missing required field and Confirm is not available |
A |
Enter a length for each marked column, for example |
The target table has a |
The dialog proposes |
Change the Target type to |
The pipeline shows |
The banner stays until the next health check of the agent. |
Wait a minute or two and reload the page. Check the Core Hub log if it stays. |
The Control Plane does not list a table or a cache |
The agent lists only the tables of the SQL catalog ( |
Create the table with |