Set up an Amazon Redshift target with S3 bulk loads
The AWS RedShift agent writes to a Redshift cluster or a Redshift Serverless workgroup. For a snapshot it can use a bulk path: it writes the rows to a compressed CSV file in an S3 bucket, loads the file into a staging table with the Redshift COPY command, and then applies the staging table to your table. Live changes use standard writes. This guide prepares the database user and the S3 bucket, creates the target, maps the types, runs a bulk snapshot and live changes, and shows the errors that a new setup is most likely to raise, including one that cuts text without an error.
In this guide
You will create a Redshift user and a schema with the grants the agent needs, and an S3 bucket with an IAM policy for the access key. You will create the target connection with the S3 settings, add an entity and let Gluesync create the table, choose a type and a length for every column in the Field mapping dialog, run a snapshot with Bulk load, and check the rows in Redshift, the files in S3 and the load in the Core Hub log. You will then follow live changes, and recover from the failures that are most likely on a new setup.
Quick information
Goal |
Replicate a PostgreSQL table to Amazon Redshift with a bulk snapshot through S3, then keep it in sync with change data capture (CDC) |
Audience |
Data engineers and AWS administrators who own a Redshift cluster or workgroup |
Level |
Intermediate |
Time required |
About 60 minutes |
Area |
Amazon Redshift → SQL and S3; Control Plane → Pipelines → AWS RedShift target → Base settings and Advanced settings; entity → Field mapping and start options |
Applies to |
Gluesync 2.3 |
Before you begin
Make sure that:
-
You have a Redshift provisioned cluster or a Redshift Serverless workgroup, and you can run SQL on it as an administrator. Redshift is a target only: you need another database as the source. This guide was tested with Redshift Serverless in
eu-central-1and a PostgreSQL 16 source; -
Core Hub can open a connection to the Redshift endpoint on port
5439. The security group, the VPC and the public access setting of the endpoint must allow the Core Hub host; -
You have an S3 bucket in the same region as Redshift, and an IAM user whose access key you can use. The agent signs in to Redshift with a database user and a password. The access key is used only for S3, and Gluesync passes the same key to the
COPYcommand; -
You can sign in to the Control Plane with a role that can create pipelines;
-
You have a source table with a primary key. This guide uses a PostgreSQL table
public.eventswith 100,000 rows (id bigintprimary key,kind varchar(20),val integer,note text,amount numeric(12,2),flag boolean,created_at timestamp,seen_at timestamptz,born date) and a second table with one column of each less common type.
|
The messages quoted in this guide were captured in the Control Plane and in the Core Hub log against Redshift Serverless. Names in angle brackets stand for your own values. The options of the agent are in the AWS RedShift target reference. |
Guide steps
SQL
Gluesync does not need a superuser. Connect to the target database as an administrator and run the statements below. Replace the names and the password.
-
Create the user and a schema that the user owns. The agent creates the target tables there, and an owner can create, change, truncate and drop its own tables:
CREATE USER gluesync_user PASSWORD '<a strong password>'; CREATE SCHEMA gluesync_data AUTHORIZATION gluesync_user; -
Let the user create its staging tables. The bulk path creates one staging table for each entity, and it creates it without a schema name. The table lands in the first schema of the search path of the user, which is
publicwith the default search path (in the test, a staging table namedpu_…appeared inpublic). GrantCREATEon that schema:GRANT USAGE, CREATE ON SCHEMA public TO gluesync_user; -
If you load into tables that already exist, and the user does not own them, grant the rights on each of them:
GRANT SELECT, INSERT, UPDATE, DELETE ON <schema>.<table> TO gluesync_user;The Empty the table first option of a snapshot runs
TRUNCATE, which needs the ownership of the table, or theTRUNCATEprivilege on it. The bulk path also runsANALYZEon its staging table, which the user owns. -
Check what the user can do:
SELECT has_schema_privilege('gluesync_user', 'gluesync_data', 'CREATE') AS data_schema,
       has_schema_privilege('gluesync_user', 'public', 'CREATE') AS staging_schema;
CLI
The bulk path needs a bucket where Core Hub writes the files and Redshift reads them. Create the bucket in the same region as your Redshift endpoint, then give the IAM user the three rights that the agent and the COPY command use. Replace <bucket>.
-
Create the bucket, if you do not have one:
aws s3api create-bucket --bucket <bucket> --region eu-central-1 \ --create-bucket-configuration LocationConstraint=eu-central-1 -
Attach this policy to the IAM user whose access key you will give to Gluesync:
{ "Version": "2012-10-17", "Statement": [ { "Effect": "Allow", "Action": "s3:ListBucket", "Resource": "arn:aws:s3:::<bucket>" }, { "Effect": "Allow", "Action": ["s3:PutObject", "s3:GetObject"], "Resource": "arn:aws:s3:::<bucket>/gluesync-bulk/*" } ] }s3:ListBucketis for the check that Gluesync runs on the bucket,s3:PutObjectis for the upload, ands3:GetObjectis for the read of theCOPYcommand, which runs with the same key. The agent always writes under the prefixgluesync-bulk/, and you cannot change it. -
The agent never deletes the files it writes, so add a lifecycle rule that removes them. Without it the bucket grows with every bulk load:
aws s3api put-bucket-lifecycle-configuration --bucket <bucket> --lifecycle-configuration '{
  "Rules": [{
    "ID": "expire-gluesync-bulk",
    "Status": "Enabled",
    "Filter": {"Prefix": "gluesync-bulk/"},
    "Expiration": {"Days": 1}
  }]
}'
UI
-
In the Control Plane, select Create your first pipeline, or the + button of the pipeline list. The Agents setup wizard opens;
-
In 1. Setup source, choose the PostgreSQL CDC agent tile and fill Base settings with your source database. Select Test and continue, then Next. The PostgreSQL WAL source guide prepares the source;
-
In 2. Setup target(s), choose the AWS RedShift agent tile and fill Base settings:
-
Host name / Address: the endpoint, such as
<workgroup>.<account>.<region>.redshift-serverless.amazonaws.comfor Serverless, or the cluster endpoint without the port and the database; -
Port:
5439; -
Database name, Username and Password: the database and the user of step 1;
-
AWS S3 bucket name (used by bulk operations):
<bucket>; -
AWS Region for S3 bucket: the region of the bucket, such as
eu-central-1. When the field has no value, the agent usesus-east-1; -
AWS Access Key ID for S3 and AWS Secret Access Key for S3: the key of the IAM user;
-
-
Under Security, set Enable TLS to encrypt the connection. It is off by default. With Enable TLS on and Trust server certificate off, the connection to Redshift Serverless was accepted and live changes kept flowing;
-
Select Test and continue. The target appears with a green check mark. Select Next, enter a Pipeline name and select Finish.
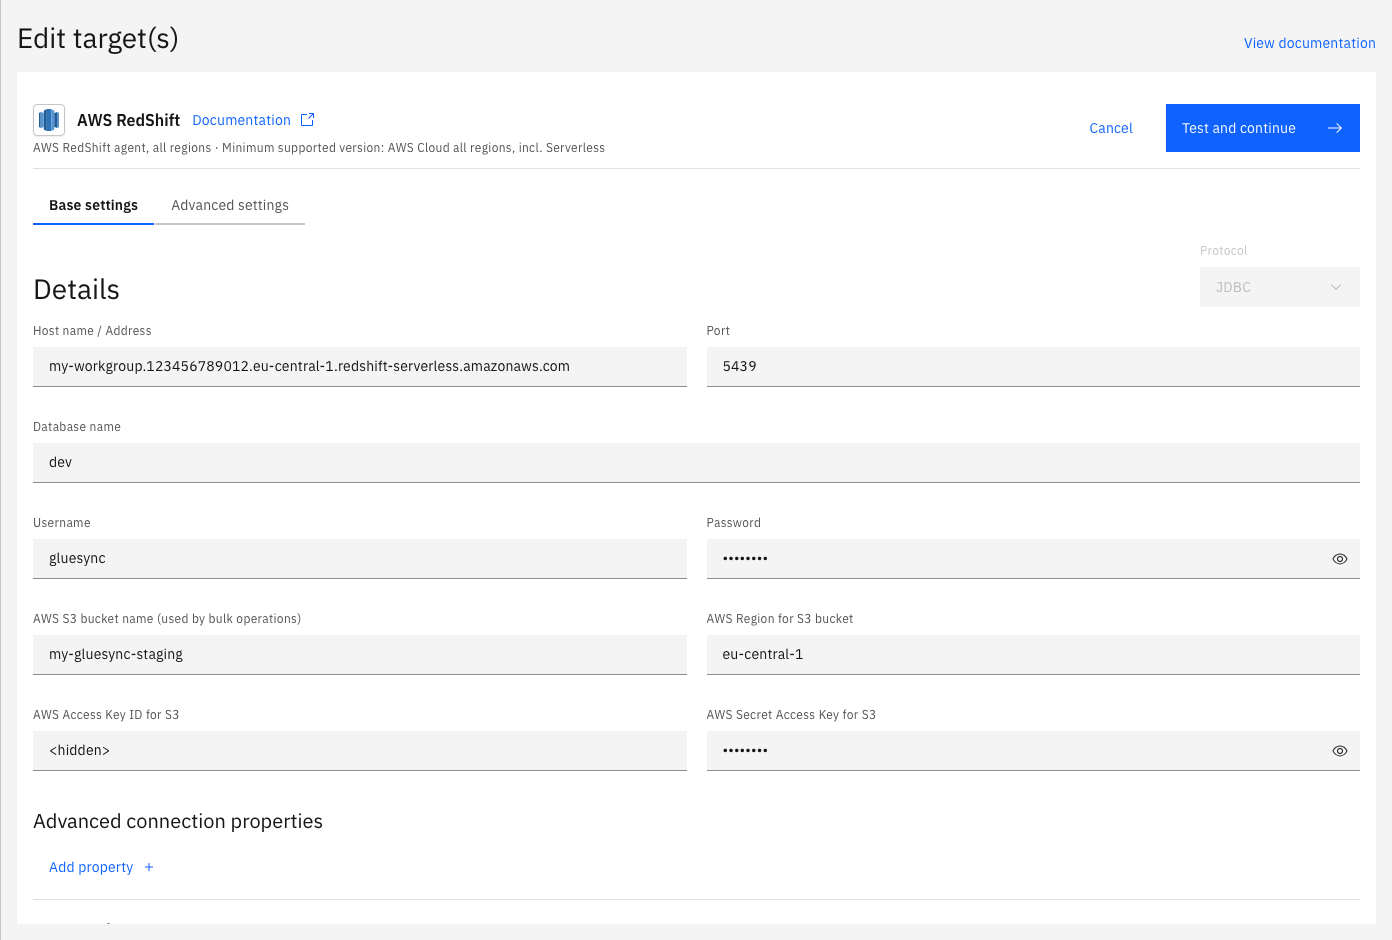
There is no Schema, Workgroup or S3 Key Prefix field. The schema comes from the Target Schema of each entity, and the workgroup is part of the endpoint host name. The key names for the REST API are in the reference.
UI
-
In the pipeline, select Entities. The Add entities page opens with the Object browser. Expand the source schema
public, select the check box of the tableevents, and then select the mapping icon of the table in the Selected entities list. The Field mapping dialog opens; -
Under Target, choose the Target Schema. In Target Table type the table name and choose Create table "<name>". The dialog shows New table <name> will be created on confirm. and a proposed target type for every column;
-
The
textcolumn shows the error Missing required field, because its Length is0. Read the next section before you set it; -
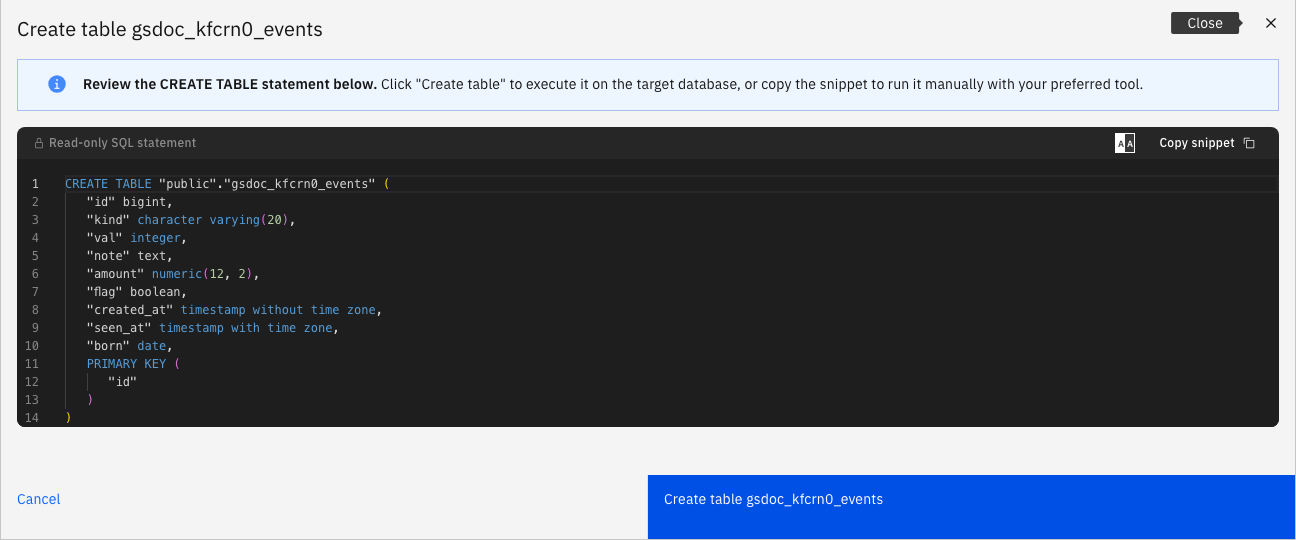
Select Confirm. The Create table dialog shows the Read-only SQL statement. Select Create table <name> to run it in Redshift;
-
Back on the Add entities page, select Confirm and continue.
The statement has this form:
CREATE TABLE "<schema>"."events" (
    "id" bigint,
    "kind" character varying(20),
    "val" integer,
    "note" text,
    "amount" numeric(12, 2),
    "flag" boolean,
    "created_at" timestamp without time zone,
    "seen_at" timestamp with time zone,
    "born" date,
    PRIMARY KEY ("id")
)
|
In Redshift, |
See Target table creation for the dialog.
UI
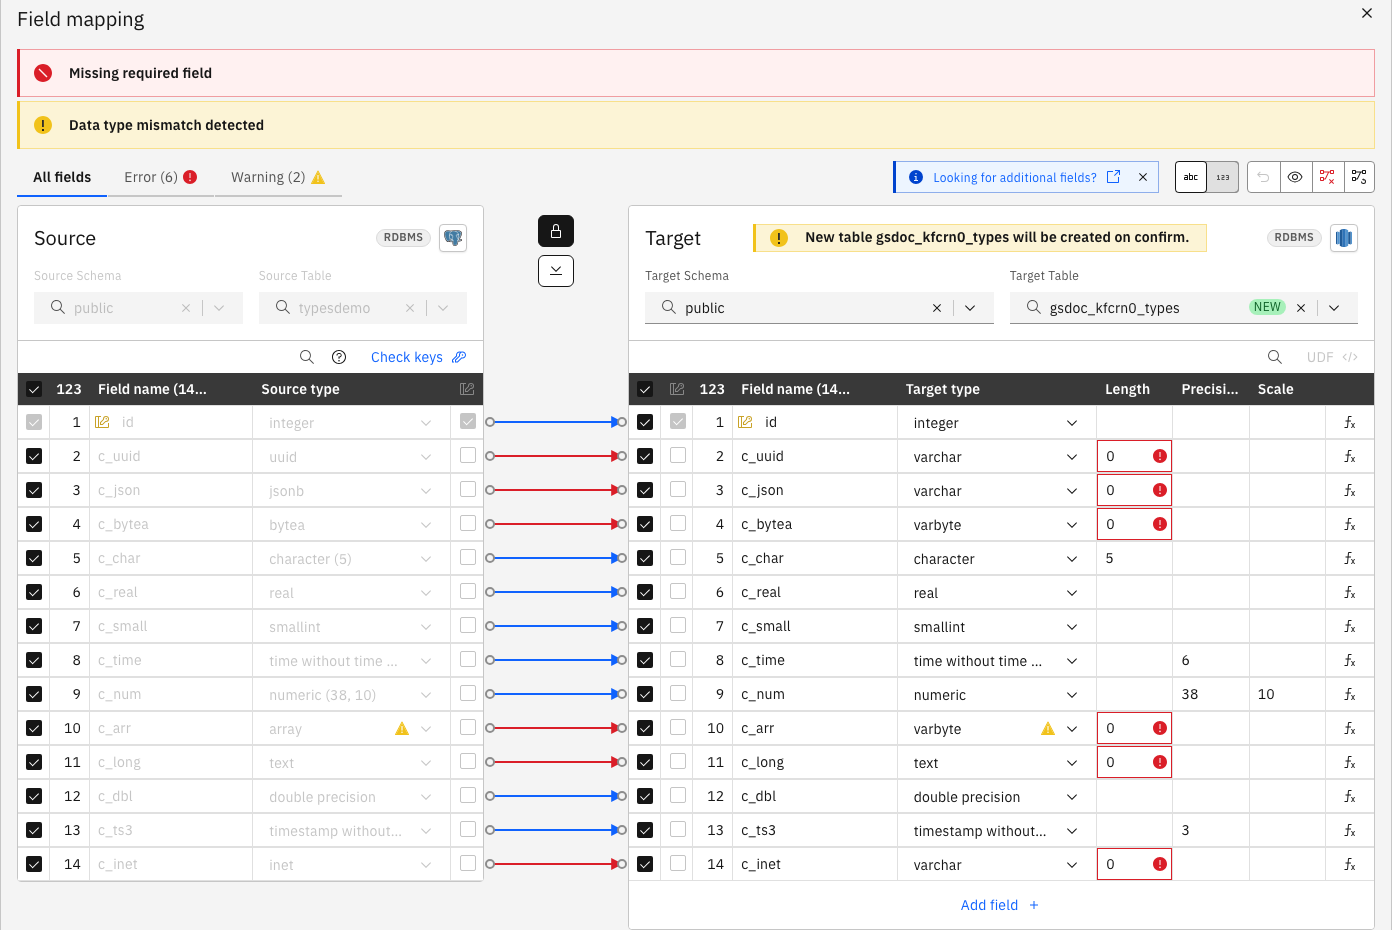
Most types map to the Redshift type with the same name. A few need a decision, and two cannot be loaded at all. The table below lists what the Field mapping dialog proposed for a PostgreSQL source, and what to do.
-
For
uuidandinet, the proposal isvarcharwith Length0. Set Length to36foruuidand to45forinet; -
For
jsonbandjson, the proposal isvarchar. To query the document with the RedshiftSUPERfunctions, choosesuperas Target type and set Length to-1. In the test,c_json.areturned the value of the keya, andis_object(c_json)returnedtrue; -
For
byteaand for array columns, clear the check box of the column in the Field mapping dialog, so that Gluesync does not copy it. The proposal isvarbyte, and an array shows a Data type mismatch detected warning. Step 8 shows the error that you get if you keep them.
| Source type | Redshift type | Note |
|---|---|---|
|
|
Values written unchanged |
|
|
Values written unchanged |
|
|
|
|
|
Padded with blanks to |
|
|
Length kept |
|
|
Choose |
|
|
|
|
|
Values written unchanged |
|
|
|
|
|
Set the length |
|
|
|
|
|
Not loadable: clear the check box of the column |
See Data type mapping for the Gluesync types behind this table.
UI + SQL
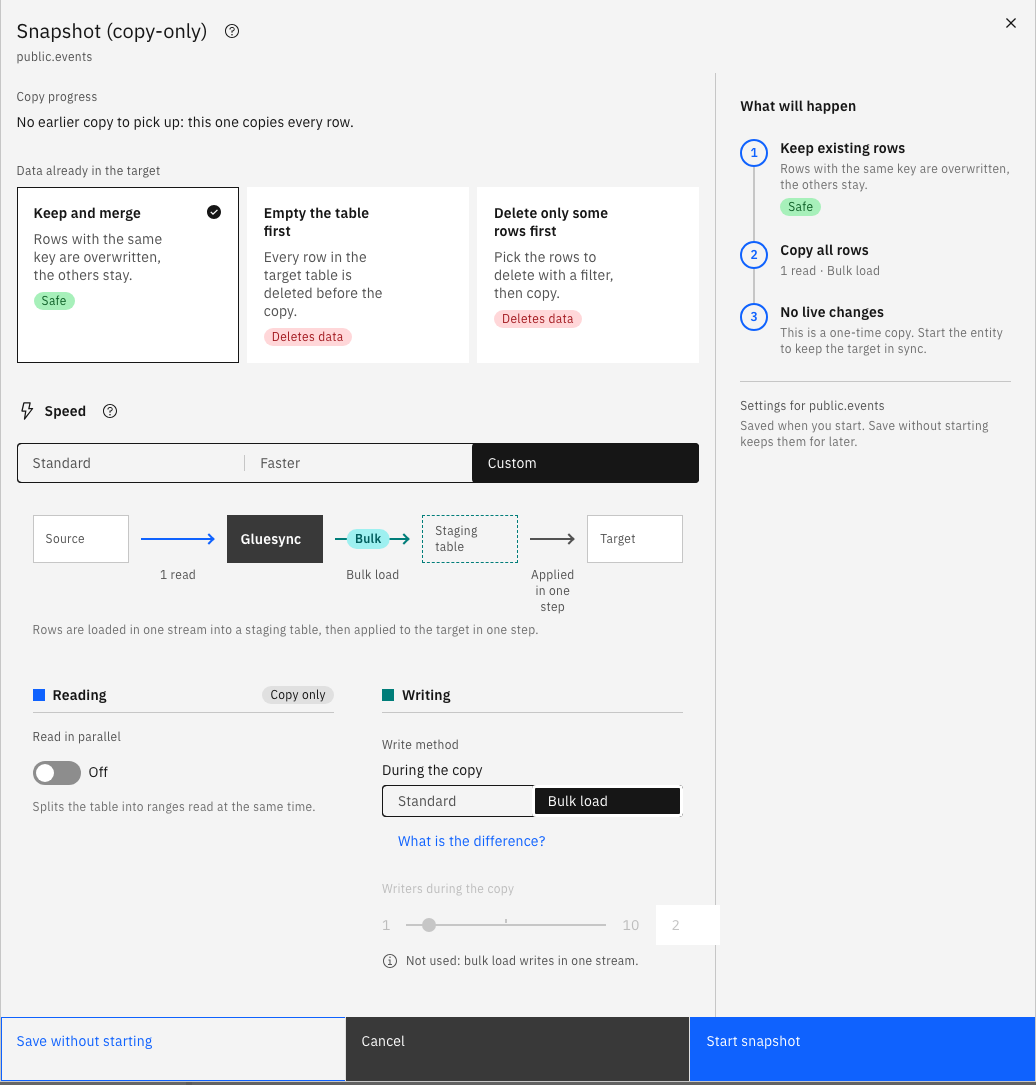
Bulk load is a setting of the snapshot. With it off, the agent writes JDBC batches. With it on, it writes the rows to a gzip CSV file in S3, loads the file into the staging table with COPY, and applies it to the target table.
-
In the pipeline, find the entity. On Hold, select the start options button, the one next to the play button. The Snapshot (copy-only) dialog opens;
-
Keep Keep and merge under Data already in the target;
-
Under Speed select Custom. In the Writing column, under During the copy, select Bulk load. The diagram shows Bulk and a Staging table;
-
Select Start snapshot.
Check the rows in Redshift:
SELECT count(*), min(id), max(id) FROM <schema>.events;Check the staging file in S3. The agent leaves it there, which is why step 2 adds a lifecycle rule:
aws s3 ls s3://<bucket>/gluesync-bulk/ --recursiveThen read the Core Hub log. The lines of the load are at INFO level:
docker logs <core hub container> 2>&1 | grep -E "RedshiftCsvUploader|RedshiftBulkCopyExecutor"|
On Redshift Serverless the final commit of a load can be slow. In the test, 100,000 rows loaded in about 10 seconds, and the commit alone took 9.9 seconds, with the warning |
UI + SQL
The copy-only snapshot leaves the entity on Hold. Start it to follow the changes, then change the source and read the target.
-
Select the play button of the entity. The Sync changes (CDC) dialog opens. Under Start from choose Now, because the rows are already in the target, and select Start entity. The entity becomes Active. Under Writing the dialog shows Standard and This target has no bulk load: live changes always use standard writes;
-
On the source, insert, update and delete one row each:
INSERT INTO events VALUES (200001, 'new', 1, 'cdc insert', 12.34, true, now(), now(), current_date); UPDATE events SET val = -1, note = 'cdc update' WHERE id = 5; DELETE FROM events WHERE id = 6; -
After a few seconds, read the three keys and the count in Redshift:
SELECT id, kind, val, note FROM <schema>.events WHERE id IN (5, 6, 200001) ORDER BY id;
SELECT count(*), count(DISTINCT id) FROM <schema>.events;
Gluesync applies a batch of changes with an UPDATE of the rows that exist and an INSERT of the missing ones, so an update of a row that is not in the target creates it. A delete runs as a DELETE on the key. Redshift is built for large loads, and every statement goes through the leader node, so a long stream of single-row statements is slower than one large batch. Read Tune replication throughput for the settings of the pipeline.
UI + SQL
Each error below was reproduced on the target. The first three come from the check of the S3 settings. They appear as Failed to save when you select Test and continue on a target that has an entity with Bulk load. The wrong value stays saved, so fix it and select Test and continue again.
-
Set AWS S3 bucket name (used by bulk operations) to a name that does not exist. The banner says
The connection was saved, but agent <id> of pipeline <id> did not accept the new credentials: S3 bucket '<bucket>' not found. Please verify the bucket name.Fix: type the right name; -
Set a wrong AWS Secret Access Key for S3. The banner says
… Access denied to S3 bucket '<bucket>'. Please check your AWS credentials and bucket permissions.Fix: use the key of the IAM user of step 2, and check its policy; -
Set AWS Region for S3 bucket to a region other than the one of the bucket. The banner says
… S3 error (status 400) while accessing bucket '<bucket>': Bad Request (Service: S3, Status Code: 400, Request ID: <id>, Extended Request ID: <id>). Fix: use the region of the bucket; -
Add a source row whose
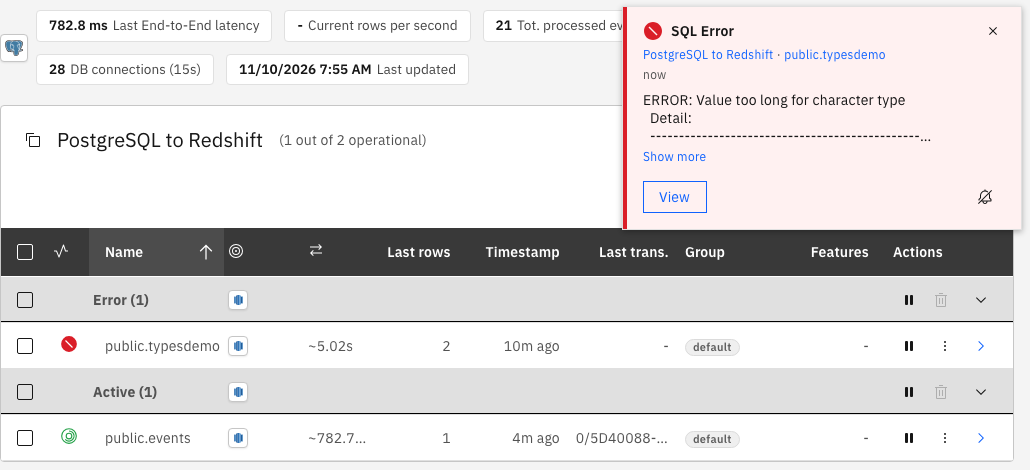
textcolumn is longer than the target column, with a standard write. Fornoteasvarchar(256), a 300-character value puts the entity in the Error group, with the notification SQL Error andERROR: Value too long for character type. The log hascontext: Value too long for type character varying(256). Fix: widen the column in Redshift. The entity retries on its own and no restart is needed. In the test, the row was in Redshift within 45 seconds of theALTER:ALTER TABLE <schema>.events ALTER COLUMN note TYPE varchar(2000); -
Load the same value with Bulk load and there is no error: the
COPYcommand runs withTRUNCATECOLUMNS, which cuts the value to the size of the column. In the test, a 300-character value arrived as 256 characters, and the row count matched. Compare the longest value on both sides after a bulk load, and widen a column before the load if the source can hold more; -
Keep a
byteaor an array column in the entity. Confirm and continue shows The entity could not be saved. andUnsupported type for columns <column> with type unsupported, <column> with type unsupported in entity <schema>.<table> for <schema>.<table>. Redshift reports avarbytecolumn asbinary varying, which the agent does not know, so the column cannot be used. Fix: clear the check box of these columns in the Field mapping dialog. Mapping them to avarcharis refused with Incompatible data types; -
To delete an entity, pause it first: Delete stays disabled while it runs. Deleting an entity drops its staging table, and leaves the target table and the files in S3.
Bulk and throughput settings
The target has these properties, under Advanced settings with Add property. The names are the labels of the Control Plane:
| Setting | Default | When to change it |
|---|---|---|
Max concurrent S3 uploads |
4 |
Raise it when many entities load at once and the upload to S3 is the slow step |
Target slice count for parallel load optimization |
4 |
A load of 200,000 rows or 100 MB or more is cut into this number of gzip files and loaded with a manifest, so that the slices of Redshift read them in parallel. Set it to |
Disable truncate on target table before snapshot inserts |
|
Stops the agent from truncating the target table before the first snapshot rows. Read the reference before you change it |
Enable automatic compression analysis on COPY |
off |
Runs the |
Enable automatic statistics update on COPY |
off |
Runs the |
Use ALTER TABLE APPEND for insert-only batches (requires identical DISTSTYLE/DISTKEY/SORTKEY between staging and target) |
off |
Replaces the final |
Enable temporary bulk lock diagnostics, Bulk lock diagnostics row limit (10), Bulk lock diagnostics slow final commit threshold (ms) (5000) |
off |
Switch them on with MOLO17 Support when commits wait on locks |
Read Tune replication throughput for the settings that apply to every target.
Troubleshooting
| Problem | Possible cause | What to do |
|---|---|---|
Failed to save with |
The bucket name is wrong |
Correct AWS S3 bucket name (used by bulk operations) and select Test and continue |
Failed to save with |
The access key or the secret is wrong, or the IAM user cannot list the bucket |
Check the key, and the |
Failed to save with |
AWS Region for S3 bucket is not the region of the bucket |
Set the region of the bucket. The default is |
|
A |
|
Rows arrive in Redshift with a cut text and there is no error |
Bulk load runs |
Widen the column before the load, and compare the longest value of each text column on both sides |
Missing required field on a |
Length is |
Type a length. For |
The entity could not be saved. with |
The entity has a |
Clear the check box of the column in Field mapping |
|
A file that Redshift cannot read, or an S3 right that is missing for the |
Read the lines |
The warning |
The commit of a load waits in the commit queue of Redshift, which is common on Serverless |
Load fewer, larger batches, or raise the threshold of the warning. Write to MOLO17 Support if every load waits |
The bucket grows |
The agent never deletes its files |
Add the lifecycle rule of step 2 |
Delete is disabled for an entity |
The entity is running or in error |
Pause it, then delete it |
Related guides
Contact MOLO17 Support if you need assistance with a Redshift target.