Securing Database and Service Communications
This guide explains how to establish secure TLS connections between Gluesync agents and your databases or services. Proper TLS configuration ensures that all data transmitted between your Gluesync agents and your data sources remains encrypted and secure.
1. Core concepts and formats
Before configuring Gluesync, it is important to understand the files and formats involved in the TLS handshake.
Trust Store vs Key Store
In many enterprise environments, databases and services use certificates issued by a private or internal Certificate Authority (CA). The Gluesync agent must explicitly trust that CA before it can establish a TLS connection. This is achieved by creating a trust store and importing the CA certificate into it.
Although trust stores and key stores may use the same file formats, they serve different purposes:
-
Trust Store: Contains trusted certificates, typically Certificate Authorities, used to verify remote services. A typical trust store entry appears as
ca-certificate → trustedCertEntry. -
Key Store: Contains private keys and certificates used to identify a client or server. If the entry type appears as
PrivateKeyEntry, the file functions as a key store rather than a trust store.
Most Gluesync TLS database connections only require a trust store containing the CA certificate that signed the database or service certificate
Supported certificate formats
Gluesync supports various certificate formats to accommodate different security requirements:
-
.pem: Privacy Enhanced Mail format (Base64 encoded DER certificate).
-
.jks: Java KeyStore format.
-
.txt: Text files containing PEM-formatted certificates.
-
.json: JSON files containing security-authentication certificates.
2. Prerequisites and required tools
Some commands in this guide require specific tools:
-
keytool, included with the Java Development Kit (JDK), used to manage Java trust stores and key stores.
If keytool is not available on your system, you must install a Java Development Kit.
Linux installation
Install OpenJDK using your package manager.
Debian / Ubuntu:
sudo apt update
sudo apt install openjdk-17-jdk
RHEL / CentOS / Rocky:
sudo dnf install java-17-openjdk-develWindows installation
keytool is included with the Java Development Kit (JDK).
-
Install a JDK distribution (for example from https://adoptium.net).
-
Ensure the JDK
bindirectory is added to the systemPATH. Example path:C:\Program Files\Eclipse Adoptium\jdk-17\bin
Adding the JDK bin directory to the Windows System PATH
To make the keytool command available in PowerShell, Command Prompt, and Git Bash, the JDK installation directory must be added to the Windows system PATH.
-
Open the Start Menu and search for: Environment Variables → Edit the system environment variables
-
In the System Properties window, click Environment Variables…
-
Under System variables, select
Pathand click Edit -
Click New and add the JDK
bindirectory. For example: C:\Program Files\Eclipse Adoptium\jdk-17\bin (use your JDK installation path) -
Click OK to save all dialogs
-
Close and reopen your terminal (PowerShell, CMD, Git Bash)
Verifying keytool in Windows terminals
PowerShell:
keytool -helpIf everything is configured correctly, you will see the list of available keytool commands.
Using keytool in Git Bash on Windows
If Git for Windows is installed, you can run keytool directly from Git Bash.
Git Bash inherits the Windows system PATH, so once the JDK bin directory is configured correctly, the command works exactly like on Linux.
To verify:
keytool -helpIf the command prints the help text, Git Bash is correctly configured.
3. Creating a trust store
A trust store can be created by importing a CA certificate using the keytool utility. Ensure you have the CA certificate that issued the server certificate. If your organization already provides a CA certificate, use that certificate directly. You must generate a certificate with the appropriate tool for your database.
Linux workflow
Create a working directory, and put your certificate in it:
mkdir tls
cd tls

keytool -importcert \
-alias ca-certificate \
-file ca-certificate.cacrt \
-keystore truststore.jks \
-storepass changeit \
-noprompt

# Verify the trust store
keytool -list -keystore truststore.jks -storepass changeit
Windows workflow
Create a working directory, and put your certificate in it:
mkdir C:\tls
cd C:\tls

keytool -importcert `
-alias ca-certificate `
-file ca-certificate.cacrt `
-keystore truststore.jks `
-storepass changeit `
-noprompt

# Verify the trust store
keytool -list -keystore truststore.jks -storepass changeit
4. Applying certificates in Gluesync
Once the trust store has been created, provide it to the Gluesync agent. Gluesync provides two methods for configuring TLS certificates:
Method 1: Using the Setup Wizard
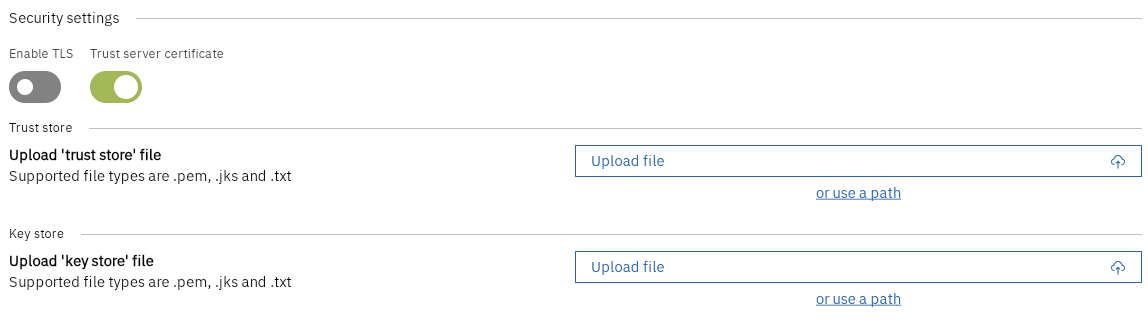
The easiest way to configure TLS certificates is through the Gluesync Setup Wizard:
-
Navigate to the Security settings section in the agent setup wizard.
-
Enable TLS by toggling the switch.
-
Choose whether to trust the server certificate.
-
Upload your certificates (Trust Store and Key Store files).
Method 2: Docker volume mount
For automated deployments or when managing certificates through infrastructure as code, you can mount certificates directly as volumes.
version: '3'
services:
  gluesync-core-hub:
    image: gluesync/core-hub:latest
    volumes:
- ./your-certs/truststore.jks:/opt/gluesync/certs/truststore.jks|
Once done, restart the container and paste |
5. Security best practices & troubleshooting
Best Practices
-
Certificate Management: Regularly rotate certificates before expiration, use strong private keys (minimum 2048 bits for RSA), and keep private keys secure.
-
Access Control: Limit certificate access to authorized personnel and use separate certificates for different environments.
-
Monitoring: Monitor certificate expiration dates and set up alerts for certificate-related issues.
Troubleshooting TLS connections
If you encounter TLS connection issues, verify certificate file permissions, check expiration dates, ensure the format matches your configuration, validate the trust chain, and review Gluesync agent logs for TLS-related errors.
Swapping the built-in CA certificate
If you’re using a custom Certificate Authority (CA) to issue certificates, you may need to swap the built-in CA certificate with the one issued by your CA.
-
Download the new CA certificate from your CA.
-
Upload the new certificate to your agent.
-
Restart the agent.
To upload the new certificate using a Docker Volume Mount, target the cacerts folder within the agent container:
version: '3'
services:
  gluesync-core-hub:
    image: gluesync/core-hub:latest
    volumes:
      - ./certs/new-ca.pem:/usr/lib/jvm/zulu21/lib/security/cacerts