OIDC (OpenID Connect) Authentication
This guide explains how Gluesync CoreHub integrates with external identity providers via OpenID Connect (OIDC) so that users can log in through your existing SSO and have their CoreHub role driven by the identity provider.
For step-by-step provider integrations, see:
OAuth 2.0 vs. OpenID Connect
These two protocols are often mentioned together — here is what each one does.
OAuth 2.0 is an authorization framework. It lets an application request permission to access resources on behalf of a user (for example, "allow this app to read your calendar"). It issues an access token that says what the application is allowed to do, but it says nothing about who the user is.
OpenID Connect (OIDC) is an authentication layer built on top of OAuth 2.0.
It adds the concept of identity: alongside the access token, the provider returns an ID token — a signed JWT that contains who the user is (name, email, subject identifier, roles, and so on).
OIDC also standardizes the discovery document (/.well-known/openid-configuration), which allows any client to locate the correct authorization, token, and userinfo endpoints automatically, without hardcoding provider-specific URLs.
|
OAuth answers "what can this application do?", while OIDC also answers "who is the user?".
For Gluesync’s login flow you need both — that is why the |
All major identity providers — Keycloak, Auth0, Okta, Microsoft Entra ID, Google Workspace — implement both OAuth 2.0 and OIDC simultaneously.
Overview
Gluesync CoreHub supports OIDC authentication, allowing users to log in using any OIDC-compliant identity provider, for example:
-
Keycloak
-
Auth0
-
Okta
-
Microsoft Azure AD / Entra ID
-
Google Workspace
Key features:
-
Provider-agnostic: CoreHub uses the standard OIDC Discovery document (
/.well-known/openid-configuration) to locate the authorization, token, userinfo, and (when advertised) end-session endpoints automatically. Only theissuerUrlis required. -
Authorization Code Flow with PKCE: All authentication flows use PKCE (RFC 7636) to protect against authorization code interception.
-
Dual authentication: OIDC and local authentication work side by side. The local
adminuser is always available as a fallback. -
Role mapping: Map identity-provider roles or groups to Gluesync roles (
SUPER ADMIN,MANAGER,VIEWER). -
Auto-provisioning: Users can be created automatically on their first OIDC login.
Configuration parameters
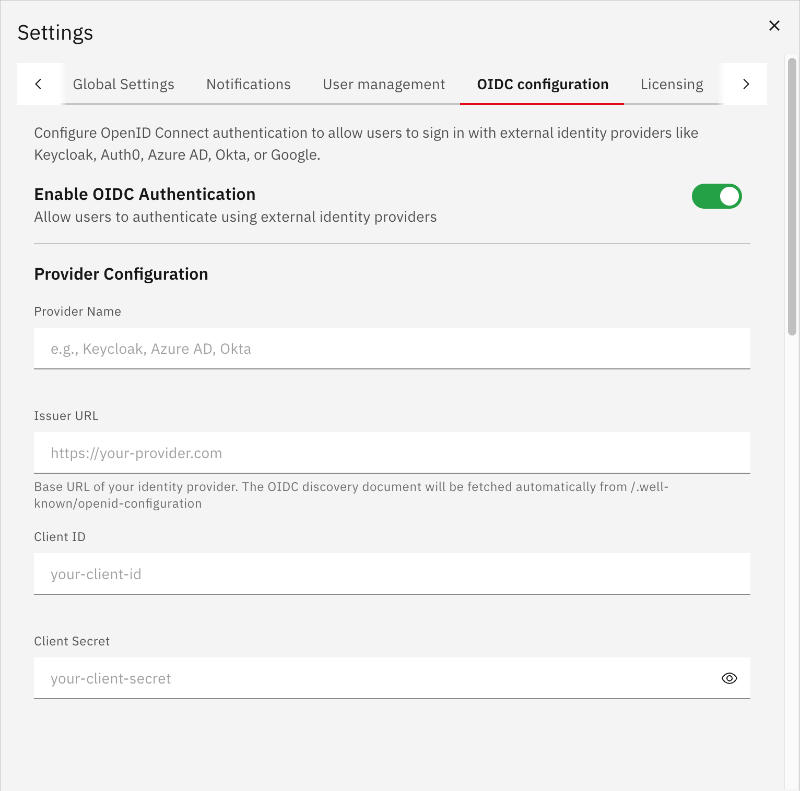
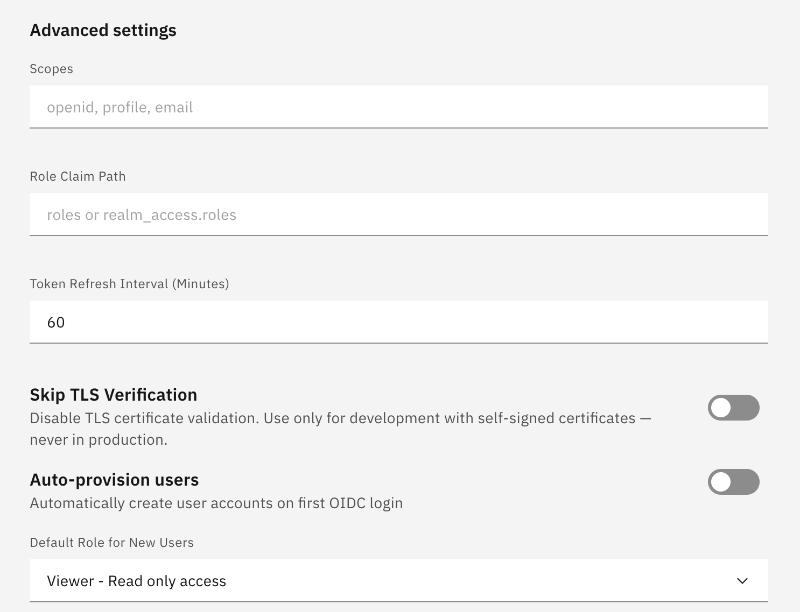
OIDC is configured from the CoreHub Settings panel (OIDC Authentication tab) or via the REST API.
| Parameter | Type | Required | Default | Description |
|---|---|---|---|---|
|
boolean |
Yes |
|
Enable or disable OIDC authentication. |
|
string |
No |
— |
Display name shown on the login button (for example |
|
string |
Yes* |
— |
Base URL of your identity provider. CoreHub fetches the discovery document from |
|
string |
Yes* |
— |
OAuth 2.0 client ID registered with the identity provider. |
|
string |
Yes* |
— |
OAuth 2.0 client secret. |
|
string |
Yes* |
Auto-generated |
Callback URL the identity provider redirects to after login. Must match the redirect URI registered in the provider. The UI auto-fills this with |
|
array |
No |
|
OAuth scopes to request. |
|
string |
No |
|
Location of the role claim inside the identity provider’s response. See How CoreHub resolves the role claim for the supported path syntax. |
|
string |
No |
|
Gluesync role assigned when no |
|
boolean |
No |
|
Automatically create a Gluesync account for a user on their first successful OIDC login. |
|
object |
No |
|
Map identity-provider role names to Gluesync roles. See Role mapping. |
|
integer |
No |
|
How often (in minutes) the Gluesync session checks the IdP for token validity. This does not affect the IdP token lifetime itself. |
|
boolean |
No |
|
When |
* Required when enabled is true.
|
There is no Signout URL (or equivalent) field in CoreHub OIDC configuration — neither in Settings → OIDC Authentication nor in the REST payload.
Logout uses the identity provider’s |
How CoreHub resolves the role claim
When a user logs in through OIDC, CoreHub needs to find their identity-provider roles inside the tokens returned by the provider. The roleClaimPath parameter tells it where to look.
Where roles are read from
CoreHub looks for the role claim in this order, returning as soon as it finds at least one role:
-
The
/userinforesponse from the identity provider. -
The ID token payload (the JWT returned alongside the access token).
-
The access token payload (as a final fallback).
|
The ID-token fallback is essential for providers like Auth0, which deliver custom-namespace claims (for example CoreHub does not re-verify the ID-token signature when reading these claims because the token has just been received over TLS from the identity provider during the authorization-code exchange. |
roleClaimPath syntax
The same path syntax applies to all three sources (userinfo, ID token, access token).
The resolution rules are:
-
Full path as a top-level key — if the configured
roleClaimPathmatches a key at the root of the payload verbatim, that value is returned. This is the rule that handles namespaced URI claims used by Auth0/Okta, such ashttps://gluesync.com/roles. -
Nested navigation — otherwise the path is split on
.and walked as nested object keys. This is the rule that handles Keycloak’srealm_access.roles. -
Escaped dots — to embed a literal
.inside a single segment, escape it with a backslash (\.).
Common values
| Provider | Recommended roleClaimPath |
|---|---|
Auth0 (with a namespace Action) |
|
Keycloak (realm roles) |
|
Keycloak (client roles) |
|
Okta (groups) |
|
Microsoft Entra ID (app roles) |
|
Generic top-level array |
|
Role mapping
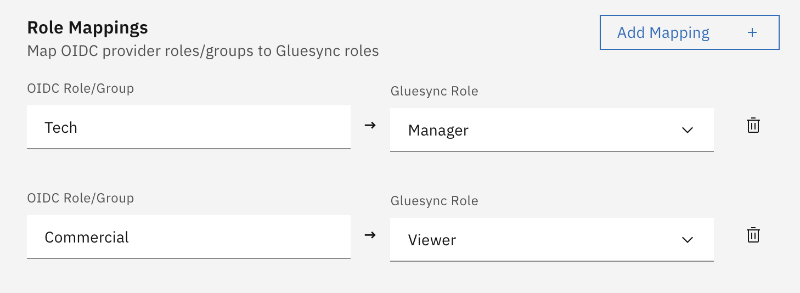
roleMappings translates identity-provider role names into Gluesync roles:
{
  "manager": "MANAGER",
  "viewer": "VIEWER",
  "platform-admin": "SUPER_ADMIN"
}
Supported Gluesync roles:
-
SUPER ADMIN— Full system access, including user management. -
MANAGER— All operations including user management forMANAGERandVIEWERusers. -
VIEWER— Read-only access.
Selection logic:
-
CoreHub extracts the user’s roles from the claim at
roleClaimPath(see How CoreHub resolves the role claim). -
It walks
roleMappingsentries and uses the first matching identity-provider role. The match is case-insensitive, soManager,MANAGER, andmanagerall match the same mapping key. -
If the mapping target is not a valid Gluesync role, the configured
defaultRoleis used. -
If no mapping matches at all,
defaultRoleis used.
|
If a user keeps landing on
See Troubleshooting for diagnostic steps. |
How OIDC discovery works
CoreHub does not hardcode any provider-specific URL paths. When a user initiates login, or when CoreHub needs to exchange a code or fetch user information, it first retrieves the discovery document:
GET \{issuerUrl}/.well-known/openid-configuration
This document (standardized in OpenID Connect Discovery 1.0) contains the actual endpoint URLs for the provider:
-
authorization_endpoint— where to redirect the user for login. -
token_endpoint— where to exchange the authorization code for tokens. -
userinfo_endpoint— where to fetch user claims. -
end_session_endpoint— where to send the user for RP-initiated logout, when the provider advertises it. CoreHub uses this endpoint automatically when it is present. There is no Signout URL field in CoreHub; customers do not configure a logout URL in Gluesync.
The discovery document is cached for one hour per issuerUrl to avoid redundant HTTP calls.
This approach means CoreHub works with any OIDC-compliant provider without code changes — supply the correct issuerUrl and the rest is discovered automatically.
Login flow
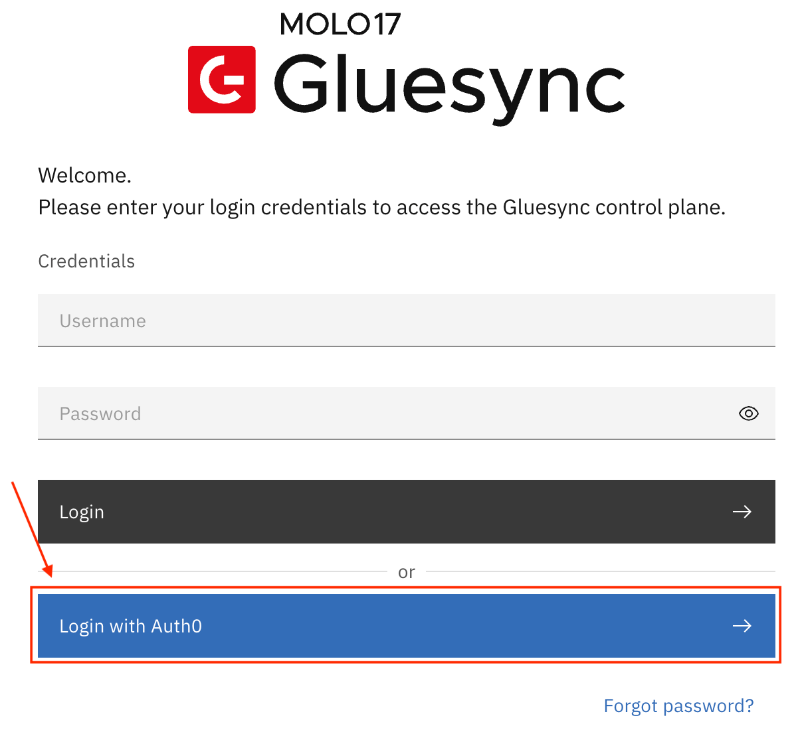
-
The user clicks the OIDC login button. CoreHub generates a
state, anonce, and a PKCEcode_verifier/code_challenge, then redirects the browser to the identity provider’sauthorization_endpoint. -
The user authenticates at the identity provider. The provider redirects back to
{redirectUri}with an authorizationcode. -
CoreHub exchanges the code for an access token, ID token, and refresh token at the provider’s
token_endpoint, providing the original PKCE verifier. -
CoreHub calls
/userinfoto fetch identity claims, then reads the role claim from userinfo, the ID token, and the access token in that order (see How CoreHub resolves the role claim). -
CoreHub applies
roleMappings(case-insensitive) and resolves the user’s Gluesync role. -
If
autoProvisionUsersistrueand the user does not already exist locally, CoreHub creates the account with the resolved role. -
CoreHub issues its own session token (a MOLO17 JWT containing the resolved role) and the user is logged in.
Logout flow
Logout is always local first. CoreHub clears the session cookie and invalidates the JWT jti, so the user is signed out of Gluesync regardless of the identity provider.
If the session was established through OIDC and the identity provider’s discovery document includes an end_session_endpoint, CoreHub also returns an idpLogoutUrl to the UI. That URL is the IdP end_session_endpoint with the following query parameters:
-
id_token_hint— the ID token issued at login. -
client_id— the OIDC client ID. -
post_logout_redirect_uri— alwayshttps://{corehub-host}/ui/v2/login.
The UI then navigates to that URL (OpenID Connect RP-Initiated Logout 1.0). After the identity provider ends its session, it redirects the browser back to the Gluesync login page.
If the identity provider does not advertise end_session_endpoint, local logout still completes and the user remains on the Gluesync login page. The identity-provider session is left as-is.
|
Gluesync does not take a custom Signout URL in the OIDC configuration. CoreHub discovers On Okta, and any other OIDC identity provider that enforces a sign-out allowlist, you must register that exact URI as a Sign-out redirect URI, post-logout redirect URI, or Allowed Logout URL (the label depends on the provider). Without that URI on the identity-provider allowlist, Okta (and similar providers) reject |
Provider configuration
For complete end-to-end instructions, follow the dedicated guides:
The sections below give short reference snippets for the most common identity providers.
Keycloak (quick reference)
{
  "enabled": true,
  "providerName": "Keycloak",
  "issuerUrl": "https://keycloak.example.com/auth/realms/your-realm",
  "clientId": "gluesync-client",
  "clientSecret": "your-client-secret",
  "redirectUri": "https://gluesync.example.com/oidc/callback",
  "scopes": ["openid", "profile", "email"],
  "roleClaimPath": "realm_access.roles",
  "defaultRole": "VIEWER",
  "autoProvisionUsers": true,
  "roleMappings": {
    "gluesync-admin": "SUPER_ADMIN",
    "gluesync-manager": "MANAGER",
    "gluesync-viewer": "VIEWER"
  }
}
See the full Keycloak guide for client creation, role assignment, and verification steps.
Auth0 (quick reference)
{
  "enabled": true,
  "providerName": "Auth0",
  "issuerUrl": "https://your-tenant.auth0.com",
  "clientId": "your-auth0-client-id",
  "clientSecret": "your-auth0-client-secret",
  "redirectUri": "https://gluesync.example.com/oidc/callback",
  "scopes": ["openid", "profile", "email"],
  "roleClaimPath": "https://gluesync.com/roles",
  "defaultRole": "VIEWER",
  "autoProvisionUsers": true,
  "roleMappings": {
    "manager": "MANAGER",
    "viewer": "VIEWER"
  }
}
Auth0 requires a Post-Login Action to inject roles into the token. See the full Auth0 guide for the Action source code and the namespace conventions.
Microsoft Azure AD / Entra ID
-
Azure portal → Azure Active Directory → App registrations → New registration.
-
Set the Redirect URI to
https://your-gluesync-domain.com/oidc/callback. -
Add
https://your-gluesync-domain.com/ui/v2/loginas an additional Redirect URI (type Web). Entra ID uses registered Web redirect URIs as the allowlist forpost_logout_redirect_uri. Add this URI whenever the identity provider enforces a post-logout allowlist. Gluesync does not have a Signout URL field. -
Certificates & secrets → create a new client secret. Copy the Application (client) ID and the Client secret.
-
Token configuration → Add optional claim → add the
rolesclaim. -
App roles → create roles (for example
gluesync.admin,gluesync.manager,gluesync.viewer) and assign users in Enterprise applications.
{
  "enabled": true,
  "providerName": "Azure AD",
  "issuerUrl": "https://login.microsoftonline.com/{tenant-id}/v2.0",
  "clientId": "your-application-id",
  "clientSecret": "your-client-secret",
  "redirectUri": "https://gluesync.example.com/oidc/callback",
  "scopes": ["openid", "profile", "email"],
  "roleClaimPath": "roles",
  "defaultRole": "VIEWER",
  "autoProvisionUsers": true,
  "roleMappings": {
    "gluesync.admin": "SUPER_ADMIN",
    "gluesync.manager": "MANAGER",
    "gluesync.viewer": "VIEWER"
  }
}
Okta
-
Applications → Create App Integration → OIDC - OpenID Connect → Web Application.
-
Sign-in redirect URI:
https://your-gluesync-domain.com/oidc/callback. -
Sign-out redirect URI:
https://your-gluesync-domain.com/ui/v2/login. This exact URI must be on the Okta allowlist so logout can return to Gluesync. Gluesync does not take a custom Signout URL; it uses the IdP discoveryend_session_endpoint. -
Copy the Client ID and Client secret.
-
Directory → Groups → create groups (for example
Gluesync-Admin,Gluesync-Manager). -
In your application, Sign On → OpenID Connect ID Token → add the
groupsclaim.
{
  "enabled": true,
  "providerName": "Okta",
  "issuerUrl": "https://your-domain.okta.com/oauth2/default",
  "clientId": "your-client-id",
  "clientSecret": "your-client-secret",
  "redirectUri": "https://gluesync.example.com/oidc/callback",
  "scopes": ["openid", "profile", "email", "groups"],
  "roleClaimPath": "groups",
  "defaultRole": "VIEWER",
  "autoProvisionUsers": true,
  "roleMappings": {
    "Gluesync-Admin": "SUPER_ADMIN",
    "Gluesync-Manager": "MANAGER",
    "Gluesync-Viewer": "VIEWER"
  }
}
Security considerations
PKCE (Proof Key for Code Exchange)
All OIDC flows use PKCE (RFC 7636) automatically. PKCE prevents authorization-code interception attacks and is natively supported by all major providers. No additional configuration is required.
State and nonce validation
-
State parameter: Prevents CSRF attacks. States expire after 10 minutes.
-
Nonce: Prevents replay attacks.
HTTPS in production
In production, always use HTTPS:
-
Redirect URIs must use
https://. -
The
issuerUrlshould point to an HTTPS endpoint. -
The
skipTlsVerificationoption must remainfalse(the default).
Self-protection rules
Users authenticated via OIDC are subject to the same self-protection rules as local users:
-
A user cannot delete their own account.
-
A user cannot change their own role.
See User Management & RBAC for details.
Troubleshooting
"Invalid or expired OIDC state"
-
Cause: The state parameter was not found or has expired (10-minute window).
-
Solution: Make sure cookies are enabled in the browser and retry within 10 minutes. Avoid opening the login page in multiple tabs simultaneously.
"Failed to exchange authorization code"
-
Cause (most common): TLS certificate validation failure. This happens when the identity provider uses a self-signed certificate and
skipTlsVerificationis not enabled. -
Solution: For local development with self-signed certificates, enable Skip TLS Verification in Advanced settings. For production, ensure the IdP certificate is signed by a trusted CA.
-
Other causes: Incorrect
clientId/clientSecret, or aredirectUrimismatch between Gluesync and the provider’s registered URIs.
"Failed to retrieve user information"
-
Cause: The access token is invalid or the granted scopes are insufficient.
-
Solution: Ensure
openid,profile, andemailare included inscopesand are allowed by the provider application configuration.
"OIDC is not configured or enabled"
-
Cause: OIDC has not been enabled or required fields are blank.
-
Solution: Set
enabledtotrueand fill in all required fields (issuerUrl,clientId,clientSecret,redirectUri).
"Failed to fetch OIDC discovery document"
-
Cause: CoreHub cannot reach
{issuerUrl}/.well-known/openid-configuration. This can be a network issue, a wrongissuerUrl, or a TLS error with self-signed certificates. -
Solution: Verify the
issuerUrlis reachable from the CoreHub host. If you are using self-signed certificates in a test environment, enable Skip TLS Verification.
Stuck on an identity-provider error page after Logout
-
Cause: The identity provider rejected
post_logout_redirect_uri. CoreHub has already ended the local session, but the IdP will not redirect back to Gluesync unless this exact URI is on its sign-out allowlist:https://{corehub-host}/ui/v2/login. -
Solution: In the identity-provider application, add
https://{corehub-host}/ui/v2/loginas a Sign-out redirect URI (Okta), Allowed Logout URL (Auth0), Valid post logout redirect URI (Keycloak), or a Redirect URI of type Web (Microsoft Entra ID). Origin-only values (the host without/ui/v2/login) are not sufficient. Gluesync does not take a custom Signout URL; it always uses this path from discovery.
Users receive VIEWER instead of the expected role
This is the most common operational issue. Work through the checks below in order — they mirror the actual resolution logic described in How CoreHub resolves the role claim and Role mapping.
-
Is the role claim actually present in the identity provider’s response?
Use your provider’s token inspector — for example Auth0’s Test tab on the Action, Keycloak’s Evaluate tab on a client, or
https://jwt.iofor the access/ID token — and confirm the role claim appears at the path you configured inroleClaimPath. -
Is
roleClaimPathcorrect?For namespaced URI claims (Auth0 with a Post-Login Action), set
roleClaimPathto the full URI (for examplehttps://gluesync.com/roles). For Keycloak realm roles, userealm_access.roles. The path syntax is described in How CoreHub resolves the role claim. -
For Auth0: is the Post-Login Action attached to the login flow?
Auth0 only injects the namespaced custom claim if the Action is deployed and attached to the Login flow. The Action’s Test tab being green is not enough — verify it appears in Actions → Flows → Login.
-
Do the mapping keys match the identity-provider role names?
roleMappingskeys are compared case-insensitively, but the entire string must match.viewerwill not match an identity-provider role namedviewer-only. -
Is the mapping value a valid Gluesync role?
The accepted values are
SUPER ADMIN,MANAGER,VIEWER. Any other value falls back todefaultRole. -
Is the user being looked up correctly?
Auto-provisioning uses
preferred_username,email, orsub(in that order) as the local username. If a local account already exists with a different role, the existing local role takes precedence over the OIDC mapping until the local account is removed or its role is updated by aSUPER ADMIN.