Set up OIDC SSO with Microsoft Entra ID
This guide walks you through configuring Microsoft Entra ID (formerly Azure AD) as the OIDC identity provider for Gluesync CoreHub. It covers the app registration process in the Azure portal, token configuration for proper user mapping, and the corresponding CoreHub configuration.
For the underlying OIDC concepts, see OIDC (OpenID Connect) Authentication.
Before you begin
You need:
-
An active Microsoft Entra ID tenant.
-
Administrative access to your Entra ID to create app registrations and enterprise applications.
-
Administrative access to your Gluesync CoreHub.
-
The HTTPS URL of your Gluesync instance (referred to below as
https://gluesync.example.com).
High-level flow
-
Register a Web application in Entra ID.
-
Configure optional claims to ensure Gluesync can read the user’s email or username.
-
Create App roles in Entra ID (or use Groups).
-
Assign these roles to your users via Enterprise Applications.
-
Configure OIDC in Gluesync CoreHub, mapping the Entra ID roles to Gluesync’s
MANAGERandVIEWERroles.
Step 1 — Register the application in Entra ID
-
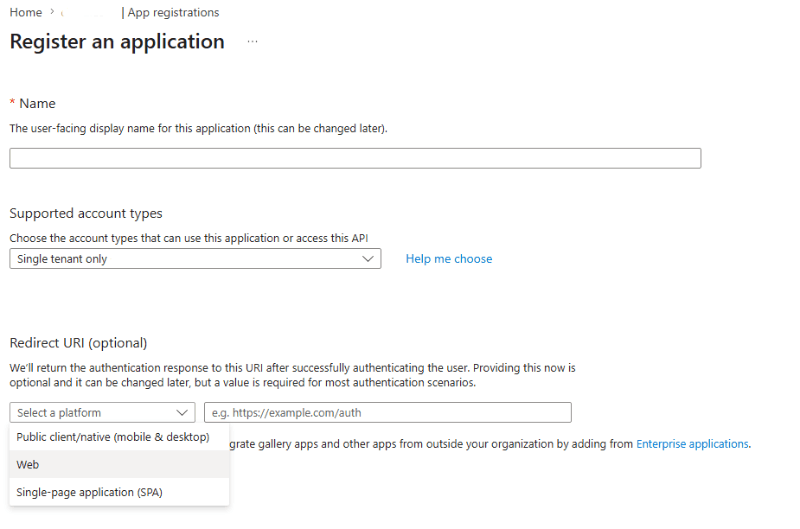
Log in to the Azure Portal and go to Microsoft Entra ID → App registrations.
-
Click New registration.
-
Enter a name (for example,
Gluesync CoreHub). -
Under Supported account types, choose the appropriate option for your organization (typically "Accounts in this organizational directory only").
-
Under Redirect URI:
-
Select the platform: Web (this is mandatory for the Authorization Code Flow with PKCE).
-
Enter your callback URL:
https://gluesync.example.com/oidc/callback.
-
-
Click Register.
-
On the app Overview page, note down the Application (client) ID and the Directory (tenant) ID. You will need these later.
-
Go to Authentication. Under Redirect URIs, add a second URI of type Web:
https://gluesync.example.com/ui/v2/login. Entra ID uses registered Web redirect URIs as the allowlist forpost_logout_redirect_uri. CoreHub always sends this URI after logout. You do not need to set Front-channel logout URL for this flow, and Gluesync does not have a Signout URL field. -
Go to Certificates & secrets → New client secret. Add a description, choose an expiration, and click Add. Copy the Value of the secret immediately.
Step 2 — Configure token claims (Important for Usernames)
By default, Entra ID might only send a unique alphanumeric string (the sub claim) to identify the user. To ensure Gluesync displays a readable username or email, you must expose optional claims.
-
In your App registration, go to Token configuration.
-
Click Add optional claim.
-
Select ID token.
-
Check the boxes for
emailandupn(User Principal Name). -
Click Add. (If prompted to turn on Microsoft Graph email permissions, accept it).
Step 3 — Define roles in Entra ID
Entra ID separates App Roles from Directory Groups. The recommended approach for Gluesync is to use App roles.
-
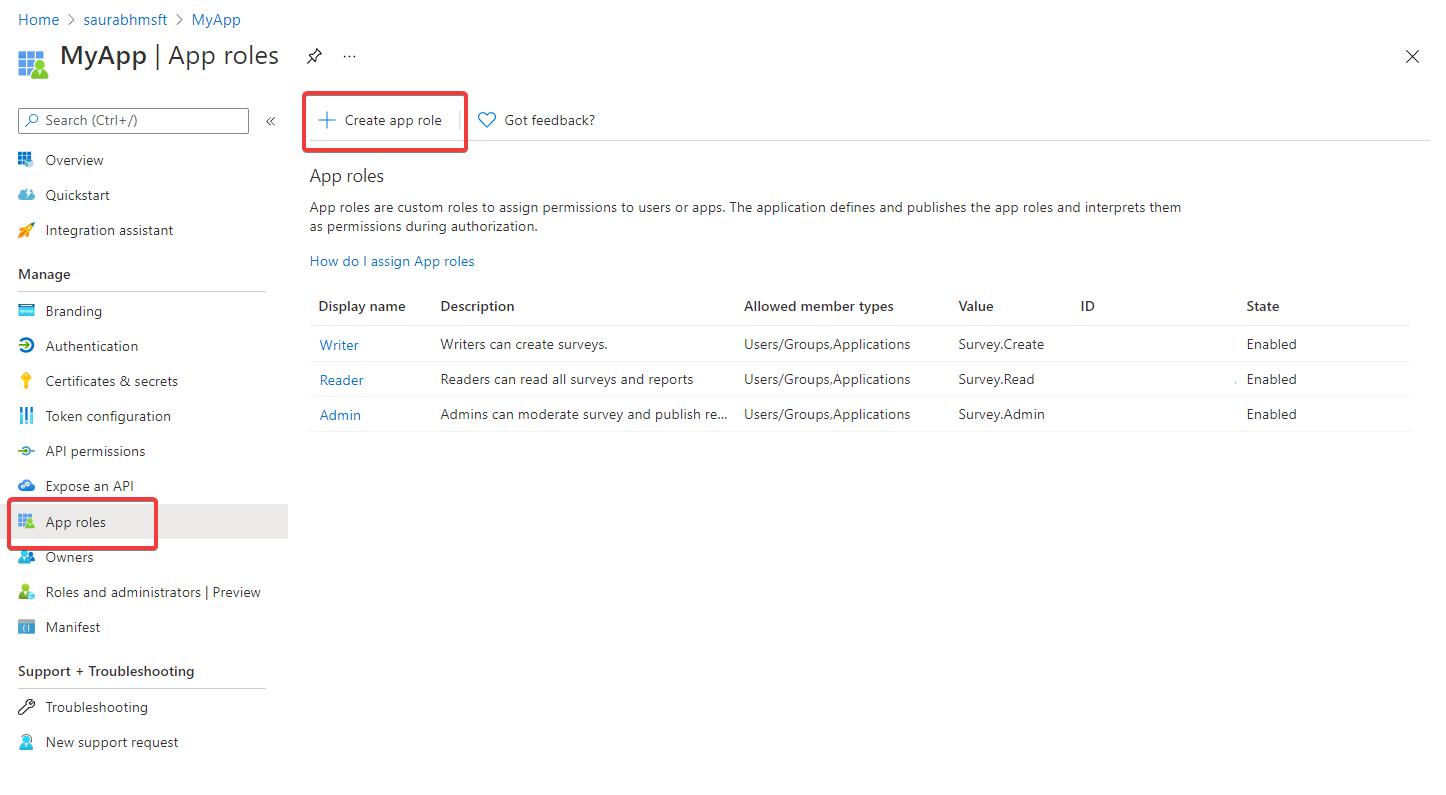
In your App registration, go to App roles.
-
Click Create app role.
-
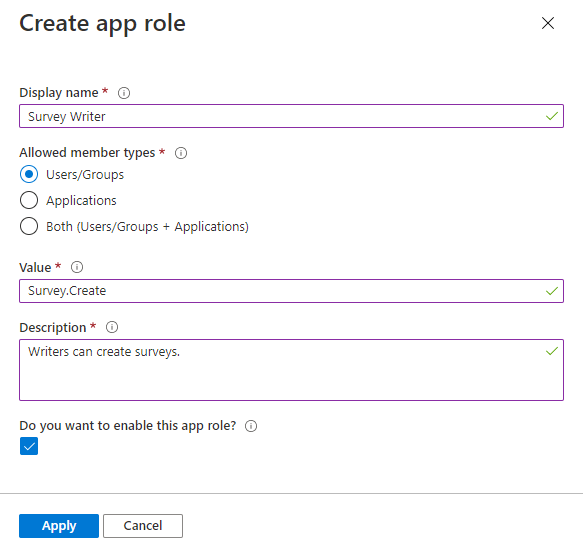
Create a role for your managers:
-
Display name:
Gluesync Manager -
Allowed member types:
Users/Groups -
Value:
gluesync.manager(this is the exact string Gluesync will read). -
Description:
Manager role for Gluesync. -
Check Do you want to enable this app role? and click Apply.
-
-
Repeat the process to create a viewer role (e.g., Value:
gluesync.viewer).
|
Using Groups instead of App Roles:
If your organization prefers using Directory Groups ("Add groups claim"), you can do so. In Token configuration, select Add groups claim → Directory roles or Security groups. If you choose this path, you must change the |
Step 4 — Assign roles to users
-
Go back to the main Entra ID menu and navigate to Enterprise applications.
-
Search for and select your
Gluesync CoreHubapplication. -
Go to Users and groups → Add user/group.
-
Select the users you want to grant access to.
-
Click Select a role and choose either the
Gluesync ManagerorGluesync Viewerrole. -
Click Assign.
Step 5 — Configure OIDC in Gluesync CoreHub
|
SUPER ADMIN Role Limitation
By design, Gluesync allows only one |
-
Log in to CoreHub as the local
adminuser. -
Go to Settings → OIDC Authentication.
-
Fill in the configuration:
| Field | Value |
|---|---|
Enable OIDC |
toggle on |
Provider Name |
|
Issuer URL |
|
Client ID |
from Step 1 |
Client Secret |
from Step 1 |
Redirect URI |
|
Scopes |
|
Role Claim Path |
|
Default Role |
|
Auto-provision Users |
on |
Role Mappings |
|
Troubleshooting
The username appears as a strange string of characters
The strange string is the Entra ID internal sub identifier.
Fix: Ensure you completed Step 2 (adding email and upn to the Token configuration) and that your Gluesync OIDC Scopes include openid, profile, and email.
Stuck on a Microsoft error page after Logout
-
Cause: The app registration does not include the exact URI CoreHub sends as
post_logout_redirect_uri. -
Solution: In the app registration, go to Authentication and add
https://gluesync.example.com/ui/v2/loginas a Redirect URI of type Web. Gluesync does not take a custom Signout URL; it uses the Entra ID discoveryend_session_endpointand always redirects to/ui/v2/login.
Users receive VIEWER instead of the MANAGER role
This usually happens due to a mismatch in the role configuration:
-
If you used App roles, verify that the Role Claim Path in Gluesync is exactly
roles, and the mapping keys perfectly match the Value you defined in Entra ID (e.g.,gluesync.manager). -
If you used Add groups claim, ensure the Role Claim Path in Gluesync is set to
groups, and that your JSON mapping uses the exact Group names or Object IDs injected by Microsoft into the token. -
Check if the user was actually assigned the role in the Enterprise applications menu (Step 4).